Search This Blog

Tuesday, June 19, 2012

Cài đặt cấu hình tài liệu ( Configuration Settings Documents)

Trong phần này bạn sẽ thiết lập Directory Profile và tạo một tài liệu Configuration Settings, nó được sử dụng để cấu hình các tham số vận hành - bao gồm cả các tham số trong NOTES.INI - cho một hoặc nhiều server


Configutaion Settings

Có rất nhiều tài liệu quan trọng mà bạn phải cấu hình mà Domino có thể vận hành được. Để cấu hình được, bạn truy cập vào tab chức năng Configuration, trong công cụ quản trị Domino.

  • Directory Profile document: Domino Directory là nơi lưu trữ tất cả các cấu hình về server. Directory Profile chứa một chút cài đặt hoạt động của Domino Directory trong chính nó. Chỉ có duy nhất một Directory Profile Document.
  • Server document: Mỗi server trong Domino Domain làm chủ một Server Document. Đây là tài liệu cấu hình chính cho một server. Trong phần sau tôi sẽ nói kỹ hơn về Server Document.
  • Configuration Settings document: Nơi một Server document áp dụng cho chỉ một máy chủ. Configuration Settings documents có khả năng áp dụng tới cá nhân, nhóm hoặc tất cả các server trong Domino Domain. Nó giảm bớt công việc quản trị bằng cách cho phép bạn tạo ra các cấu hình cho nhiều server.

Directory Profile Document

Domino Directory (names.nsf)
Bạn có thể thay đổi Directory Profile bằng các chọn Current Server Document, chọn tab chức năng Functions

Sau đó chọn Actions - Edit Directory Profile

Có một cấu hình cần chú ý, bạn phải chắc chắn rằng, Domino Domain trong field đầu tiên phải đúng. Bạn sẽ quoay lại để thiết lập các trường khác sau.
Bởi vì Directory Profile sẽ đồng bộ hóa với Domino Directory, các cài đặt này sẽ áp dụng đối với tất cả server trong cùng Domain, vì thế bạn chỉ cần làm một lần.
Cảnh báo: bạn không được chọn Action - Remove Directory Profile. Bạn sẽ phải cấu hình lại từ đầu. Đặc biệt là nếu bạn thiết lập tên Directory Catalog, người dùng sẽ ko thể tìm kiếm tên từ database nếu tên đó bị loại bỏ.

Configuration Settings document

Configuration Settings documents được phát triển xa hơn, dựa trên các tham số thiết lập trong file notes.ini. Chúng là những cơ chế chính để cấu hình, ví dụ:

  • Cho phép phiên bản nào của Notes Client có thể kết nối
  • Tự động nâng cấp Notes Client và theo dõi license
  • Gửi và phân phát SMTP message
  • chuyển đổi từ Notes sang tài liệu có cấu trúc MIME
  • Lotus iNotes
  • Activity Logging và Activity Trends
  • Tập hợp các báo cáo chuẩn đoán

Server đọc tài liệu Configuration Setting lúc khởi động và cứ mỗi 5 phút lại đọc lại một lần. Khi Configuration Setting được đồng bộ hóa tới các server khác, cần 15 đến 20 phút để có thể effect.


Để tạo hoặc chỉnh sửa tài liệu Configuration Settings, mở tab chức năng Configuration, mở rộng Server section, chọn Configurations để mở cửa sổ Configurations

Chú ý: Quá trình cài đặt first domino server sẽ tạo ra Configuration Settings, nhưng quá trình đăng ký và cài đặt các server tiếp theo, yêu cầu bạn phải tạo bằng tay tài liệu Configuration Settings.
Nhấp chuột vào Add Configuration để tạo mới Configuration hoặc chọn Configuration đã tồn tại, và click chuột vào Edit configurtaion để sửa.


NOTES.INI


Server và các tài liệu Configuration Setting nắm giữ hầu hết các cấu hình server, nhưng có một số cài đặt chỉ có thể được tạo ra bằng cách thêm hoặc thay đổi tham số trong file notes.ini
Cảnh báo: trước khi thay đổi các tham số trong file notes.ini bạn nên backup ra một bản để khi lỗi bạn có thể phục hồi lại được.
Có nhiều cách để edit file notes.ini:

  • Dùng công cụ text editor
  • Sử dụng công cụ Domino Web Administrator
  • Sử dụng server console bằng câu lệnh set configuration
  • Thêm hoặc thay đổi một số biến bằng cách sử dụng tài liệu Configutaion Settings

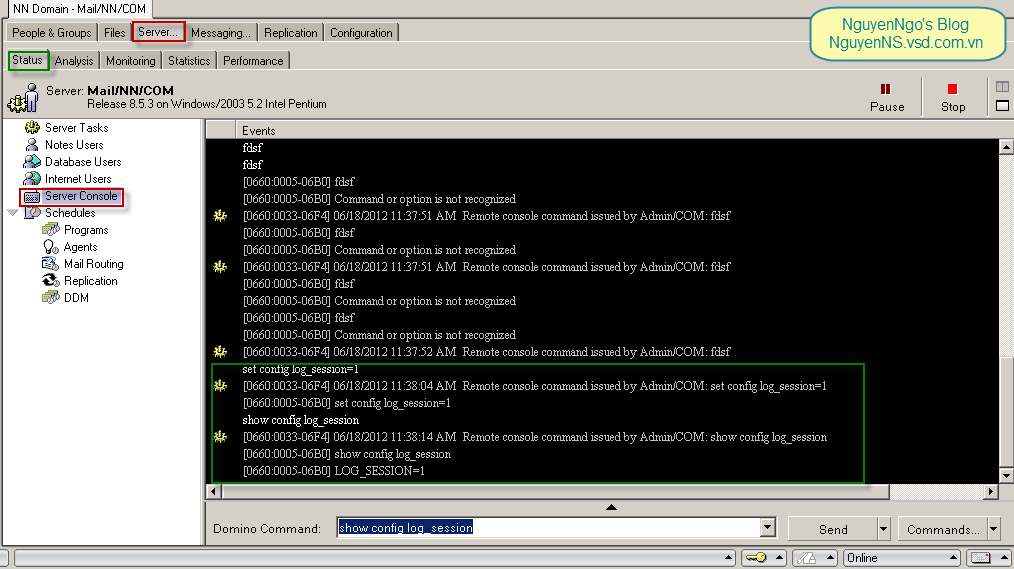
Console command để chỉnh sửa file notes.ini

  • Lệnh thiết lập tham số: set config <variable>=value
  • Lệnh xem tham số: show config <variable>


Bài tiếp theo: Tổng quan về bảo mật trong Domino ( Domino Security Overview)

Friday, June 15, 2012

Đồng bộ hóa dữ liệu trên 2 Database Server dùng SQL Server 2008


Khi bạn sở hữu một website với cơ sỡ dữ liệu đồ sộ và có lượng truy cập cao thì vấn đề an toàn dữ liệu và tính sẵn sàng cao của dữ liệu là hết sức cần thiết. Thông thường các website này sẽ chạy trên nhiều Database đặt ở các server khác nhau nhằm đáp ứng tính an toàn cho dữ liệu, đồng thời giảm tải lên 1 database server khi website có khi lượng truy cập quá lớn.
Trong bài viết này, mình sẽ trình bày cách triển khai cơ sỡ dữ liệu trên 2 Database server với khả năng đồng bộ dữ liệu với nhau, đảm bảo tính nhất quán của dữ liệu website.
Chuẩn bị:
  • 2 server để chứa database.
  • Trên 2 server có cài sẵn SQL Server 2008. Mình khuyến khích dùng SQL Server 2008 Enterprise chạy trên Windows Server 2008.
  • Cài thêm công cụ SQL Server Management để thao tác.
Tiến hành:
Khi đã cài SQL Server xong, bạn đảm bảo các dịch vụ như hình bên dưới đã start thành công!
  • SQL Server
  • SQL Server Agent
  • SQL Server Browser

Trong Protocols for MSSQLSQLSERVER đảm bảo đã Enable giao thức TCP/IP

Tiến hành dùng công cụ SQL Management để đăng nhập vào server 1 và server 2. Trong bài lab này mình sẽ sử dụng 2 server với tên là kenhgiaiphap01 và kenhgiaiphap02.

Sau khi đăng nhập xong, ở Server kenhgiaiphap01 tạo database là test1 và ở serverkenhgiaiphap02 tạo database là test2. Đây sẽ là cơ sỡ dữ liệu của website, 2 database này sẽ có dữ liệu hoàn toàn giống sau khi đã đồng bộ hóa.
Yêu cầu database test1 của bạn cần được import dữ liệuh trước (database test2 ko cần).

Sau đó, ở server kenhgiaiphap01 bạn bung Replication, bấm phải chuột vào Publication và chọn New Publication.

Cửa sổ Welcome hiện ra, ta chọn Next

Chọn database mà ta muốn đồng bộ hóa với server 2. Ở đây ta chọn test1
Chọn chế độ Merge Puplication
Chú ý: Nếu bạn chọn chế độ Transactional puplication thì dữ liệu sẽ được đồng bộ theo 1 chiều, tức là server 1 cập nhật dữ liệu thì server 2 cũng sẽ có dữ liệu . Tuy nhiên ngược lại thì không được. Còn chế độ Merge Puplication sẽ đồng bộ dữ liệu theo cả 2 chiều.

Do nhiều server có thể chạy các bản SQL Server khác nhau, nên ở đây bạn sẽ được yêu cầu chọn phiên bản. Mình sẽ chọn SQL Server 2008.

Chọn những thành phần trong Database mà bạn muốn nó được đồng bộ hóa.
Chú ý: Table của Database mà bạn muốn đồng bộ hóa cần có khóa chính.

Tiếp tục họn Next

Tiếp tục họn Next

Cho phép tạo Snapshot ngay lập tức và sau đó chọn Next

Chọn Security Setting

Nhập lại tài khoản đăng nhập SQL Server của Server 1. Ở đây, mình khuyến  khích bạn dùng chế độ đăng nhập Windows Account

Ok -> Next

Nhập tên hiển thị. Ở đây mình nhập là Test Replication

Sau đó nhấn Next, nếu không có gì sai thì kết quả sẽ như hình dưới đây.

Khi đã tạo một Publication thành công, ta tiếp tục click phải chuột lên nó và chọn New Subscriptions

Ở màng Welcome chọn Next

Chọn Cơ sở dữ liệu mà Server 2 cần lấy để đồng bộ hóa.

Nhấn Next

Ở đây, ta nhấn vào ADD SQL Server Subcriber và add vào server thứ 2 (kenhgiaiphap02) và chọn cơ sỡ dữ liệu test 2 trên server này.

Nhấn Next và nhập thông tin đăng nhập của Database server 2 (kenghaiphap02)

Nhấn next. Trong Agent Schedule ta chọn Run Continously

Nhấn next.

Nhấn Next

Kiểm tra lại thông tin và nhấn Finish

Nếu setup thành công, thì kế quả sẽ như hình dưới đây.

Chờ một chút để cơ sở dữ liệu từ test1 đồng bộ sang test2

Kiểm tra kết quả:
Trên Database Test1 tiến hành nhập một Record mới.

Mở Database test2 lên và thấy dữ liệu đã được cập nhật y như bên database test1. Và ngược lại nếu có sử thay đổi trên database test2 thì database test1 cũng sẽ được cập nhật.

Chúc bạn thành công! Smile

Friday, June 8, 2012

Công cụ quản trị Domino 8.5.3

Domino Administration Tool
Domino Administration, Domino Admin

I. Kết nối Lotus Notes/ Domino Admins tới Domino Server
Sau khi cài đặt xong Notes / Domino Amin bạn sẽ có 2 shortcut như hình dưới
Khởi chạy Domino Administrator, cửa sổ Configuration hiện ra, nhấp chuột vào Next

Cửa sổ tiếp theo, bạn gõ tên và địa chỉ của Domino Server, tích vào lựa chọn "I want to connect to ad Domino server, nếu bạn là người quản trị Domino,  sau đó nhấp chuột vào Next
Cửa sổ tiếp theo nhấn Next
Nhấn Next tiếp
Nhập vào mật khẩu của Admin.id nhấp chuột vào Log In
Cửa sổ tiếp theo nhấn Finish để hoàn tất

II. Giới thiệu công cụ quản trị Domino ( Domino Admin)

1. Giao diện người dùng

Danh mục
Chức năng
Menu
Danh mục các chức năng để điều khiển
Windows Tabs
Nếu bạn chỉ làm với Domino Administrator, bạn chỉ có một Windows tab
Functios Tabs
Các tác vụ quản trị được chia ra thành các tab: People & Groups, Files, Server, Messaging, Replication, Configuration
Server Messaging có các tab con
Directory Selector
Chọn ra directory để đọc từ hoặc tập tin để xem. Xuất hiện trên các tab chức năng khác nhau.
(Đoạn này hơi khó hiểu, nên dịch ra cũng khó, tôi sẽ giải thích kỹ với các bạn ở phần sau)
Context Pane
Thể hiện danh sách các đối tượng có sẵn dưới function tab, ví dụ, bạn chọn Domino Directory khi bạn làm việc trong tab People & Views.
Các điều khiển sẽ xuất hiện trong Result Pane
Results Pane
Thể hiện kết quả khi lựa chọn các đối tượng trong Context Pane
Chú ý: ấn phím F9 để nạp lại khung nhìn, hoặc có thể ấn Shift+Ctrl+F9 để reset lại toàn bộ khung nhìn nếu cần thiết
Tools Pane
Một danh sách các công cụ mà bạn có thể thực hiện các tác vụ quản trị riêng biệt. Nếu công cụ này bị mờ, có nghĩa là chức năng này ko có sẵn hoặc có sẵn cho những lựa chọn mục nào đó ở khung Results Pane.
Để sử dụng công cụ này, bạn chọn item trong khung Results Pane và lựa chọn các chức năng trong Tool Pane


2. Thứ tự để sử dụng Domino Administrator


--->1. Chọn Server mà bạn muốn quản trị
--->2. Chọn tab chức năng mà bạn muốn làm
--->3. Chọn đối tượng nếu bạn muốn thao tác trong Context Pane.
--->4. Chọn Item trong khung Result Pane
--->5. Nhấp chuột vào Tool và thực hiện các thao tác ( bạn có thể nhấp chuột phải thay vì click vào Tool)

Bài tiếp theo: Hướng dẫn cài đặt và cấu hình tài liệu (Configuration Settings Documents)

Thursday, June 7, 2012

Steps to upgrade a 32-bit Domino server to 64-bit server on Windows platform


Problem

What steps should be taken to upgrade a 32-bit Domino server to 64-bit server on Windows platform.
We can consider two scenarios in upgrading the Domino server from 32-bit to 64-bit Domino.
I. On the 64-bit Windows you are running 32-bit Domino, How to upgrade it to 64-bit Domino?
II. On the 32-bit Windows you are running 32-bit Domino, How to upgrade it to 64-bit Domino on 64-bit Windows on a different hardware?

Resolving the problem

You can follow the below steps for the above scenarios to upgrade the Domino server to 64-bit.
NOTES:
Before you upgrade the Domino server it is always recommended to back up your ID files (server.id, admin.id and cert.id), notes.ini file of the server along with the back up of your entire data directory.

Before starting your Domino upgrade process, it is a best practice to make sure all 3rd party and Lotus Companion products that require a parallel 64-bit Domino upgrade are available and upgraded at same time.


Scenario 1: How to upgrade 32-bit Domino to 64-bit Domino running on 64-bit Windows


1. Write down your current Domino Program Directory and current Domino Data Directory. You will need this information when you run the 64-bit Installer.
2. Shut down the Domino server.
3. Run the installer for the Domino 64-bit, Once you run it will first uninstall the existing 32-bit Domino and it shows the below window for sometime to complete the uninstall process of 32-bit Domino.


Note: It will only uninstall the program directory files and it will keep the data directory files and also the notes.ini file in the program directory as it is.

Click next to continue.
4. It will now prompt with next screen with default path for the program directory as C:\Program Files\IBM\Lotus\Domino as shown below


Here you need to change the path to your earlier 32-bit server path for the PROGRAM and DATA directory path.
5. Click next to continue and follow on screen display to finish the installation of Domino 64-bit.
6. Final window it shows as below and choose "Finish" to complete the installation process.


7. Before restarting the Domino server, run the offline maintenance on the following system databases from command prompt.

Fixup:
x:\Lotus\Domino\nfixup names.nsf -F
x:\Lotus\Domino\nfixup admin4.nsf -F

If you are using "transaction logging", make sure you use the switch -J, as below:
x:\Lotus\ Domino\nfixup names.nsf -J
x:\Lotus\Domino\nfixup admin4.nsf -J

Compact:
x:\Lotus\Domino\ncompact names.nsf -c
x:\Lotus\Domino\ncompact admin4.nsf -c

Updall:
Updall should be run on all databases. When the code changes from 32-bit to 64-bit, all existing views and Full Text indexes will get rebuilt when you first access a database after you bring up the Domino server for the first time after the upgrade. This can take a very long time, so it's advisable to have updall do this work for you while the server is already scheduled to be down for the upgrade. By running updall while the server is still down, it will rebuild those views so when they are accessed that first time, the rebuild is not happening at that point in time, it's already done.

You can use indirect files (.IND) to run multiple updall processes concurrently to complete in a more timely manner. See the following wiki article for more information: Using indirect files to run maintenance tasks

8. Start the Domino 64-bit server by double clicking icon on the desktop. To start the server you can select as a service or as an application.
9. If the 32-bit Domino is upgraded from previous version 8.0.x to 8.5.x and if the server is an Administration server then at the server starts up it will prompt you with the message.

    "Do you want to upgrade the design of your address book?  This replaces the standard forms and views with the ones from the template.(Yes/No)."

10. Type Yes or Y and enter it will upgrade the design of the names.nsf with the latest 85x template.

This completes the upgrade of your Domino server to 64-bit.

Scenario 2: How to upgrade 32-bit Domino running on 32-bit Windows to new hardware running 64-bit Domino on 64-bit Windows


1. On the new hardware which is running 64-bit Windows create Program directory path and data directory path same as your earlier 32-bit Domino.

    For example: If the programs and data directory were in the path C:\Lotus\Domino and D:\Lotus\Domino\Data On the new hardware create the same folder structure as above.

2. Copy notes.ini file from 32-bit Domino program directory to new hardware Domino program directory which you created in the above step. 3. Copy the entire Data directory from 32-bit Domino to the new hardware Data directory which you created in the above step 1.
4. Once copied notes.ini and Data directory to new hardware, Run the Lotus Domino 8.5.x 64-bit installer on the new hardware and follow the on screen display and select the above created Domino and Datadirectory path to install the Domino server.
5. Click next to continue and follow on screen display to finish the installation of Domino 64-bit.


6. Before restarting the Domino server, run the offline maintenance on the following system databases from command prompt.

Fixup:
x:\Lotus\Domino\nfixup names.nsf -F
x:\Lotus\Domino\nfixup admin4.nsf -F

If you are using "transaction logging", make sure you use the switch -J, as below:
x:\Lotus\ Domino\nfixup names.nsf -J
x:\Lotus\Domino\nfixup admin4.nsf -J

Compact:
x:\Lotus\Domino\ncompact names.nsf -c
x:\Lotus\Domino\ncompact admin4.nsf -c


Updall:
Updall should be run on all databases. When the code changes from 32-bit to 64-bit, all existing views and Full Text indexes will get rebuilt when you first access a database after you bring up the Domino server for the first time after the upgrade. This can take a very long time, so it's advisable to have updall do this work for you while the server is already scheduled to be down for the upgrade. By running updall while the server is still down, it will rebuild those views so when they are accessed that first time, the rebuild is not happening at that point in time, it's already done.

You can use indirect files (.IND) to run multiple updall processes concurrently to complete in a more timely manner. See the following wiki article for more information: Using indirect files to run maintenance tasks

7. Start the Domino 64-bit server by double clicking icon on the desktop. To start the server you can select as a service or as an application.
8. If the 32-bit Domino is upgraded from previous version 8.0.x to 8.5.x and if the server is an Administration server then at the server starts up it will prompt you with the message.

    "Do you want to upgrade the design of your address book?  This replaces the standard forms and views with the ones from the template.(Yes/No)."

9. Type Yes or Y and enter it will upgrade the design of the names.nsf with the latest 85x template.

This completes the migration of your Domino server to 64-bit.
IBM