Search This Blog

Showing posts with label Windows Server 2008. Show all posts

Wednesday, July 23, 2014

Windows - Certificate Auto Enrollment Fails

KB ID 0000921 Dtd 01/02/14

Problem

I was trying to get Windows 7 to auto enroll with a CA on Windows 2008 R2, after a couple of reboots the certificates were simply not appearing on the test client I was working on.

Solution

1. Test to make sure the client can see the CA, and is able to communicate with it, issue the following command;
certutil -pulse
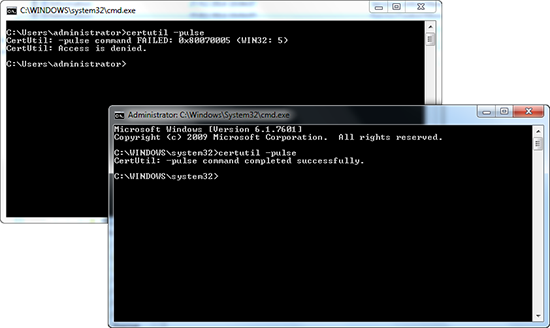
CertUtil -pulse failed
As you can see above, the first time I ran the command I got the following error;
CertUtil: -pulse command FAILED: 0x80070005 (WIN32: 5)
CertUtil: Access is denied.

I then ran the command window 'as administrator' and it completed, this was the first inkling I had, that permissions were probably not right.
2. Run mmc on an affected machine, and add in the certificates (local computer*) snap-in. right click the 'personal container' > attempt to get the certificate you have published manually.
*Or local user if you are auto enrolling user certificates.
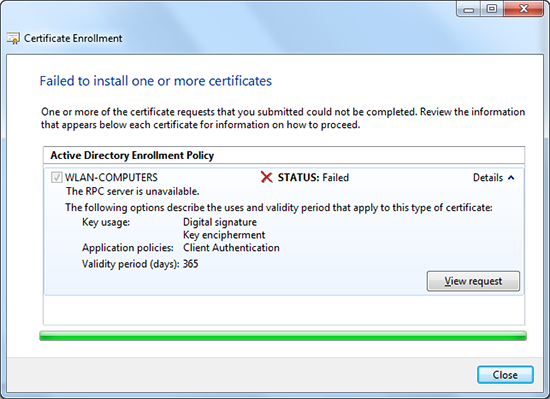
Certifcate RPC server is unavailble
At that point I got this error;
Active Directory Enrollment Policy
STATUS: Failed
The RPC server is unavailable.

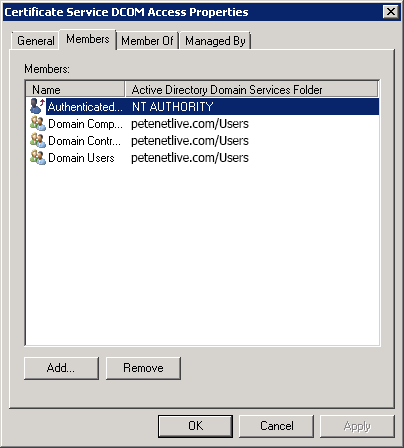
3. The most common cause for that error, is the membership of the 'Certificate Service DCOM Access' group is incorrect, check yours and make sure it matches the one below.
Certificate Servi DCOM Access Group Membership
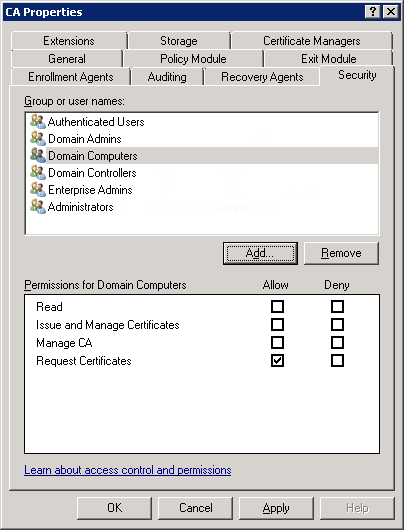
4. On the CA Server launch the Certification Authority management tool and look at the properties of the CA Server itself, on the security tab make sure yours looks like this, (Domain computer and domain controllers should have the 'request certificates' rights).
CA Server Security Settings
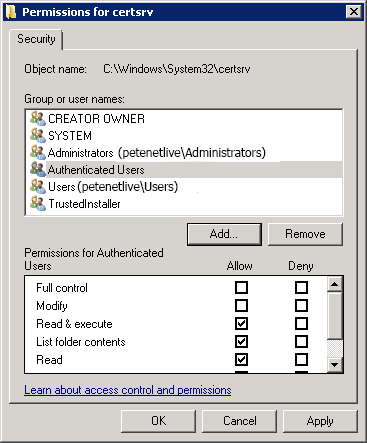
5. Still on the CA Server, check the permissions on the C:\Windows\System 32\certsrv directory, authenticated users should have Read & Execute rights.
certsrv folder pemissions
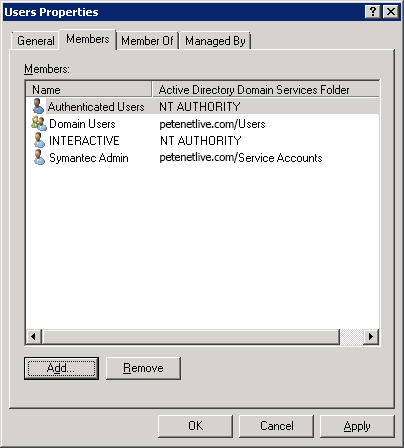
6. This is the change that finally fixed mine: In active directory users and computers, locate the Builtin container, within it there is a group called 'Users'. Make sure it contains Authenticated Users and INTERACTIVE.
Builtin users group membership
7. Run a 'gpupdate /force' on your test client, and/or reboot it.
www.petenetlive.com

Thursday, July 10, 2014

Sao lưu và phục hồi trong Windows

Đối với người quản trị hệ thống thì việc sao lưu và phục hồi dữ liệu là một công việc quyết định sự tồn tại của họ nói riêng và của cả công ty họ nói chung. Dữ liệu là tài sản vô cùng quí giá đối với bất kì tổ chức nào. 
A.     Back up có các dạng sau: Normal, Differential, Incremental, Copy và Daily.
1.      Normal:
ü      Back up toàn bộ dữ liệu mà ta cấu hình “job” cho dữ liệu đó.
ü      Xóa marker, nghĩa là sau khi backup xong windows sẽ ghi nhận là dữ liệu đã được back up.
2.      Differential:
ü      Chỉ back up những phần dữ liệu có sự thay đổi mà ta cấu hình “job” cho dữ liệu đó.
ü      Không xóa marker, nghĩa là sau khi backup xong windows sẽ ghi nhận là dữ liệu chưa được back up.
3.      Incremental:
ü      Chỉ back up những phần dữ liệu có sự thay đổi mà ta cấu hình “job” cho dữ liệu đó.
ü      Xóa marker, nghĩa là sau khi backup xong windows sẽ ghi nhận là dữ liệu đã được back up.
4.      Copy:
ü      Back up toàn bộ dữ liệu mà ta cấu hình “job” cho dữ liệu đó.
ü      Xóa marker, nghĩa là sau khi backup xong windows sẽ ghi nhận là dữ liệu chưa được back up.
5.      Daily:
ü      Chỉ back up những dữ liệu bị thay đổi trong ngày hiện tại mà ta cấu hình “job” cho dữ liệu đó.
ü      Không xóa marker, nghĩa là sau khi backup xong windows sẽ ghi nhận là dữ liệu chưa được back up.
B.     Sự kết hợp của các kiểu back up
Chúng ta có các kiểu kết hợp thông dụng sau:
ü      Normal + Incremetal.
ü      Normal + Differential.
ü      Normal + Differential + Copy.
Ví dụ: ta có dữ liêu sau cần back up.
retore

Khi đó, mỗi sự kết hợp khác nhau sẽ có cách hoạt động khác nhau, sau đây chúng ta sẽ tìm hiểu từng kiểu back up đã nêu trên.
1.      Normal + Incremetal:
Ta cấu hình chúng thực hiện back up theo bảng sau:
Thứ
Hai
Ba
Năm
Sáu
Bảy
Kiểu Back up
Normal
Incremetal
Incremetal
Incremetal
Incremetal
Incremetal
File lưu trữ
N2.bkf
I3.bkf
I4.bkf
I5.bkf
I6.bkf
I7.bkf

Diển giải:
File N2.bkf sẽ chứa tất cả các dữ liệu mà ta cấu hình “job” thực hiện back up cho dữ liệu đó.
Các file: I3.bkf, I4.bkf, I5.bkf, I6.bkf và I7.bkf chỉ chứa những dữ liệu mà có thay đổi trong các ngày tương ứng lần lược từ thứ Ba, Tư, Năm, Sáu và Bảy. 
Nếu chúng ta cần phục hồi dữ liệu của ngày thứ năm thì ta se restore lần lược các file sau đây:
N2.bkf -> I3.bkf -> I4.bkf -> I5.bkf. (Restore 4 file) 
Tóm lại, ưu khuyết điểm của kiểu này như sau:
Ưu: back up nhanh.
Khuyết: resotre chậm.

2.      Normal + Differential:
Ta cấu hình chúng thực hiện back up theo bảng sau:

Thứ
Hai
Ba
Năm
Sáu
Bảy
Kiểu Back up
Normal
Differential
Differential
Differential
Differential
Differential
File lưu trữ
N2.bkf
D3.bkf
D4.bkf
ID5.bkf
D6.bkf
D7.bkf

Diển giải:
File N2.bkf sẽ chứa tất cả các dữ liệu mà ta cấu hình “job” thực hiện back up cho dữ liệu đó.
File D3.bkf chỉ chứa những thay đổi của ngày thứ Ba.
File D4.bkf chứa những thay đổi của ngày thứ Ba và Tư.
File D5.bkf chứa những thay đổi của ngày thứ Ba, Tư và Năm.
File D6.bkf chứa những thay đổi của ngày thứ Ba, Tư, Năm và Sáu.
File D7.bkf chứa những thay đổi của ngày thứ Ba, Tư, Năm, Sáu và Bảy.
Nếu chúng ta cần phục hồi dữ liệu của ngày thứ năm thì ta se restore lần lược các file sau đây:
N2.bkf -> D5.bkf. (Restore 2 file)
Tóm lại, ưu khuyết điểm của kiểu này như sau:
Ưu: back up chậm.
Khuyết: resotre nhanh.

3.      Normal + Differential + Copy:
Ta cấu hình chúng thực hiện back up theo bảng sau:

Thứ
Hai
Ba
Năm
Sáu
Bảy
Kiểu Back up
Normal
Differential
Differential
Differential
Copy
Differential
Differential
File lưu trữ
N2.bkf
D3.bkf
D4.bkf
D5.bkf
C5.bkf
D6.bkf
D7.bkf

Diển giải:
Kiểu kết hợp này tương tự như kiểu 2, nhưng vấn đề đặt ra là, khi chúng ta đã cấu hình sẵn sàng cho hệ thống thực hiện back up tự động các ngày trong tuần bất thình lình ngày thứ năm chúng ta được yêu cầu back up lại toàn bộ dữ liệu
Như vậy chúng ta sẽ thêm 1 “job” vào ngày thứ Năm và job này chỉ có thể là Copy vì nấu chúng ta chọn Normal thì sau khi back up xong windows sẽ xóa marker đi dẫn đến tiến trình back up “Normal + Differentil” đã cấu hình sẵn sẽ chạy sai với mong muốn ban đầu.

Dương Việt Trí

Monday, June 30, 2014

Troubleshoot DNS Event ID 4013: The DNS server was unable to load AD integrated DNS zones

Some Microsoft and external content have recommended setting the registry value Repl Perform Initial Synchronizations to 0 in order to bypass initial synchronization requirements in Active Directory. The specific registry subkey and the values for that setting are as follows:
HKEY_LOCAL_MACHINE\SYSTEM\CurrentControlSet\Services\NTDS\Parameters
Value name:  Repl Perform Initial Synchronizations
Value type:  REG_DWORD
Value data: 0
This configuration change is not recommended for use in production environments or in any environment on an ongoing basis. The use of Repl Perform Initial Synchronizations should be used only in critical situations to resolve temporary and specific problems. The default setting should be restored after such problems are resolved.

Viable alternatives include:
  • Remove references to stale domain controllers.

  • Make offline or non-functioning domain controllers operational.

  • Domain controllers hosting AD-integrated DNS zones should not point to a single domain controller and especially only to themselves as preferred DNS for name resolution.

    DNS name registration and name resolution for domain controllers is a relatively lightweight operation that is highly cached by DNS clients and servers.

    Configuring domain controllers to point to a single DNS server's IP address, including the 127.0.0.1 loopback address, represents a single point of failure. This is somewhat tolerable in a forest with only one domain controller but not in forests with multiple domain controllers.

    Hub-site domain controllers should point to DNS servers in the same site as them for preferred and alternate DNS server and then finally to itself as an additional alternate DNS server.

    Branch site domain controllers should configure the preferred DNS server IP address to point to a hub-site DNS server, the alternate DNS server IP  address to point to an in-site DNS server or one in the closest available site, and finally to itself using the 127.0.0.1 loopback address or current static IP address.

    Pointing to hub-site DNS servers reduces the number of hops required to get critical domain controller SRV and HOST records fully registered. Domain controllers within the hub site tend to get the most administrative attention, typically have the largest collection of domain controllers in the same site, and because they are in the same site, replicate changes between each other every 15 seconds (Windows Server 2003 or later) or every five minutes (Windows 2000 Server), making such DNS records "well-known".

    Dynamic domain controller SRV and host A and AAAA record registrations may not make it off-box if the registering domain controller in a branch site is unable to outbound replicate.

    Member computers and servers should continue to point to site-optimal DNS servers as preferred DNS and may point to off-site DNS servers for additional fault tolerance.

    Your ultimate goal is to prevent everything from replication latency and replication failures to hardware failures, software failures, operational practices, short and long-term power outages, fire, theft, flood, earthquakes and terrorist events from causing a denial of service while balancing costs, risks and network utilization.
  • Make sure that destination domain controllers can resolve source domain controllers using DNS (i.e. avoid fallback)

    Your primary goal should be to ensure that domain controllers can successfully resolve the guided CNAME records to host records of current and potential source domain controllers thereby avoiding high latency introduced by name resolution fallback logic.

    Domain controllers should point to DNS servers that:
    • Are available at Windows startup
    • Host, forward, or delegate the _msdcs.<forest root domain> and primary DNS suffix zones for current and potential source domain controllers
    • Can resolve the current CNAME GUID records (for example, dded5a29-fc25-4fd8-aa98-7f472fc6f09b._msdcs.contoso.com) and host records of current and potential source domain controllers.
Missing, duplicate, or stale CNAME and host records all contribute to this problem. Scavenging is not enabled on Microsoft DNS servers by default, increasing the probability of stale host records. At the same time, DNS scavenging can be configured too aggressively, causing valid records to be prematurely purged from DNS zones.

  • Optimize domain controllers for name resolution fallback

    The inability to properly configure DNS so that domain controllers could resolve the domain controller CNAME GUID records to host records in DNS was so common that Windows Server 2003 SP1 and later domain controllers were modified to perform name resolution fallback from domain controller CNAME GUID to fully qualified hostname, and from fully qualified hostname to NetBIOS computer name in an attempt to ensure end-to-end replication of Active Directory partitions.

    The existence of NTDS replication Event ID 2087 and 2088 logged in the Directory Service event logs indicates that a destination domain controller could not resolve the domain controller CNAME GUID record to a host record and that name resolution fallback is occurring. See the following article in the Microsoft Knowledge Base for more information:

    824449 Troubleshooting Active Directory replication failures that occur because of DNS lookup failures, event ID 2087, or event ID 2088

    WINS, HOST files and LMHOST files can all be configured so that destination domain controllers can resolve the names of current and potential source domain controllers. Of the three solutions, the use of WINS is more scalable since WINS supports dynamic updates.

    The IP addresses and computer names for computers inevitably become stale, causing static entries in HOST and LMHOST files to become invalid over time. Experienced administrators and support professionals have spent hours trying to figure out why queries for one domain controller incorrectly resolved to another domain controller with no name query observed in a network trace, only to finally locate a stale host-to-IP mapping in a HOST or LMHOST file.
  • Change the startup value for the DNS server service to manual if booting into a known bad configuration

    If booting a domain controller in a configuration known to cause the slow OS startup discussed in this article, set the service startup value for the DNS Server service to manual, reboot, wait for the domain controller to advertise, then restart the DNS Server service.

    If the service startup value for DNS Server service is set to manual, Active Directory does not wait for the DNS Server service to start.
Additional considerations:
  • Avoid single points of failure.

    Examples of single points of failure include:
    • Configuring a DC to point to a single-DNS Server IP
    • Placing all DNS servers on guest virtual machines on the same physical host computer
    • Placing all DNS servers in the same physical site
    • Limiting network connectivity such that destination domain controllers have only a single network path to access a KDC or DNS Server
Install enough DNS servers for local, regional and enterprise-wide redundancy performance but not so many that management becomes a burden. DNS is typically a lightweight operation that is highly cached by DNS clients and DNS servers.

Each Microsoft DNS server running on modern hardware can satisfy 10,000-20,000 clients per server. Installing the DNS role on every domain controller can lead to an excessive number of DNS servers in your enterprise that can increase cost.

  • Stagger the reboots of DNS servers in your enterprise when possible.
    • The installation of some hotfixes, service packs and applications may require a reboot.
    • Some customers reboot domain controllers on a scheduled basis (every 7 days, every 30 days).
    • Schedule reboots, and the installation of software that requires a reboot, in a smart way to prevent the only DNS server or potential source replication partner that a destination domain controller points to for name resolution from being rebooted at the same time.
If Windows Update or management software is installing software requiring reboots, stagger the installs on targeted domain controllers so that half the available DNS servers that domain controllers point to for name resolution reboot at the same time.

  • Install UPS devices in strategic places to ensure DNS availability during short-term power outages.
  • Augment your UPS-backed DNS servers with on-site generators.

    To deal with extended outages, some customers have deployed on-site electrical generators to keep key servers online. Some customers have found that generators can power servers in the data center but not the on-site HVAC. The lack of air conditioning may cause local servers to shutdown when internal computer temperatures reach a certain threshold.

Monday, May 21, 2012

4 Reasons ReFS (Resilient File System) is Better Than NTFS

Overview

Resilient File System (ReFS) is a new file system introduced in Windows Server 2012. Initially, it is being targeted for implementation as a file system that is primarily used for file servers. However, starting as the file system for a file server is just the beginning. Like its predecessor, NTFS, ReFS will begin as a file server system, then become a mainstream file system. Before long, we will all be using ReFS on our boot partitions.
So why would you want to change file systems? If NTFS is working, why should anybody even consider switching to ReFS? ReFS is better and faster in many ways than NTFS, but in one way more than all others: its resiliency.
Resilient File System will likely replace NTFS completely within the next versions of Windows, and here are some reasons why you are going to really love the new file system.

4) ReFS Supports Long File Names and File Path. Really Long.

Capacity is just one of the ways that ReFS is making changes. There will no longer be a limitation of 255 characters for a long file name. A file name in ReFS can be up to 32,768 unicode characters long! The limitation on full path size has also been updated from 255 characters for the total path size to 32K (32,768).
The legacy 8.3 naming convention is no longer stored as part of the file data. There is only one file name, and it can be a very long name.
Other changes have increased the capacity as well, though it is unlikely that the maximum size of a single volume will impact a real person. NTFS already had a maximum volume size of 16 Exabytes. The ReFS format allows a maximum volume size of 262,144 Exabytes.

3) ReFS is Much Better at Handling Power Outages

NTFS stores all of its file information in metadata. The filename is stored in the metadata. The location on the hard disk is stored in the metadata. When you rename a file, you’re changing the metadata. Likewise, ReFS stores its file information in metadata.
One big difference in how NTFS and ReFS are different is in the way they update the metadata. NTFS performs like metadata updates, which means that the metadata is updated “in-place.” The metadata says your new folder is named “New Folder,” and then you rename it to “Downloaded Files.” When you make the change, the actual metadata itself is written over. When a power outage occurs at the time you’re updating a disk, the metadata can be partially or completely overwritten, causing data corruption (called a “torn write”). You may experience a BSOD when you try to restart, or you may find that your data is no longer accessible.
ReFS does not update the metadata in-place. Instead, it creates a new copy of the metadata, and only once the new copy of the metadata is intact and all the writes have taken place does the file update itself with the new metadata. There are further improvements to the way that ReFS handles writes to the metadata, but for the most part the other changes are performance improvements. This new way of updating metadata allows you to reliably and consistently recover from power outages without disk corruption.
“We perform significant testing where power is withdrawn from the system while the system is under extreme stress, and once the system is back up, all structures are examined for correctness. This testing is the ultimate measure of our success. We have achieved an unprecedented level of robustness in this test for Microsoft file systems. We believe this is industry-leading and fulfills our key design goals.”
- Surendra Verma, “Building the Next Generation File System for Windows 8”
Development Manager, Storage and File Systems
Microsoft

2) ReFS works with Storage Spaces to Better Detect and Repair Problems

Storage Spaces is a storage virtualization technology. Storage Spaces was not made to run exclusively with ReFS, but they do work great together. ReFS has improved functionality when used in conjunction with Storage Spaces. Likewise, some of the redundancy features that Storage Spaces offers are able to be leveraged because of the abilities of ReFS.
So ReFS can be used without Storage Spaces, and Storage Spaces can be used without ReFS, but when they are used together, both ReFS and Storage Spaces both work more effectively. Storage Spaces uses mirroring, spreading copies of data across multiple physical data drives. When Storage Spaces finds a problem with even one piece of corrupt data on a drive, the corrupt data will be removed from the drive, and will be replaced with a known good copy of the data from another one of the physical drives.
ReFS uses checksums on the metadata to ensure that the data has not been corrupted. When Storage Spaces finds mismatched data between two or more copies of the same file, it can rely on the built-in metadata checksums that are a feature of ReFS. Once the checksums are validated, the correct data is copied back to the other physical drives, and the corrupted data is removed.
Occasionally, an ReFS drive controlled by Storage Spaces will undergo routine maintenance called “scrubbing.” Scrubbing is a task that runs on each file in a Storage Space. Checksums are verified, and if there are any checksums that are found to be invalid, the corrupted data is replaced with known good data from a physical drive that has a valid checksum. Scrubbing is on by default, but can be customized and configured even on individual files.


1) ReFS Volumes can Stay Live even if they have Irreparable Corruption

With NTFS, even a small amount of data corruption can cause big problems. With ReFS you are much less likely to have problems. In a case where a system is not using Storage Spaces and mirroring, or if for some strange reason one part of the data across the whole mirror is corrupt, only the corrupt parts will be removed from the volume, and the volume itself will stay active, thanks to “salvage.”
Salvage can remove even a single file that is corrupt. Once the corrupt data is removed, the volume is brought back. This turns what is usually a server that is brought offline for time consuming disk checking utilities to find and repair the entries, to a volume which is repaired except for the corrupt data files and brought back online in under one second.

Conclusion

Just like NTFS, ReFS brings with it some major improvements which will become a normal part of our industry for the likely future. Specifically, ReFS brings improvements in the way that metadata is updated, and by using checksums to ensure that corrupt data is easily found and repaired.
ReFS is the most robust file system from Microsoft to date, with reliability built in to make the most of our time and reduce the total cost of ownership on Windows Servers.
Michael Simmons

Overview of the File Server Role in Windows Server 8 Failover Clustering

Introduction

The next version of Windows Server has been officially dubbed and the name comes as no surprise to IT pros who have used the last three versions: It’s Windows Server 2012. My next few articles will delve into some of its new and improved features, beginning this time with an overview of the file server role in failover clustering.
In operating systems prior to Windows Server 2012, highly available file services were provided by failover cluster Client Access Point (CAP) that clients could use to connect to SMB (Server Message Block) or Network File System (NFS) shares on physical disk resources. If you deployed a shared-nothing cluster, only one node in a cluster File Server group could be online. In the event of a failure or if the File Server group was moved to another cluster node, clients were disconnected and had to reconnect when the group became available on an online node in the cluster. 
In Windows Server 2012, the File Server Role has been expanded to include a new scenario where application data (specifically Hyper-V and SQL Server) is supported on highly available SMB shares in Windows Server 2012 Failover Clustering. This is called Scale-Out File Services and uses the following:
  • a new client access method using a new cluster resource type, called a Distributed Network Name (DNN)
  • Cluster Shared Volumes v2 (CSVv2)
  • SMB v3 improvements, which enables continuous availability and transparent failover. 
SMB v3 allows SMB connections to be distributed across all nodes in the cluster that have simultaneous access to all shares. This can make it possible to provide access with almost zero downtime.

Installing the General Use File Server Role

File servers in a cluster can be configured for general use (such as users storing files in shares) or to support application storage for Hyper-V and SQL. The General Use File Server in Windows Server 2012 is almost the same as it was in Windows Server 2008 R2. The only significant difference is that shares can be made continuously available with the help of the SMB 3.0 protocol.
The following steps show the installation options for installing the General User File Server role on a Windows Server 2012 failover cluster:
  1. Click on Configure Role in the Actions pane in Failover Cluster Manager.
  2. Click  Next on the Before You Begin page.
  3. On the Select Role page, select the File Server role. Make sure there are no errors indicating the role is not installed on all nodes in the cluster, and click Next.

Figure 1
  1. On the File Server Type page, select File Server for general use and click Next. Note that when you select this option, you have support for SMB and NFS shares, and you can also use File Server Resource Manager, Distributed File System Replication and other File Services role services.

Figure 2
  1. On the Client Access Point page, enter the information for the Client Access Point (CAP) and click Next.
  2. On the Select Storage page, enter a storage location for the data and click Next.
  3. On the Confirmation page, read the Confirmation information and click Next.
  4. On the Summary page, you can click the View Report button if you want to see details of the configuration. Click Finish.
Now that the role is installed, you can create file shares on the failover cluster.
Perform the following steps to create the file shares:
  1. Click the File Server Role in the Failover Cluster Manager and in the Actions pane, click Add File Share.
  2. The server configuration will be retrieved as a connection is made to the File and Storage Services Management interface.
  3. The Select Profile page presents you with five options. For our purposes, you can choose either SMB Share - Basic or SMB Share - Advanced and click Next

Figure 3
  1. On the Share Location page, choose a Share Location and click Next.
  2. On the Share Name page, provide a Share Name and click Next.
  3. On the Other Settings page, there are a number of additional share settings from which you can choose. Notice that Enable Continuous Availability is checked by default; this is to take advantage of the new SMB v3 functionality (Transparent Failover). Another new feature in SMB v3 enables you to encrypt the SMB connection without requiring the overhead of IPsec. You can find out more about SMB v3 here. Click Next.

Figure 4
  1. On the Permissions page, you can configure permissions to control access (both NTFS and share permissions). Click Next

Figure 5
  1. On the Confirmation page, review the information and click Create.
When the share is configured, it will appear in the Shares tab.

Figure 6
If you prefer the command line, you can also get information about the share by using the PowerShell cmdlet Get-SMBShare.
Another place you can find share information is in the File and Storage Services Management Interface in Server Manager.

Installing the Scale-Out File Server Role

The Scale-Out File Server role is new in Windows Server 2012. With the many new technologies in Windows Server 2012, you can provide continuously available file services for application data and, at the same time, respond to increased demands quickly by bringing more servers online. Scale-Out File Servers take advantage of new features included in Windows Server 2012 Failover Clustering. The key new features that are included in Windows Server 2012, which enable the Scale Out Server Role, include the following:
  • Distributed Network Name (DNN) – this is the name that client systems use to connect to cluster shared resources
  • Scale-Out File Server resource type
  • Cluster Shared Volumes Version 2 (CSVv2)
  • Scale-Out File Server Role
Note that Failover Clustering is required for Scale-Out File Servers and the clusters of Scale Out File Servers are limited to four servers. Also, the File Server role service must be enabled on all nodes in the cluster. 
SMB v3, which is installed and enabled by default in Windows Server 2012, provides several features that support continuous availability of file shares to end users and applications. It’s important to point out that Scale-Out File Servers support storing application data on file shares and that SMB v3 will provide continuous availability for those shares for the two supported applications, which are Hyper-V and SQL Server. Specific capabilities that exist as part of the new SMBv2.2 functionality include:
  • SMB2 Transparent Failover – this allows all members of the cluster to host the shared resources and makes it possible for clients to connect to other members of the cluster transparently, without any perceptible disconnection on the client side.
  • MB2 Multichannel – this enables the use of multiple network connections to connect to cluster hosted resources and enables the cluster members to be highly available by supporting out of the box NIC teaming and bandwidth aggregation.
  • SMB2 Direct (RDMA) – this makes it possible to take advantage of the full speed of the NICs without impacting the processors on the cluster members; it also makes it possible to obtain full wire speed and network access speeds comparable to direct attached storage.
For more information about the Scale-Out File Server role, check out this link.
Perform the following steps to create a Scale-Out File Server Role:
  1. Click Configure Role in the Actions pane in Failover Cluster Manager.
  2. On the Before You Begin page, click Next.
  3. On the Select Role page, click the File Server role. Make sure there are no errors indicating the role is not installed on all nodes in the cluster and click Next.

Figure 7
  1. On the File Server Type page, select File Server for scale-out application data and click Next. Note that when you select this role, there is support only for SMB v3 shares; that is, there is no support for NFS shares. In addition, with this configuration you will not be able to use some file server role services, such as FSRM and DFS replication.

Figure 8
  1. On the Client Access Point page, enter a valid NetBIOS name for the Client Access Point and click Next.
  2. On the Confirmation page, review the information and click Next.
  3. When the wizard completes, you can click the View Report button to see details of the configuration. Click Finish.
Now that the role is installed, you’re ready to create file shares for applications where you can place the application data.
Perform the following steps to create shared folders:
  1. Click the File Server Role in the Failover Cluster Manager, and in the Actions pane, click on Add File Share.
  2. The server configuration will be retrieved as a connection is made to the File and Storage Services Management interface.
  3. On the Select Profile page of the New Share Wizard, choose SMB Share - Server Application for the profile and click Next.

Figure 9
  1. On the Share Location page, you should see only Cluster Shared Volumes.  Select a volume where you want to place the share and click Next.

Figure 10
  1. On the Share Name page, enter a Share Name and click Next.
  2. On the Other settings page, note that Enable continuous availability is selected by default. Click Next.
  3. On the Permissions page, you can configure permissions to control access (both NTFS and share permissions) as needed. Click Next.
  4. Review the information on the Confirmation screen and click Create.
The Shares tab reflects all the shares that are configured on the CSV volumes.

Figure 11
The Distributed Network Name resource, which is part of the Scale-Out File Server role, has no dependencies on IP addresses; that means you don’t have to configure anything in advance for this to work. The reason for this is that the resource registers the node IP addresses for each node in the cluster in DNS. These IP addresses can be static IP addresses or they can be managed by DHCP. The IP address of each of the nodes in the cluster is recorded in DNS and is mapped to the Distributed Network Name. Clients then receive up to six addresses from the DNS server and DNS round robin is used to distribute the load.

Summary

In this article, we took a quick look at some of the new file server role capabilities included in Windows Server 2012. The traditional file server role continues with Windows Server 2012, but includes some nice new benefits, thanks to the new SMB v3 protocol, which provides for continuous availability and near zero downtime for file resources being hosted by the cluster. A new file services role, the Scale-Out File Server role, enables you to store application data for Hyper-V and SQL server, and is optimized for these applications that require continuous connectivity to these files over the network. Several improvements included in the SMB v3 protocol make it possible to host these files on a file server cluster and enable performance at wire speed and very close to the storage performance you can get with direct attached storage.

Author: Deb Shinder

Tuesday, January 31, 2012

Active Directory restores: How to restore deleted objects

Windows Server 2008 and Windows Server 2008 R2 allow you to restore deleted objects back to the Active Directory. In this article, I will demonstrate an Active Directory restore with a combination of authoritative and non-authoritative techniques.
A non-authoritative restoration is a process in which the domain controller is restored, and then the Active Directory objects are brought up to date by replicating the latest version of those objects from other domain controllers in the domain.
An authoritative restore is an operation in which the data that has been restored takes precedence over the data that exists on other domain controllers in the domain. When you perform an authoritative restore, the current versions of objects in the Active Directory are overwritten by the versions of the objects which were restored.
This process works the same way regardless of how you made the backup or where the data is being restored from. The Active Directory objects that have been restored are assigned a new version number, which ensures that the Active Directory replication process will overwrite the existing Active Directory objects with the objects that have been restored. This process is completely automated and it affects all of the domain controllers in the domain.
Performing the restoration
The restoration process is performed from the command line. To begin, you’ll need to know the name of the object that you plan to restore, as well as that object’s location within the Active Directory.
Because we are restoring an object that has been previously overwritten or deleted, we will have to perform an authoritative restore. That way the item that you have restored will not be overwritten by a newer copy during the Active Directory replication process.
However, we can’t just jump right in to an authoritative restoration, because the entire Active Directory would be rolled back to a previous state and defeat the purpose of performing a granular restoration.
To keep that from happening, we’ll perform a non-authoritative restore of the entire Active Directory. After doing so, we can make the restoration authoritative for the specific object that needs to be restored.
Performing a non-authoritative restoration
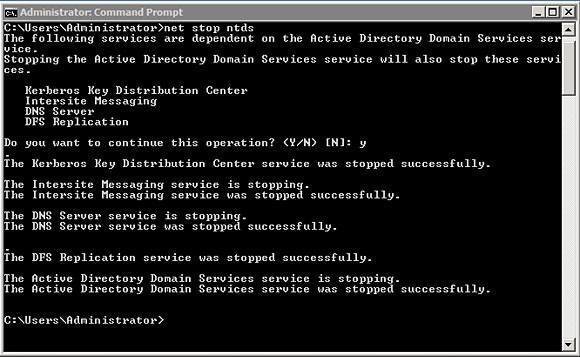
There are a variety of methods for performing the initial non-authoritative restore. The easiest way to complete this process is to stop the Active Directory Domain Services and then restore a valid system state. To stop the Active Directory Domain Services you will need to open an elevated command prompt and then enter the following command:
Net Stop NTDS
As you can see in Figure A, shutting down the Active Directory Domain Services causes several other dependency services to stop as well. The dependency services that are affected by this operation include:
Kerberos Key Distribution Center
Intersite Messaging
DNS Server
DFS Replication
Once the Active Directory Domain Services have been stopped, you can restore a System State backup. When the restoration process completes, you will likely be prompted to reboot your server. You should avoid rebooting because doing so will cause the Active Directory Domain Services to be restarted, which will cause your restoration to be overwritten.
Performing an authoritative restore
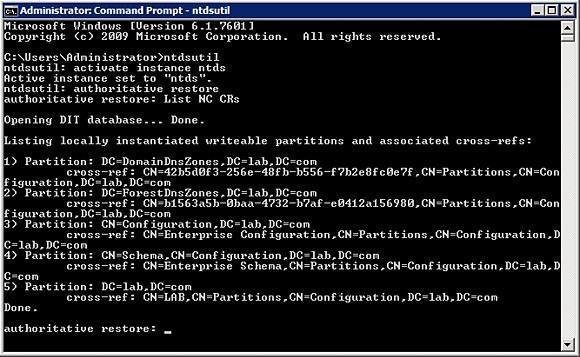
Before the server is rebooted, we need to tell Windows which Active Directory object needs to be restored authoritatively. This can be accomplished by using the NTDSUTIL utility. You can begin the process by entering the following commands:
Ntdsutil
Activate Instance NTDS
Authoritative Restore
Although not technically required, I recommend entering the LIST NC CRs command at this point. This command will list the various Active Directory partitions and their cross references. It allows you to validate that you are about to perform an authoritative restore within the correct Active Directory partition, as shown in Figure B.

Now it’s time to specify the object that needs to be restored. You can do so by using the Restore Object command. For example, suppose that you wanted to restore a user account named User1 that existed in the Users container in a domain named Contoso.com. To perform such a restoration, you would use the following command:
Restore Object “CN=User1,CN=Users,DC=Contoso,DC=com”
Wrapping it up
Now that you have marked the object that needs to be restored, the only thing that is left do is to restart the Active Directory Domain Services. This can be accomplished by entering the following command:
Net Start NTDS
When the Active Directory Domain Services start, the object that you restore will be replicated to the other domain controllers in the domain.
About the author: Brien M. Posey, MCSE, has previously received Microsoft's MVP award for Exchange Server, Windows Server and Internet Information Server (IIS). Brien has served as CIO for a nationwide chain of hospitals and has been responsible for the Department of Information Management at Fort Knox. You can visit Brien's personal website at www.brienposey.com.

Wednesday, January 11, 2012

How to Backup and Restore Active Directory on Server 2008

Have you ever accidentally deleted a user account or an OU in Active Directory and wished you could restore it?
I recently had a client call me after they installed updates and rebooted their server. They noticed after the reboot that there was a message that said “Active Directory is rebuilding indices. Please wait”.
Their Active Directory database had become corrupted from the updates. So what do you do? How can you restore AD?
Let’s talk about how to backup AD in Windows Server 2008 and how to restore it. Today I’ll show you:
  • what you need to do to get your Server 2008 ready for backup
  • how to backup Active Directory on Server 2008
  • how to perform an Authoritative Restore of Active Directory
  • how to perform Active Directory Snapshots

Prerequisites: Getting Server 2008 Ready for Backup

Before you can backup Server 2008 you need to install the backup features from the Server Manager.
1. To install the backup features click StartServer Manager.

How to Backup and Restore Active Directory on Server 2008 - 1
2. Next click FeaturesAdd Features


How to Backup and Restore Active Directory on Server 2008 - 2
3. Scroll to the bottom and select both the Windows Server Backup and the Command Line Tools


How to Backup and Restore Active Directory on Server 2008 - 3
4. Click Next, then click Install

Backing up Server 2008 Active Directory

Now that we have the backup features installed we need to backup Active Directory. You could do a complete server backup, but what if you need to do an authoritative restore of Active Directory?
As you’ll notice in Server 2008, there isn’t an option to backup the System State data through the normal backup utility.


How to Backup and Restore Active Directory on Server 2008 - 4
So what do we do? We need to go “command line” to backup Active Directory.
1. Open up your command prompt by clicking Start and type “cmd” and hit enter.
2. In your command prompt type “wbadmin start systemstatebackup -backuptarget:e:” and press enter.
Note: You can use a different backup target of your choosing
3. Type “y” and press enter to start the backup process.


How to Backup and Restore Active Directory on Server 2008 - 5
When the backup is finished running you should get a message that the backup completed successfully. If it did not complete properly you will need to troubleshoot.


How to Backup and Restore Active Directory on Server 2008 - 6
Now you have a system state backup of your 2008 Server!

Authoritative Restore of Active Directory

So now what if you accidentally delete an OU, group, or a user account and it’s already replicated to your other servers? We will need to perform an authoritative restore of the Active Directory object you accidentally deleted.
1. To do this you will need to boot into DSRM (Directory Services Restore Mode) by restarting your server and pressing F8 during the restart.
2.Choose Directory Services Restore Mode from the Advanced Boot menu.


How to Backup and Restore Active Directory on Server 2008 - 7
3. Login to your server with your DSRM password you created during Active Directory installation.
4. Once you’re logged into your server and in DSRM safe mode, open a command prompt by clicking Start, type “cmd“, and press enter.
5. To make sure you restore the correct backup it’s a good idea to use the “wbadmin get versions” command and write down the version you need to use.


How to Backup and Restore Active Directory on Server 2008 - 8
6. Now we need to perform a non-authoritative restore of Active Directory by typing “wbadmin start systemstaterecovery -version:04/14/2009-02:39“.
Note: The version of backup will vary depending on your situation. Type “y” and press enter to start the non authoritative restore.
7. Go grab some coffee and take a break while the restore completes.


How to Backup and Restore Active Directory on Server 2008 - 9
8. You can mark the sysvol as authoritative by adding the –authsysvol switch to the end of the wbadmin command.


How to Backup and Restore Active Directory on Server 2008 - 10
9. But if you want to restore a specific Active Directory object then you can use the ever familiar ntdsutil.
For this example we are going to restore a user account with a distinguished name of CN=Test User,CN=Users,DC=home,DC=local. So the commands would be:
ntdsutil
activate instance ntds
authoritative restore
restore object “cn=Test User,cn=Users,dc=home,dc=local”
Note: The quotes are required


How to Backup and Restore Active Directory on Server 2008 - 11
10. Reboot your server into normal mode and you’re finished. The object will be marked as authoritative and replicate to the rest of your domain.

Using Active Directory Snapshots

There is a really cool new feature in Windows Server 2008 called Active Directory Snapshots. Volume Shadow Copy Service now allows us to take a snapshot of Active Directory as a type of backup. They are very quick to create and serve as another line of defense for your backup strategy.
With your server booted into normal mode open a command prompt by clicking Start, type “cmd“, and press enter.
We are going to use the ntdsutil again for creating the Active Directory snapshots. The commands are:
ntdsutil
snapshot
activate instance ntds
create
quit
quit

How to Backup and Restore Active Directory on Server 2008 - 12
So now that you have a snapshot of AD, how do you access the data? First we need to mount the snapshot using ntdsutil. The commands are:
ntdsutl
snapshot
list all
mount 1
— (Note: You should mount the correct snapshot you need; for this example there is only 1.)
quit
quit

How to Backup and Restore Active Directory on Server 2008 - 13
Your snapshot is mounted, but how do you access the data? We need to use the dsamain command to accomplish this. Then we need to select an LDAP port to use. The command is as follows:

dsamain –dbpath c:\$SNAP_200905141444_VOLUMEC$\WINDOWS\NTDS\ntds.dit –ldapport 10001
The result should look like this:


How to Backup and Restore Active Directory on Server 2008 - 14
Now we need to go to Start, Administrative Tools, then Active Directory Users and Computers.
Right click Active Directory Users and Computers and select Change Domain Controller.


How to Backup and Restore Active Directory on Server 2008 - 15
In the area that says < Type a Directory Server name [:port] here > enter the name of your server and the LDAP port you used when running the dsamain command.
For my example it would be: WIN-V22UWGW0LU8.HOME.LOCAL:10001


How to Backup and Restore Active Directory on Server 2008 - 16
Now you can browse the snapshot of Active Directory without affecting anything else negatively.

Your AD Backup Strategy

It’s always good to have a solid backup plan for your Active Directory. You can use a combination of backup strategies or just one of these methods for backing up your Active Directory.
Make sure you tailor your Active Directory backup strategy to meet your company’s needs and make it easy to recover if disaster does strike.

Trainsignal.com