
Posey begins with a general overview of how Edge Transport security works. He then provides step-by-step instructions on how to install an Edge Transport server and configure communication with Active Directory and the Hub Transport server. Finally, he explains how to set up and customize Edge Transport antispam and antivirus features like content filtering, recipient filtering, IP filtering, Sender ID and attachment blocking.
Step 1: How an Edge Transport server works
Because an Edge Transport server sits at your network perimeter, It is the one server in an Exchange Server 2007 organization that is exposed to the outside world (although this server should still be protected by a firewall).In Exchange Server 2003, the NNTP and SMTP services have to be installed before you're allowed to install Exchange Server. These services are no longer required in Exchange Server 2007.
The pre-installation checks will actually fail if NNTP is installed on Exchange Server 2007, because it does not support the NNTP service. Likewise, the Exchange 2007 Setup wizard also checks to make sure that the SMTP service is not installed.
The SMTP service is forbidden because it is actually an Internet Information Services (IIS) component. Fearing that IIS might be vulnerable to attack, the Exchange Server development team completely rewrote the SMTP service using managed code. The new and improved SMTP service gets installed as a part of Exchange Server 2007.
The relationship between an Edge Transport server and Active Directory
Microsoft has also made some changes to Exchange Server's dependency on Active Directory. Exchange Server 2007 requires access to Active Directory, but the Edge Transport server role is an exception.
It would be a huge security risk to give a perimeter server read and write access to Active Directory. So an Edge Transport server uses Active Directory Application Mode (ADAM) instead.
What this means is that critical portions of Active Directory are copied to an Active Directory partition that resides on the Edge Transport server. Consequently, the server has the necessary configuration information -- but you eliminate the risk of exposing sensitive Active Directory data.
Edge Transport Server server role rules
Microsoft created the concept of server roles in Exchange 2007 as a way of making the newest Exchange version more modular. Various roles can be combined on a machine so Exchange Server can perform its required tasks without unnecessary overhead or security risks that could potentially be introduced by running unnecessary code.
Normally, a single Exchange 2007 server can host multiple server roles -- an Edge Transport server is again the exception. Because an Edge Transport server needs to be hardened (and because it doesn't have direct access to Active Directory), no other Exchange 2007 server roles can be run on the same machine.
Step 2: Install the Edge Transport server
Installing an Edge Transport server in an Exchange Server 2007 environment is pretty straightforward:- Insert your Exchange Server 2007 installation CD. The Windows Autoplay feature should execute the Setup.exe file. When the Exchange Server 2007 splash screen appears, click Step 4: Install Microsoft Exchange to launch the Setup wizard.
- Click Next to bypass the Setup wizard's Welcome screen.
- Accept the End User License Agreement and click Next.
- Setup will ask you if you would like to enable error reporting. Error reporting will automatically send information regarding server errors to Microsoft. Decide whether or not you want to enable error reporting and then click Next.
- The Edge Transport Server role is only available through a custom installation, so choose the Custom Exchange Server Installation option and click Next.
- You should now see a screen asking you which Exchange Server roles you want to deploy. Deselect all the roles, and then select the Edge Transport Role checkbox. Before moving on, pay attention to the disk space requirements displayed on this screen. The Edge Transport Role only requires 724 MB of disk space, but it's still a good idea to make sure that your server has sufficient disk space. If necessary, this screen gives you the option of changing the installation path.
- Click Next and Setup will perform a quick readiness check.
- Assuming that there are no readiness issues, click the Install button and Setup will begin copying all of the necessary files.
- When the installation process completes, click Finish
Step 3: Create an Edge Subscription
Exchange 2007 Edge Transport servers do not have direct access to Active Directory data because of the inherent security risk it would introduce. But the server still needs access to some configuration information stored in Active Directory.To solve this problem, an Edge Transport server copies the necessary information from the Active Directory database to an Active Directory Application Mode (ADAM) partition.
Setup does not automatically extract the necessary Active Directory information though. Instead, you have to create an Edge Subscription. An Edge Subscription is essentially a one-way trust with the Active Directory database (the Edge Transport Server trusts the Active Directory, but not vice versa).
Once the subscription has been established, Exchange Server will use the EdgeSync synchronization service to copy the necessary configuration information from Active Directory to the Edge Transport server.
Edge Subscription caveats
Before I show you how to create an Edge Subscription, I need to warn you that doing so will completely undo any custom configurations that you might have applied to the Edge Transport server. Specifically if the Edge Transport server contains any of the following types of items, they will be deleted:
- Accepted domains
- Message classifications
- Remote domains
- Send connectors
As an added precaution, the Edge Subscription process modifies the Exchange Management Shell so that it can no longer be used to manage the abovementioned objects. If you need to modify any of these types of objects in the future, you need to do it on a non-Edge Transport server. Your changes can then be replicated to the Edge Transport server via the EdgeSync service.
Up to this point, the Edge Transport server you created in Step 2 has no knowledge of your Exchange Server organization, and vice versa. Because of this, you can't just click a magic button and expect Active Directory information to be imported into the Edge Transport server. Instead, you have to make the Exchange Server organization aware of the Edge Transport server's existence.
The process involves exporting the Edge Transport server's configuration information to an XML file, which can then be imported into your Exchange Server organization.
How to set up an Edge Subscription
- Open the Exchange Management Shell on the Edge Transport server, and enter this command: New-EdgeSubscription –file "C:subscription.xml"
- At this point, Exchange will display a rather ominous warning message. This warning just tells you about all of the types of objects that will be overwritten or deleted during the subscription process. When the warning asks you if you want to continue, press Y and the command will go to work.
- When you execute this command, Exchange Server will create an XML file named subscription.xml, which it will place in the root directory on the Edge Transport server's C: drive. The command also creates an ADAM account. This account is used for the purpose of securing the configuration data as it's replicated from Active Directory.
Now we need to import the subscription.xml file into the Hub Transport server in order to create the Edge Subscription.
- Copy the XML file to a location where it will be accessible to the machine that you are going to be using to set up the Edge Subscription. My personal recommendation is to copy the file to a USB thumb drive and then erase it from the Edge Transport server (for security reasons).
- Once the file has been copied to an accessible location, log in to your Hub Transport server using an account that is both a local administrator and a member of the Exchange Organization Administrator's group.
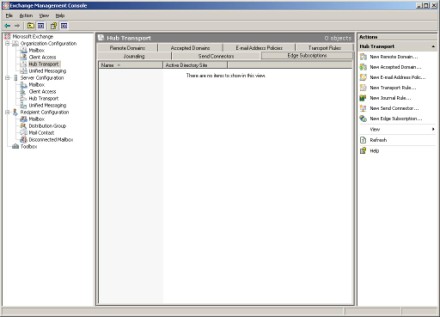
- Open the Exchange Management Console and navigate through the console tree to Organization Configuration -> Hub Transport.
- Select the Edge Subscription tab shown in Figure A and then click the New Edge Subscription link found in the Actions pane. Figure A: This is the Edge Subscriptions tab.
The New Edge Subscription dialog box asks you which Active Directory site the Edge Transport server should become a part of. If your organization consists only of a single site, then there is no grand decision involved. If you have multiple sites though, then you should make the Edge Transport server a member of the site that has the fastest (or most reliable) network connectivity to the perimeter network.
Figure B: Create the subscription to the Edge Transport server here.
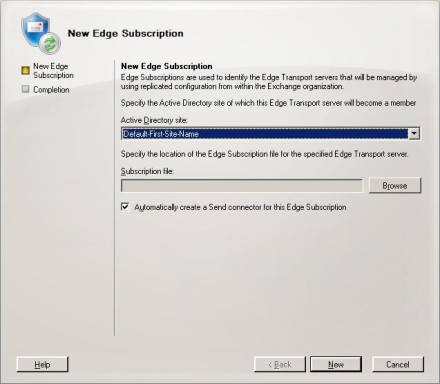
After you choose the Active Directory site in which the Edge Transport server should be included, it's time to import the XML file that you created earlier.
- Use the Browse button to browse for and select the subscription.xml file.
- Verify that the Automatically Create A Send Connector for this Edge Subscription checkbox is selected, then click the New button to import the XML file and create the Edge Subscription. (A send connector is used any time that messages are sent to the Internet through the Edge Transport server.)
Step 4: Replicate Active Directory data to the Edge Transport server
The Edge Transport server does not receive a complete copy of Active Directory for security reasons, but there is still quite a bit of information that gets replicated, including:- The safe senders list
- The Remote Domains list
- The Accepted Domains list
- Recipient data including email address, contacts, distribution lists, etc.
Instead, Exchange Server keeps the ADAM partition synchronized with Active Directory. The EdgeSync synchronization does not occur nearly as quickly as true Active Directory replication though. Exchange Server synchronizes changes to configuration-related data hourly; it synchronizes changes to recipient data once every four hours.
Of course, there may be situations in which waiting four hours for a directory synchronization to occur is simply impractical. Fortunately, there is a way to force a manual EdgeSync synchronization. Just open the Exchange Management Shell and enter this command:
Start-EdgeSynchronization
Now that you have created an Edge Subscription, you must wait for the initial synchronization to complete. The amount of time it will take varies depending on the size of your Active Directory and the size of your Exchange Server organization. If possible, recommend just letting the synchronization run overnight.
Step 5: Verify communication between the Edge Transport server and Hub Transport server
The next step is to verify that the Edge Transport server has received the necessary information from the Hub Transport server. Since a full directory comparison would be unfeasible, there are a couple of specific things you can spot check to verify that the Edge Transport server is working correctly:- First, go to the Edge Transport server and open the Exchange Management Console to verify that the send connector was created successfully. The only primary containers you should see in the console tree should be the Edge Transport container and the Toolbox container.
- To make sure that the send connector was created successfully, select the Edge Transport container. The lower half of the details pane will display a series of tabs. Select the Send Connectors tab and verify that a send connector is present and enabled.
edgesync – default-first-site-name to Internet      Enabled
edgesync – Inbound to Default-First-Site-Name       Enabled
As you can see, the send connector actually consists of two different components: an inbound connector and an outbound connector. Both of these connectors should be created automatically.
If for some reason the send connector doesn't exist, you can use the New Send Connector option found on the Actions pane to manually create one (there is also an option to enable the send connector if it is disabled for some reason).
Before you create a send connector though, make sure that the Accepted Domains list has been replicated to the Edge Transport server. If the Accepted Domains list has been synchronized, but there is no send connector, you may have simply forgotten to select the checkbox to automatically create it when you set up the Edge Subscription.
If the send connector is missing and the Accepted Domains list has not been synchronized though, there is clearly some sort of problem occurring.
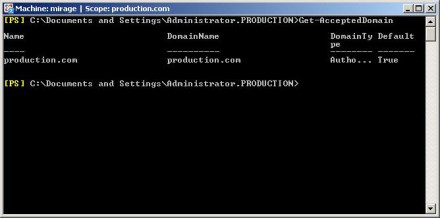
To check the Accepted Domains list, go to the Hub Transport server, open the Exchange Management Shell, and enter this command:
Get-AcceptedDomain
Exchange Server should return a list of the accepted domains, as shown in Figure C.
Figure C: Get-AcceptedDomain will retrieve a list of the accepted domains.
Now that you have a list of the accepted domains in hand, go to your Edge Transport server, open the Exchange Management Shell and issue the Get-AcceptedDomain command.
The Edge Transport server should produce a list of accepted domains. All you have to do now is to verify that the two lists match each other. If the Edge Transport server contains a partial list of accepted domains, then synchronization is most likely working, but probably has not completed yet.
If you have given synchronization time to complete, but the Accepted Domains list is empty, then there is probably some sort of communications problem between the Edge Transport server and the Hub Transport server.
Step 6: Configure Edge Transport server email filtering agents
The Edge Transport server that we've configured so far serves no real purpose other than to isolate your back-end Exchange servers from the Internet. You can make your Edge Transport server much more useful by configuring it to filter out spam, viruses and malware prior to it arriving at your Hub Transport server.First, you need to understand though that all filters on an Edge Transport server are enabled automatically by default. What this means is that if you create a filter, it immediately goes into effect.
Over time, you can gradually filter messages more aggressively as you are able to confirm that legitimate email messages are not being filtered out. Of course, you have the option to disable filters, but doing so allows messages that would normally be filtered to pass into your Exchange 2007 organization.
Edge Transport servers filter spam and malware by making use of connection filters. Any messages flowing into the Edge Transport server's receive connector is processed by the Connection Filtering Agent. It's the Connection Filtering Agent's job to filter out spam and malware prior to messages being delivered to the recipient.
When you open the Exchange Management Console on an Edge Transport server, you will notice that there are only two available containers: Edge Transport and Toolbox. When you select the Edge Transport container, the details pane will display the various options for creating a filter, as shown in Figure D.
Figure D: You can create several different types of filters.
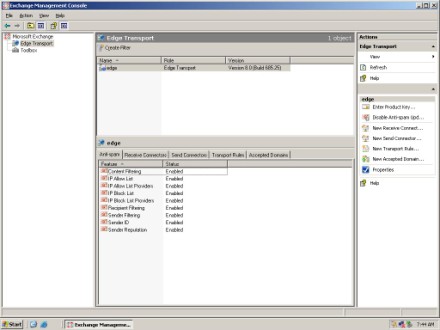
Notice that the bottom portion of the details pane contains a series of tabs. The Antispam tab is selected by default; it allows you to create several different types of spam filters.
Content filtering
One of the most useful spam filters is the Content filter. Its job is to use a mathematical algorithm to determine the probability of an email message being spam, and then filter it accordingly. The content filter uses the same Spam Confidence Level (SCL) ratings as Microsoft Outlook.
You can access the content filter by right clicking on Content Filtering and selecting Properties. The properties sheet contains three tabs that are worth paying attention to: Custom Words, Exceptions, and Action.
- The Custom Words tab allows you to enter words or phrases that can be used to flag an email message as spam. For example, you might enter phrases such as "online casino," "herbal Viagra," or "Bank of Nigeria." Keep in mind though that using the custom word filter has limited effectiveness because most spam messages are designed to avoid using trigger phrases.
- The Exceptions tab allows you to enter email addresses that the content filter should ignore. For example, if you have a sales email address and you want to make sure that no legitimate messages are ever accidentally filtered as spam, you could enter that mailbox's email address on the Exceptions tab. Exceptions are applied on a filter by filter basis. So entering an email address into the Exceptions tab will keep the content filter from blocking email messages sent to that mailbox -- but it will not prevent other filters from blocking email messages.
- By far the most important tab on the Content Filtering properties sheet is the Action tab, shown in Figure E. The Action tab allows you to set thresholds at which a message should be considered as spam. This tab allows you to delete, reject, or quarantine messages based on their SCL rating. A message's SCL rating is based on the percentage chance that the email message is spam. For example, a message with an SCL rating of 9 is 90% likely to be spam, while a message with an SCL rating of 3 has only a 30% chance of being spam.
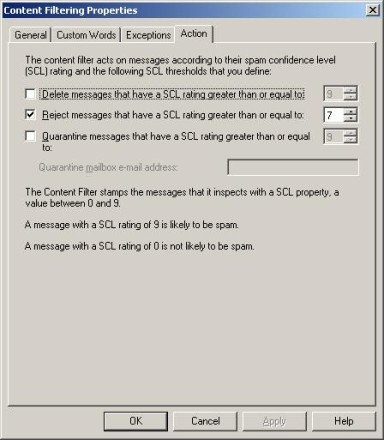
It is usually best to initially configure an Edge Transport server to provide minimal filtering and then gradually increase the aggressiveness of the filtering over time as you begin to understand the impact of the various filters.
Initially, I recommend only filtering messages with an SCL rating of 8 or higher. I tend to be a little bit conservative though. The default settings have a more aggressive SCL rating of 7 or higher.
IP filtering
Edge Transport server also filter spam by looking at the sender's IP address. There are four different filters that are designed to filter messages based on IP address: IP Allow List, IP Allow List Providers, IP Block List, and IP Block List Providers
- The IP Allow List allows you to enter the IP addresses of senders whose messages should never be treated as spam. For example, if you are worried about losing important email messages from customers, you might enter the IP address of your customer's mail server.
- The IP Allow List Providers section lets you specify any IP allows list providers that you want to use. IP allow list providers maintain lists of domains that are virtually guaranteed to never send spam. Exchange Server is able to cross-reference these lists in an effort to determine whether or not spam is known to come from the sender's domain.
- The IP Block List is designed to allow you to enter the IP addresses of mail servers from which messages should always be treated as spam. You can enter individual IP addresses or entire ranges of addresses.
- The IP block List Providers section works similarly to the IP Allow List Providers section -- except that it allows you to enter the name of any block list providers that you want to use. An example of such a provider is Spamhaus, which maintains a list of domains from which spam is known to originate. Like the content filter, the IP Block List Providers filter also allows you to create an exceptions list in case you don't want the filter to apply to certain mailboxes. The IP Block List filter does not offer the ability to use exceptions.
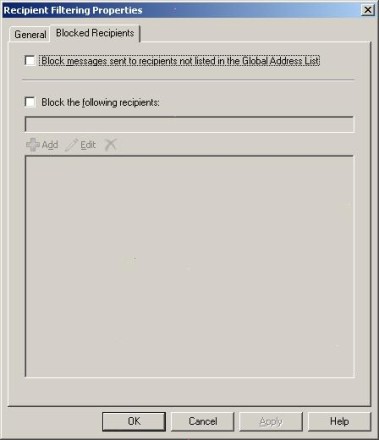
Recipient filtering blocks email messages sent to specific recipients. This is useful if you have Exchange Server mailboxes that should never receive email from the outside world. You can use recipient filtering to prevent email messages from being sent to individual mailboxes or to entire domains.
As you can see in Figure F, the Recipient Filtering properties sheet also allows you to block any email message sent to a recipient who is not listed in the Exchange Global Address List.
Figure F: You can block messages sent to specific mailboxes or domains.
Sender filtering
Sender filtering works by allowing you to filter email messages from specific senders. This filter is very flexible in that it allows you to enter individual email addresses, entire domains, or even whole domain ranges. This means that you could block a specific domain, such as Contoso.com, or you could block all domains within a specific domain hierarchy, such as .com or .net.
The Sender Filtering properties sheet contains an Action tab that lets you control what happens when a blocked sender sends an email message to your Exchange Server organization. By default, the message is rejected, but you have the option of stamping the message with a Blocked Sender stamp and processing the message any way.
Sender ID filtering
Sender ID filtering is designed to prevent domain spoofing techniques that are commonly used by spammers and in phishing scams. Sender ID works by comparing the IP address from which a message has originated against a list of the IP addresses of mail servers that the domain's owner has authorized to send email on behalf of the domain.
By default, the Edge Transport server is configured to stamp messages with the Sender ID result and then continue processing the email. The reason for this is that, although Sender ID screening is an effective antispam technique, Sender ID technology has yet to be widely adopted. Many senders have not yet registered their mail server addresses.
Sender Reputation filtering
The Sender Reputation filter is one of the more interesting filters. It can collect information about recent email messages received from individual senders and domains. If the sender or the domain has been a source for spam, then the sender's reputation is decreased.
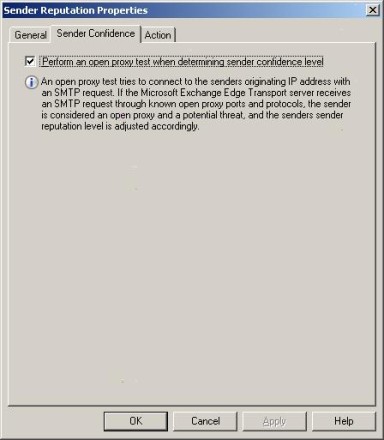
In addition to message history, a sender's reputation is also based on whether or not the sender's mail server is configured as an open proxy. When a message is received from a sender, Exchange Server uses the sender's SMTP address to perform a test against the sender's mail server to determine whether or not it is configured as an open proxy, as shown in Figure G. If the server is an open proxy, the sender's reputation is decreased.
Figure G: You can see if a sender's mail server is configured as an open proxy.
The Sender Reputation filter allows you to set a sender reputation threshold value. When this threshold value is exceeded, the sender is temporarily added to the IP Block List. As you can see in Figure H, Exchange Server allows you to control the duration of the block.
Figure H: You can block senders with bad reputations for any length of time.

Step 7: Set up Edge Transport server advanced content-filtering features
In Step 4, I showed you some basic techniques for configuring an Edge Transport server to filter out spam, viruses and malware. Now let's review some more advanced content-filtering features.
Puzzle validationAny inbound email message that passes through an Edge Transport server is analyzed and then assigned a Spam Confidence Level (SCL) number, which correlates to the percentage chance that the email message is spam. As we all know though, sometimes messages that are perfectly legitimate have some of the same characteristics as spam, and oftentimes these email messages are incorrectly rejected.
To help with these types of situations, Microsoft has created a mechanism for reducing false positives called puzzle validation. Puzzle validation only works when the sender is using Exchange Server 2007 and Outlook 2007. Assuming that the sender meets these criteria, Microsoft Outlook will digitally postmark each message that is sent. The digital postmark is essentially a hash based on the sender's identity.
When an Edge Transport server receives an email message, it checks to see if the message contains a digital postmark. If the message does contain such a postmark, the server creates its own hash based on the sender information contained in the email message.
If the number that is derived through this computation matches the contents of the digital postmark, the message is less likely to be spam. The Edge Transport server then lowers the message's SCL level accordingly.
If an inbound message does not contain a digital postmark, or if the message contains an invalid digital postmark, the message is not automatically classified as spam. Instead, the SCL that had already been calculated for the message continues to be in effect.
You can enable puzzle validation by opening the Exchange Management Shell on the Edge Transport server and execute the following command:
Set-ContentFilterConfig[-OutlookEmailPostmarkValidationEnabled $True
If you should decide later on that you want to disable puzzle validation, you can do so by entering this command:
Set-ContentFilterConfig[-OutlookEmailPostmarkValidationEnabled $False
Attachment filtering
Most of the filtering capabilities I have talked about so far can be found in just about any antispam product. One feature that helps to set an Edge Transport server apart from some of the other antispam products available is attachment filtering.
Since just about everybody uses antispam filters, some spammers choose to place their messages in documents that are attached to an email so that the message will be more likely to pass through the spam filter. At best, these types of messages are annoying, but they often also contain offensive and malicious content.
Since you probably don't want these types of messages reaching your end users, you can configure your Edge Transport server to scan email attachments -- not just the messages themselves -- and remove unwanted content.
Attachment filtering can be applied to both inbound and outbound email messages. One of the primary techniques for filtering inbound messages involves blocking file extensions for which you know that nobody in the organization has any legitimate business need.
At the very least, you should block executable files (.EXE, .BAT, .COM, .PIF, etc.) as a way of helping to keep viruses out of your organization. Keep in mind though that blocking executable files does not completely guarantee that no viruses will find their way into your organization.
It is still very common for legitimate looking messages to contain links to malicious files rather than including the file as an attachment. Such messages are harmless unless a user decides to click on the link. Fortunately, Microsoft Outlook contains some mechanisms to prevent users from accidentally executing malicious code from a link found in email.
Blocking unused file types and specific filenames
Blocking executable files is just the beginning of what you can do though. You can also block unused file types. For example, if you know that nobody in your organization uses Microsoft Excel, then you could block .xls files.
Although blocking certain file extensions certainly has its place, you also have the option of blocking specific files. For example, suppose that the latest email virus is a message with an attachment named virus.exe. You could actually configure Exchange Server to block any file named virus.exe.
I have talked a lot about preventing unwanted content from reaching your mailbox server, but remember that you can also use attachment filtering to block outbound message attachments.
At the very least, I would recommend configuring Exchange Server to prevent executable files from being emailed to the outside world. Although I'm sure that you probably take the appropriate precautions to prevent viruses, even the most cautious organizations can inadvertently become infected with viruses.
If an infection does occur, you don't want a virus to email itself to all of your company's clients. Not only could you potentially infect your clients, it might make your clients think twice about doing business with you if you send them viruses.
Attachment filtering is also good for making sure that confidential documents are not leaked to the outside world. For example, if you had a super secret document named Evil_Plan_for_World_Domination.doc, you could prevent someone from emailing the document to the outside world (accidentally or on purpose) by blocking the document's filename. The filter won't help you if someone renames the document prior to sending it though.
In order to implement attachment filtering, you need to make three basic decisions:
- Which filename or file extension you want to block
- If the block should apply to inbound email, outbound email, or both
- What will happen when the Edge Transport server finds an email message with an attachment that has been blocked
- Reject the message: Doing so will prevent delivery to the intended recipient and will issue a non-delivery report (NDR) to the sender.
- Strip the attachment from the email message:The offending attachment will be removed and replaced by a notification telling the recipient that an attachment has been removed. The nice thing about using this option is that if a message contains multiple attachments, then any email attachments that have not been blocked will still be available to the recipient.
- Silent delete: This option deletes the email message just like the reject option does. The difference is that the silent delete option does not produce non-delivery reports.
There are a handful of different Exchange Management Shell commands that are used to filtering email attachments. In the commands below, filename.ext is a generic representation of the filename of your choice.
- Check the status of a file or file extension to see if it is currently being blocked: Get-AttachmentFilterEntry filename.ext
- Block a particular filename: Add-AttachmentFilterEntry –name filename.ext –Type FileName
- Remove a block on a filename: Remove-AttachmentFilterEntry –Identity Filename:filename.ext
- If you want to work with an extension as opposed to a specific filename, leave the Type setting set to filename, but enter the extension as a wildcard. For example, if you wanted to block .exe files, you could use the following command: Remove-AttachmentFilterEntry –Identity Filename:*.exe
- You can perform a reject, strip, or silent delete on blocked files or file types using the Set-AttachmentListConfig command and then specifying the desired action. If you set the action to Reject, you also have the option of specifying the contents of the non-delivery report, as shown below: SetAttachmentFilterListConfig –Action Reject –RejectResponse "This attachment is not allowed"
When an email message is rejected by an Edge Transport server, it does not simply fall into some email black hole. Instead, Exchange Server embeds a rejection message into the SMTP non-delivery report (NDR). The default rejection message simply states: "Message Rejected Due to Content Restriction."
What you might not realize though, is that you can customize this message to meet your needs. The only real restriction is that your message can not exceed 240 characters in length. The command for customizing the rejection message through the Exchange Management Shell is:
Set-ContentFilterConfig –RejectionResponse "I don't want your spam. Stop bothering me."
Note that the actual message text must be enclosed in quotation marks.
Brien M. Posey, MCSE


