Introduction
Whether you are running your site on your own server or
in the cloud,
security must be at the top of your priority list. If so, you will be
happy to hear that IIS has a security feature called the application
pool identity. This feature was introduced in Service Pack 2 (SP2) of
Windows Server 2008 and Windows Vista. An application pool identity
allows you to run an application pool under a unique account without
having to create and manage domain or local accounts. The name of the
application pool account corresponds to the name of the application
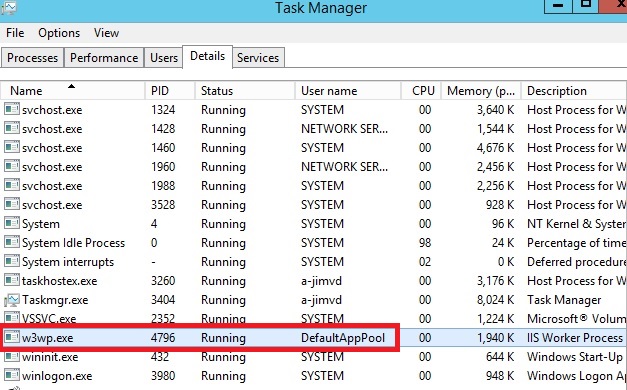
pool. The image below shows an IIS worker process (W3wp.exe) running as
the DefaultAppPool identity.

Application Pool Identity Accounts
Worker processes in IIS 6.0 and in IIS 7 run as Network Service by
default. Network Service is a built-in Windows identity. It doesn't
require a password and has only user privileges; that is, it is
relatively low-privileged. Running as a low-privileged account is a good
security practice because then a software bug can't be used by a
malicious user to take over the whole system.
However, a problem arose over time as more and more Windows system
services started to run as Network Service. This is because services
running as Network Service can tamper with other services that run under
the same identity. Because IIS worker processes run third-party code by
default (Classic ASP, ASP.NET, PHP code), it was time to isolate IIS
worker processes from other Windows system services and run IIS worker
processes under unique identities. The Windows operating system provides
a feature called "virtual accounts" that allows IIS to create a unique
identity for each of its application pools. Click
here for more information about Virtual Accounts.
Configuring IIS Application Pool Identities
If you are running IIS 7.5 on Windows Server 2008 R2, or a later
version of IIS, you don't have to do anything to use the new identity.
For every application pool you create, the Identity property of the new
application pool is set to
ApplicationPoolIdentity by
default. The IIS Admin Process (WAS) will create a virtual account with
the name of the new application pool and run the application pool's
worker processes under this account by default.
To use this virtual account when running IIS 7.0 on Windows Server
2008, you have to change the Identity property of an application pool
that you create to
ApplicationPoolIdentity. Here is how:
- Open the IIS Management Console (INETMGR.MSC).
- Open the Application Pools node underneath the machine node. Select
the application pool you want to change to run under an automatically
generated application pool identity.
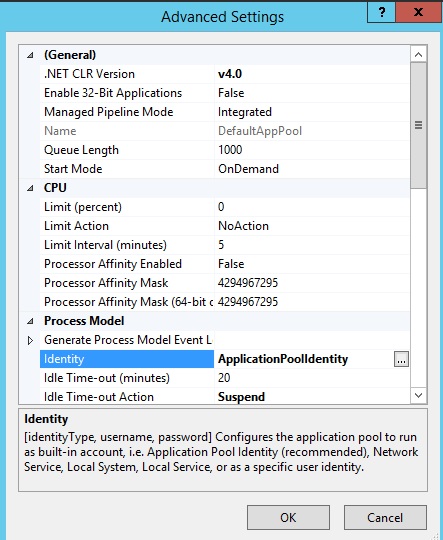
- Right click the application pool and select Advanced Settings...

- Select the Identity list item and click the ellipsis (the button with the three dots).
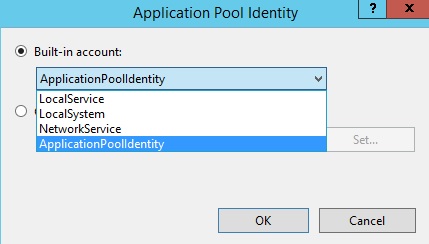
- The following dialog appears:

- Select the Built-in account button, and then select the identity type ApplicationPoolIdentity from the combo box.
To do the same step by using the command-line, you can call the appcmd command-line tool the following way:
%windir%\system32\inetsrv\appcmd.exe set AppPool <your AppPool> -processModel.identityType:ApplicationPoolIdentity
Securing Resources
Whenever a new application pool is created, the IIS management
process creates a security identifier (SID) that represents the name of
the application pool itself. For example, if you create an application
pool with the name "MyNewAppPool," a security identifier with the name
"MyNewAppPool" is created in the Windows Security system. From this
point on, resources can be secured by using this identity. However, the
identity is not a real user account; it will not show up as a user in
the Windows User Management Console.
You can try this by selecting a file in Windows Explorer and adding
the "DefaultAppPool" identity to the file's Access Control List (ACL).
- Open Windows Explorer
- Select a file or directory.
- Right click the file and select Properties
- Select the Security tab
- Click the Edit button and then Add button
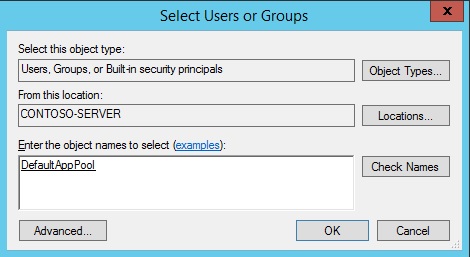
- Click the Locations button and make sure that you select your computer.

- Enter IIS AppPool\DefaultAppPool in the Enter the object names to select: text box.
- Click the Check Names button and click OK.
By doing this, the file or directory you selected will now also allow the
DefaultAppPool identity access.
You can do this via the command-line by using the ICACLS tool. The
following example gives full access to the DefaultAppPool identity.
ICACLS test.txt /grant "IIS AppPool\DefaultAppPool":F
For more information, see
ICACLS.
On Windows 7 and Windows Server 2008 R2, and later versions of
Windows, the default is to run application pools as the application pool
identity. To make this happen, a new identity type with the name
"AppPoolIdentity" was introduced. If the "AppPoolIdentity" identity type
is selected (the default on Windows 7 and Windows Server 2008 R2, and
later), IIS will run worker processes as the application pool identity.
With every other identity type, the security identifier will only be
injected into the access token of the process. If the identifier is
injected, content can still be ACLed for the ApplicationPoolIdentity,
but the owner of the token is probably not unique.
Here is an article that explains this concept.
Accessing the Network
Using the Network Service account in a domain environment has a great
benefit. Worker process running as Network Service access the network
as the machine account. Machine accounts are generated when a machine is
joined to a domain. They look like this:
<domainname>\<machinename>$,
For example:
mydomain\machine1$
The nice thing about this is that network resources like file shares
or SQL Server databases can be ACLed to allow this machine account
access.
What about Application Pool Identities?
The good news is that application pool identities also use the
machine account to access network resources. No changes are required.
Compatibility Issues with Application Pool Identities
Guidance Documentation
The biggest compatibilty issue with application pool identities is
probably earlier guidance documents which explicitly recommend that you
ACL resources for Network Service, that is, the default identity of the
DefaultAppPool in IIS 6.0 and IIS 7.0. Customers will have to change
their scripts to ACL for "IIS AppPool\DefaultAppPool" (or another
application pool name) when running on IIS 7.5 or later (see the example
above for how to do this).
User Profile
IIS doesn't load the Windows user profile, but certain applications
might take advantage of it anyway to store temporary data. SQL Express
is an example of an application that does this. However, a user profile
has to be created to store temporary data in either the profile
directory or in the registry hive. The user profile for the Network
Service account was created by the system and was always available.
However, with the switch to unique Application Pool identities, no user
profile is created by the system. Only the standard application pools
(DefaultAppPool and Classic .NET AppPool) have user profiles on disk. No
user profile is created if the Administrator creates a new application
pool.
However, if you want, you can configure IIS application pools to load
the user profile by setting the LoadUserProfile attribute to "true".
Summary
Application pool identities are a powerful new isolation feature
introduced for Windows Server 2008, Windows Vista, and later versions of
Windows. It will make running IIS applications even more secure and
reliable.
http://www.iis.net


