Search This Blog

Wednesday, July 23, 2014

Windows - Certificate Auto Enrollment Fails

KB ID 0000921 Dtd 01/02/14

Problem

I was trying to get Windows 7 to auto enroll with a CA on Windows 2008 R2, after a couple of reboots the certificates were simply not appearing on the test client I was working on.

Solution

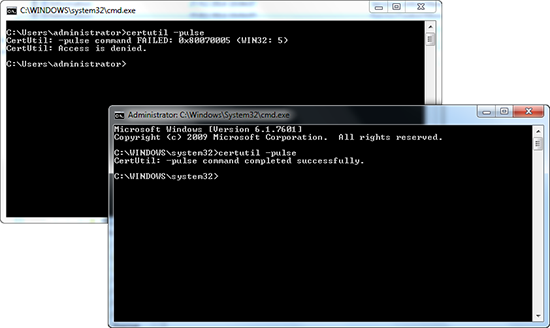
1. Test to make sure the client can see the CA, and is able to communicate with it, issue the following command;
certutil -pulse
CertUtil -pulse failed
As you can see above, the first time I ran the command I got the following error;
CertUtil: -pulse command FAILED: 0x80070005 (WIN32: 5)
CertUtil: Access is denied.

I then ran the command window 'as administrator' and it completed, this was the first inkling I had, that permissions were probably not right.
2. Run mmc on an affected machine, and add in the certificates (local computer*) snap-in. right click the 'personal container' > attempt to get the certificate you have published manually.
*Or local user if you are auto enrolling user certificates.
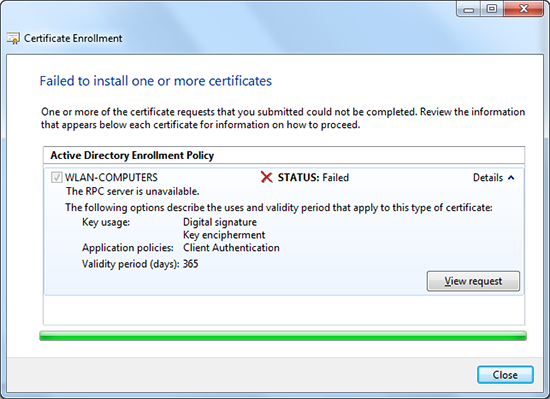
Certifcate RPC server is unavailble
At that point I got this error;
Active Directory Enrollment Policy
STATUS: Failed
The RPC server is unavailable.

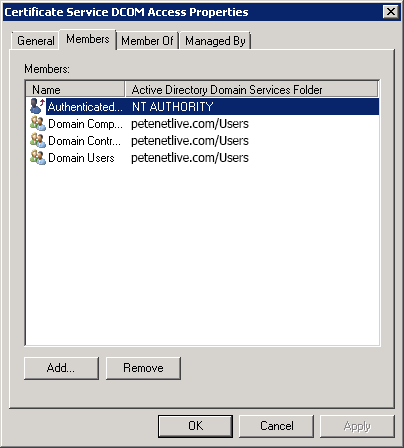
3. The most common cause for that error, is the membership of the 'Certificate Service DCOM Access' group is incorrect, check yours and make sure it matches the one below.
Certificate Servi DCOM Access Group Membership
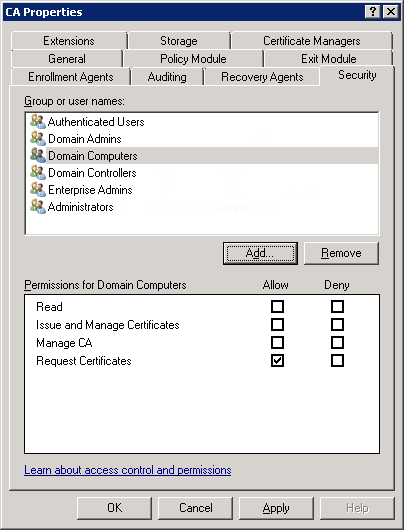
4. On the CA Server launch the Certification Authority management tool and look at the properties of the CA Server itself, on the security tab make sure yours looks like this, (Domain computer and domain controllers should have the 'request certificates' rights).
CA Server Security Settings
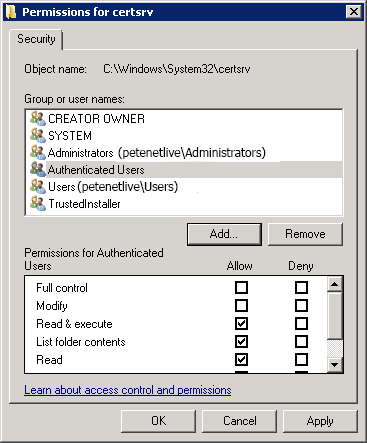
5. Still on the CA Server, check the permissions on the C:\Windows\System 32\certsrv directory, authenticated users should have Read & Execute rights.
certsrv folder pemissions
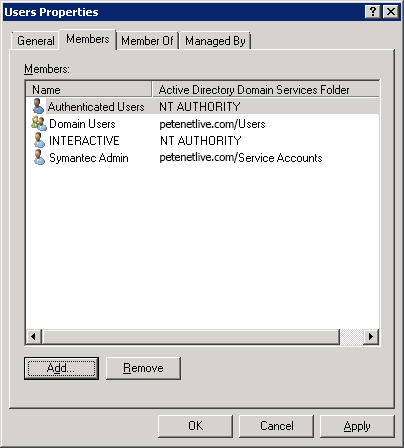
6. This is the change that finally fixed mine: In active directory users and computers, locate the Builtin container, within it there is a group called 'Users'. Make sure it contains Authenticated Users and INTERACTIVE.
Builtin users group membership
7. Run a 'gpupdate /force' on your test client, and/or reboot it.
www.petenetlive.com

Thursday, July 10, 2014

Sao lưu và phục hồi trong Windows

Đối với người quản trị hệ thống thì việc sao lưu và phục hồi dữ liệu là một công việc quyết định sự tồn tại của họ nói riêng và của cả công ty họ nói chung. Dữ liệu là tài sản vô cùng quí giá đối với bất kì tổ chức nào. 
A.     Back up có các dạng sau: Normal, Differential, Incremental, Copy và Daily.
1.      Normal:
ü      Back up toàn bộ dữ liệu mà ta cấu hình “job” cho dữ liệu đó.
ü      Xóa marker, nghĩa là sau khi backup xong windows sẽ ghi nhận là dữ liệu đã được back up.
2.      Differential:
ü      Chỉ back up những phần dữ liệu có sự thay đổi mà ta cấu hình “job” cho dữ liệu đó.
ü      Không xóa marker, nghĩa là sau khi backup xong windows sẽ ghi nhận là dữ liệu chưa được back up.
3.      Incremental:
ü      Chỉ back up những phần dữ liệu có sự thay đổi mà ta cấu hình “job” cho dữ liệu đó.
ü      Xóa marker, nghĩa là sau khi backup xong windows sẽ ghi nhận là dữ liệu đã được back up.
4.      Copy:
ü      Back up toàn bộ dữ liệu mà ta cấu hình “job” cho dữ liệu đó.
ü      Xóa marker, nghĩa là sau khi backup xong windows sẽ ghi nhận là dữ liệu chưa được back up.
5.      Daily:
ü      Chỉ back up những dữ liệu bị thay đổi trong ngày hiện tại mà ta cấu hình “job” cho dữ liệu đó.
ü      Không xóa marker, nghĩa là sau khi backup xong windows sẽ ghi nhận là dữ liệu chưa được back up.
B.     Sự kết hợp của các kiểu back up
Chúng ta có các kiểu kết hợp thông dụng sau:
ü      Normal + Incremetal.
ü      Normal + Differential.
ü      Normal + Differential + Copy.
Ví dụ: ta có dữ liêu sau cần back up.
retore

Khi đó, mỗi sự kết hợp khác nhau sẽ có cách hoạt động khác nhau, sau đây chúng ta sẽ tìm hiểu từng kiểu back up đã nêu trên.
1.      Normal + Incremetal:
Ta cấu hình chúng thực hiện back up theo bảng sau:
Thứ
Hai
Ba
Năm
Sáu
Bảy
Kiểu Back up
Normal
Incremetal
Incremetal
Incremetal
Incremetal
Incremetal
File lưu trữ
N2.bkf
I3.bkf
I4.bkf
I5.bkf
I6.bkf
I7.bkf

Diển giải:
File N2.bkf sẽ chứa tất cả các dữ liệu mà ta cấu hình “job” thực hiện back up cho dữ liệu đó.
Các file: I3.bkf, I4.bkf, I5.bkf, I6.bkf và I7.bkf chỉ chứa những dữ liệu mà có thay đổi trong các ngày tương ứng lần lược từ thứ Ba, Tư, Năm, Sáu và Bảy. 
Nếu chúng ta cần phục hồi dữ liệu của ngày thứ năm thì ta se restore lần lược các file sau đây:
N2.bkf -> I3.bkf -> I4.bkf -> I5.bkf. (Restore 4 file) 
Tóm lại, ưu khuyết điểm của kiểu này như sau:
Ưu: back up nhanh.
Khuyết: resotre chậm.

2.      Normal + Differential:
Ta cấu hình chúng thực hiện back up theo bảng sau:

Thứ
Hai
Ba
Năm
Sáu
Bảy
Kiểu Back up
Normal
Differential
Differential
Differential
Differential
Differential
File lưu trữ
N2.bkf
D3.bkf
D4.bkf
ID5.bkf
D6.bkf
D7.bkf

Diển giải:
File N2.bkf sẽ chứa tất cả các dữ liệu mà ta cấu hình “job” thực hiện back up cho dữ liệu đó.
File D3.bkf chỉ chứa những thay đổi của ngày thứ Ba.
File D4.bkf chứa những thay đổi của ngày thứ Ba và Tư.
File D5.bkf chứa những thay đổi của ngày thứ Ba, Tư và Năm.
File D6.bkf chứa những thay đổi của ngày thứ Ba, Tư, Năm và Sáu.
File D7.bkf chứa những thay đổi của ngày thứ Ba, Tư, Năm, Sáu và Bảy.
Nếu chúng ta cần phục hồi dữ liệu của ngày thứ năm thì ta se restore lần lược các file sau đây:
N2.bkf -> D5.bkf. (Restore 2 file)
Tóm lại, ưu khuyết điểm của kiểu này như sau:
Ưu: back up chậm.
Khuyết: resotre nhanh.

3.      Normal + Differential + Copy:
Ta cấu hình chúng thực hiện back up theo bảng sau:

Thứ
Hai
Ba
Năm
Sáu
Bảy
Kiểu Back up
Normal
Differential
Differential
Differential
Copy
Differential
Differential
File lưu trữ
N2.bkf
D3.bkf
D4.bkf
D5.bkf
C5.bkf
D6.bkf
D7.bkf

Diển giải:
Kiểu kết hợp này tương tự như kiểu 2, nhưng vấn đề đặt ra là, khi chúng ta đã cấu hình sẵn sàng cho hệ thống thực hiện back up tự động các ngày trong tuần bất thình lình ngày thứ năm chúng ta được yêu cầu back up lại toàn bộ dữ liệu
Như vậy chúng ta sẽ thêm 1 “job” vào ngày thứ Năm và job này chỉ có thể là Copy vì nấu chúng ta chọn Normal thì sau khi back up xong windows sẽ xóa marker đi dẫn đến tiến trình back up “Normal + Differentil” đã cấu hình sẵn sẽ chạy sai với mong muốn ban đầu.

Dương Việt Trí

Monday, July 7, 2014

Application Pool Identities

Introduction

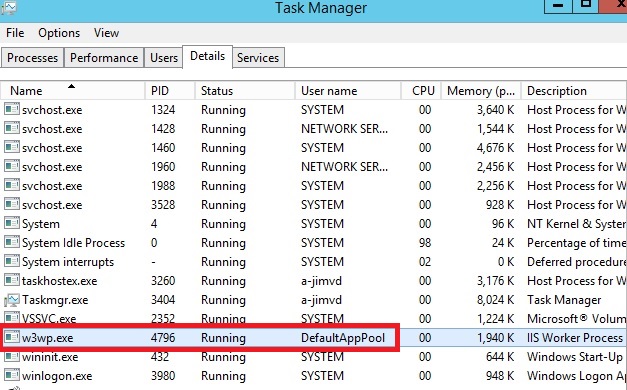
Whether you are running your site on your own server or in the cloud, security must be at the top of your priority list. If so, you will be happy to hear that IIS has a security feature called the application pool identity. This feature was introduced in Service Pack 2 (SP2) of Windows Server 2008 and Windows Vista. An application pool identity allows you to run an application pool under a unique account without having to create and manage domain or local accounts. The name of the application pool account corresponds to the name of the application pool. The image below shows an IIS worker process (W3wp.exe) running as the DefaultAppPool identity.

Application Pool Identity Accounts

Worker processes in IIS 6.0 and in IIS 7 run as Network Service by default. Network Service is a built-in Windows identity. It doesn't require a password and has only user privileges; that is, it is relatively low-privileged. Running as a low-privileged account is a good security practice because then a software bug can't be used by a malicious user to take over the whole system.
However, a problem arose over time as more and more Windows system services started to run as Network Service. This is because services running as Network Service can tamper with other services that run under the same identity. Because IIS worker processes run third-party code by default (Classic ASP, ASP.NET, PHP code), it was time to isolate IIS worker processes from other Windows system services and run IIS worker processes under unique identities. The Windows operating system provides a feature called "virtual accounts" that allows IIS to create a unique identity for each of its application pools. Click here for more information about Virtual Accounts.

Configuring IIS Application Pool Identities

If you are running IIS 7.5 on Windows Server 2008 R2, or a later version of IIS, you don't have to do anything to use the new identity. For every application pool you create, the Identity property of the new application pool is set to ApplicationPoolIdentity by default. The IIS Admin Process (WAS) will create a virtual account with the name of the new application pool and run the application pool's worker processes under this account by default.
To use this virtual account when running IIS 7.0 on Windows Server 2008, you have to change the Identity property of an application pool that you create to ApplicationPoolIdentity. Here is how:
  1. Open the IIS Management Console (INETMGR.MSC).
  2. Open the Application Pools node underneath the machine node. Select the application pool you want to change to run under an automatically generated application pool identity.
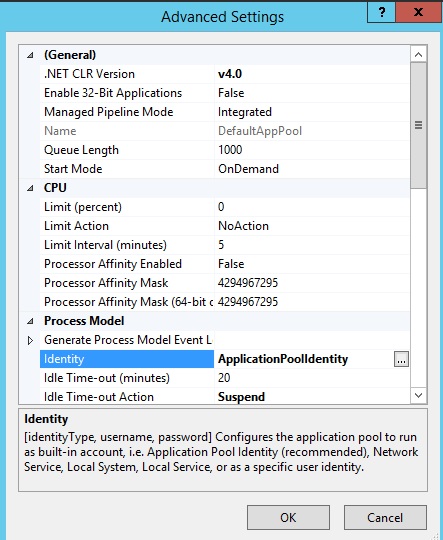
  3. Right click the application pool and select Advanced Settings...
  4. Select the Identity list item and click the ellipsis (the button with the three dots).
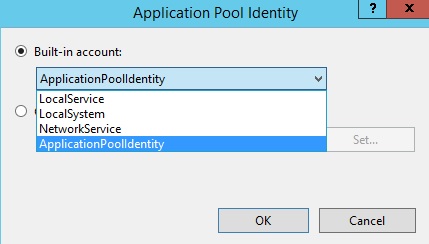
  5. The following dialog appears:
  6. Select the Built-in account button, and then select the identity type ApplicationPoolIdentity from the combo box.
To do the same step by using the command-line, you can call the appcmd command-line tool the following way:
%windir%\system32\inetsrv\appcmd.exe set AppPool <your AppPool> -processModel.identityType:ApplicationPoolIdentity

Securing Resources

Whenever a new application pool is created, the IIS management process creates a security identifier (SID) that represents the name of the application pool itself. For example, if you create an application pool with the name "MyNewAppPool," a security identifier with the name "MyNewAppPool" is created in the Windows Security system. From this point on, resources can be secured by using this identity. However, the identity is not a real user account; it will not show up as a user in the Windows User Management Console.
You can try this by selecting a file in Windows Explorer and adding the "DefaultAppPool" identity to the file's Access Control List (ACL).
  1. Open Windows Explorer
  2. Select a file or directory.
  3. Right click the file and select Properties
  4. Select the Security tab
  5. Click the Edit button and then Add button
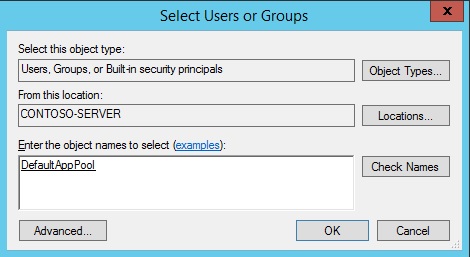
  6. Click the Locations button and make sure that you select your computer.
  7. Enter IIS AppPool\DefaultAppPool in the Enter the object names to select: text box.
  8. Click the Check Names button and click OK.
By doing this, the file or directory you selected will now also allow the DefaultAppPool identity access.
You can do this via the command-line by using the ICACLS tool. The following example gives full access to the DefaultAppPool identity.
ICACLS test.txt /grant "IIS AppPool\DefaultAppPool":F For more information, see ICACLS.
On Windows 7 and Windows Server 2008 R2, and later versions of Windows, the default is to run application pools as the application pool identity. To make this happen, a new identity type with the name "AppPoolIdentity" was introduced. If the "AppPoolIdentity" identity type is selected (the default on Windows 7 and Windows Server 2008 R2, and later), IIS will run worker processes as the application pool identity. With every other identity type, the security identifier will only be injected into the access token of the process. If the identifier is injected, content can still be ACLed for the ApplicationPoolIdentity, but the owner of the token is probably not unique. Here is an article that explains this concept.

Accessing the Network

Using the Network Service account in a domain environment has a great benefit. Worker process running as Network Service access the network as the machine account. Machine accounts are generated when a machine is joined to a domain. They look like this:
<domainname>\<machinename>$,
For example:
mydomain\machine1$
The nice thing about this is that network resources like file shares or SQL Server databases can be ACLed to allow this machine account access.

What about Application Pool Identities?

The good news is that application pool identities also use the machine account to access network resources. No changes are required.

Compatibility Issues with Application Pool Identities

Guidance Documentation

The biggest compatibilty issue with application pool identities is probably earlier guidance documents which explicitly recommend that you ACL resources for Network Service, that is, the default identity of the DefaultAppPool in IIS 6.0 and IIS 7.0. Customers will have to change their scripts to ACL for "IIS AppPool\DefaultAppPool" (or another application pool name) when running on IIS 7.5 or later (see the example above for how to do this).

User Profile

IIS doesn't load the Windows user profile, but certain applications might take advantage of it anyway to store temporary data. SQL Express is an example of an application that does this. However, a user profile has to be created to store temporary data in either the profile directory or in the registry hive. The user profile for the Network Service account was created by the system and was always available. However, with the switch to unique Application Pool identities, no user profile is created by the system. Only the standard application pools (DefaultAppPool and Classic .NET AppPool) have user profiles on disk. No user profile is created if the Administrator creates a new application pool.
However, if you want, you can configure IIS application pools to load the user profile by setting the LoadUserProfile attribute to "true".

Summary

Application pool identities are a powerful new isolation feature introduced for Windows Server 2008, Windows Vista, and later versions of Windows. It will make running IIS applications even more secure and reliable.
http://www.iis.net