Search This Blog

Monday, October 14, 2013

Moving your MOSS 2007 databases to a larger drive

I was doing a small Proof-of-Concept with SharePoint Server 2007, using one server for the database (running SQL Server 2005) and another server for SharePoint Server. The problem is that the SysAdmin that installed SQL Server not only installed it on the C: drive but also let SQL creating new database on the C: drive. As you can imagine, the C: drive ended up dangerouly low on disk space. We needed to move the data files to another drive (yes, there was another drive that was supposed to be used for data). Here are the steps we used.
WARNING: These instructions are provided "AS IS" with no warranties, and confer no rights. To be on the safe side, always perform a full backup before any major configuration change. You will need downtime on the server to perform these operations. Follow these instructions at your own risk.
1 - We confirmed there were no users on the server and properly shutdown the SharePoint Server. This makes sure there's no application hitting the database while we're moving the files around. If you SharePoint Server and SQL Server are on the same box, you will need to shutdown IIS and all SharePoint services before proceeding. Check a previous post on this blog to identify those services.
2 - We detached all databases. We also needed to disconnect current users (although SharePoint services were shut down, some connections remained there). You can check a previous post on this blog to identify those 8 or more databases involved. Make sure you take note of those, since you will need them later.
3 - We created a new folder on the E: drive, where we were moving the files to. Then we moved those 16 or more files (there was an MDF and an LDF file for each one of the 8 databases). We did not move any of the system databases, just the SharePoint-related ones.
4 - We re-attached the databases, point to the new file locations at E:\. SQL Server 2005 had no problem mounting the files from the new location.
5 - We reconfigured the default location for the SQL Server data and log files, so future database get created on the right location. We had to restart the SQL Server service for this configuration change to apply.
6 - We restarted SharePoint, which did not really care for the fact that the databases were now in a different drive. All SharePoint knows about is server and database names, and those did not change.
In the end, it was actually not that hard...
Jose Barreto - MSFT
I tried and successful, and you?

Saturday, October 5, 2013

VSD đưa ra giải pháp giải quyết vấn đề thẻ bảo hiểm y tế bị cấp trùng

Tin từ Bảo hiểm xã hội (BHXH) Việt Nam cho biết qua rà soát tại 43 tỉnh, thành phố, BHXH Việt Nam phát hiện có tới hơn 800.000 thẻ bảo hiểm Y tế (BHYT) bị cấp trùng.

Việc cấp trùng thẻ thuộc 14 nhóm đối tượng, phần lớn được Nhà nước cấp kinh phí, hoặc hỗ trợ kinh phí mua thẻ từ nguồn ngân sách. Số thẻ cấp trùng tập trung cao vào các nhóm: trẻ dưới sáu tuổi; người nghèo; bảo trợ xã hội; thân nhân quân đội; người có công với cách mạng; người cận nghèo; thân nhân người có công; cựu chiến binh. Số thẻ cấp trùng khiến ngân sách tăng chi thêm hàng trăm tỉ đồng mỗi năm (mệnh giá 576.000 đồng/thẻ/năm). Phần lớn cấp trùng hai thẻ BHYT/người, một số cấp ba thẻ/người, cá biệt có người được cấp 4 – 5 thẻ.

Có địa phương, số thẻ BHYT được cấp cao hơn thực tế số dân của địa phương. Một số tỉnh, thành phố có số thẻ BHYT cấp trùng nhiều là: Thừa Thiên – Huế, Sơn La, Bình Định, Lai Châu, Vĩnh Phúc, Đồng Tháp, TP.HCM, Hà Nội... Hiện BHXH Việt Nam đang tổ chức lấy ý kiến về giải pháp cấp thẻ BHYT có ảnh. Theo dự kiến, chậm nhất là ngày 1.1.2014, cơ quan chức năng sẽ thực hiện phát hành thẻ BHYT có ảnh cho người tham gia BHYT. Đó có thể xem là công cụ quan trọng nhằm kiểm soát và hạn chế hành vi gian lận, phát hành trùng thẻ BHYT, sử dụng thẻ của người khác.

VSD  Việt Nam đã đưa ra phần mềm giải quyết vấn đề này.

Chức năng chính của hệ thống:

  • Quản lý danh sách những đối tượng được đề xuất hưởng bảo hiểm y tế.
  • Kiểm trùng thông tin đối tượng đề xuất trong quá trình nhập liệu tại các địa phương. (cấp xã/phường/thị trấn)
  • Kiểm trùng và thông báo trong quá trình phê duyệt các nhóm đối tượng khác nhau. (Chỉ cho phép duyệt 1 người trùng thông tin trong các nhóm đối tượng khác nhau)
  • Quản lý danh sách được phê duyệt hưởng bảo hiểm y tế.
  • Quản lý danh sách cấp thẻ bảo hiểm y tế.
  • Tự động tính tiền đóng bảo hiểm y tế theo định mức hệ số lương cơ bản khai báo tại danh mục.
  • Quản lý các nhóm đối tượng được hưởng bảo hiểm y tế.
  • Khai thác, tìm kiếm, thống kê và báo cáo theo từng tiêu chí lựa chọn, báo cáo theo nhóm đối tượng, theo địa phương…..
  • Quản lý phân quyền chặt chẽ theo vai trò của người sử dụng..
  •  
  • ....................................................................................................................................................
  • Đường dẫn tham khảo phần mềm:

    Địa chỉ: http://bhyt.vsd.com.vn
    Thông tin đăng nhập
    Tài khoản
    Mật khẩu
    Ghi chú
    Địa bàn
    Nhapds
    12345
    Nhập danh sách đề xuất
    Toàn huyện
    Pheduyetds
    12345
    Phê duyệt danh sách đề xuất
    Toàn huyện
    Capthebhyt
    12345
    Quản lý danh sách cấp thẻ BHYT
    Toàn huyện
    Quản trị
    ********
    Liên hệ để xem phần quản trị
    Toàn huyện

    Mọi chi tiết xin liên hệ

    Hỗ trợ kinh doanh:

  • Nguyễn Quang Tuấn - 04.62737300,  0912.068.823 (nqtuan@vsd.com.vn)

Hỗ trợ kỹ thuật:

  • Ngô Sinh Nguyên - 04.62737311 (nsnguyen@vsd.com.vn)
  • Phùng Quốc Hoàn - 04.62737311 (pqhoan@vsd.com.vn)

Monday, July 22, 2013

Phần mềm Quản lý đối tượng hưởng bảo hiểm y tế từ ngân sách


(Bảo hiểm y tế từ ngân sách, bảo hiểm y tế, bao hiem y te, bao hiem y te tu ngan sach, ngân sách, ngan sach, phần mềm, phan mem, the bao hiem y te, thẻ bảo hiểm y tế, trùng thẻ bảo hiểm y tế, trung the bao hiem y te)

Trùng thẻ bảo hiểm y tế, Quản lý đối tượng hưởng bảo hiểm y tế từ ngân sách


Luật Bảo hiểm y tế có hiệu lực thi hành từ ngày 1.7.2009, dành cho 25 đối tượng. Đến năm 2011, Bảo hiểm Xã hội đã phát hiện có tới 770.000 thẻ bảo hiểm y tế bị cấp trùng tại 40 địa phương trong cả nước. Có người một mình sở hữu đến 4-5 thẻ bảo hiểm y tế. Cá biệt, còn có người có tới 6 thẻ. Tình trạng này đang gây nên sự lãng phí nhất định cho ngân sách nhà nước. Nguyên nhân của tình trạng này được xác định là do 1 người cùng lúc ở nhiều nhóm đối tượng khác nhau, nên 1 người nhưng lại ở 3 hoặc 4 diện cấp thẻ.

Từ nhu cầu cấp bách trên “Công ty cổ phần công nghệ VSD Việt Nam” đã xây dựng hệ thống “Quản lý đối tượng hưởng bảo hiểm y tế từ ngân sách” (dựa theo những căn cứ pháp lý: Luật BHYT số 25/2008/QH12, Thông tư liên tịch số 09/2009/TTLT-BYT-BTC, Nghị định số 62/2009/NĐ-CP) để tránh tình trạng cấp trùng thẻ bảo hiểm y tế cho các nhóm đối tượng.

Chức năng chính của hệ thống:

  • Quản lý danh sách những đối tượng được đề xuất hưởng bảo hiểm y tế.
  • Kiểm trùng thông tin đối tượng đề xuất trong quá trình nhập liệu tại các địa phương. (cấp xã/phường/thị trấn)
  • Kiểm trùng và thông báo trong quá trình phê duyệt các nhóm đối tượng khác nhau. (Chỉ cho phép duyệt 1 người trùng thông tin trong các nhóm đối tượng khác nhau)
  • Quản lý danh sách được phê duyệt hưởng bảo hiểm y tế.
  • Quản lý danh sách cấp thẻ bảo hiểm y tế.
  • Tự động tính tiền đóng bảo hiểm y tế theo định mức hệ số lương cơ bản khai báo tại danh mục.
  • Quản lý các nhóm đối tượng được hưởng bảo hiểm y tế.
  • Khai thác, tìm kiếm, thống kê và báo cáo theo từng tiêu chí lựa chọn, báo cáo theo nhóm đối tượng, theo địa phương…..
  • Quản lý phân quyền chặt chẽ theo vai trò của người sử dụng.

Miêu tả hoạt động của hệ thống:

Những danh sách đối tượng được đề xuất hưởng bảo hiểm y tế sẽ được kiểm trùng từ quá trình nhập liệu (Cảnh báo trùng thông tin khi nhập liệu), danh sách đề xuất sẽ được trình đến cơ quan có thẩm quyền phê duyệt, trong quá trình phê duyệt hệ thống sẽ kiểm trùng thông tin và cảnh báo đến người sử dụng, đồng thời chỉ cho phép phê duyệt 1 người thuộc nhiều nhóm đối tượng khác nhau, người có quyền phê duyệt có thể lựa chọn phê duyệt đối tượng trùng thông tin ở một trong những danh sách nhóm đối tượng (hệ thống không cho phép phê duyệt cùng 1 người trong nhiều nhóm đối tượng khác nhau). Những đối tượng được phê duyệt sẽ liệt kê tại danh sách chờ cấp thẻ bảo hiểm y tế, người có quyền cấp thẻ sẽ cấp thẻ bảo hiểm y tế cho các đối tượng.

Đường dẫn tham khảo phần mềm:

Địa chỉ: http://ktbhyt.vsd.com.vn
Thông tin đăng nhập
Tài khoản
Mật khẩu
Ghi chú
Địa bàn
Nhapds
12345
Nhập danh sách đề xuất
Toàn huyện
Pheduyetds
12345
Phê duyệt danh sách đề xuất
Toàn huyện
Capthebhyt
12345
Quản lý danh sách cấp thẻ BHYT
Toàn huyện
Quản trị
********
Liên hệ để xem phần quản trị
Toàn huyện

Mọi chi tiết xin liên hệ

Hỗ trợ kinh doanh:

  • Nguyễn Quang Tuấn - 04.62737300,  0912.068.823 (nqtuan@vsd.com.vn)

Hỗ trợ kỹ thuật:

  • Ngô Sinh Nguyên - 04.62737311 (nsnguyen@vsd.com.vn)
  • Phùng Quốc Hoàn - 04.62737311 (pqhoan@vsd.com.vn)


Thursday, June 20, 2013

Wednesday, June 19, 2013

PHẦN MỀM QUẢN LÝ ĐỀN BÙ VÀ HỖ TRỢ GIẢI PHÓNG MẶT BẰNG

Quản lý các dự án giải phóng mặt bằng.

Quản lý các đối tượng được đền bù, hỗ trợ giải phóng mặt bằng

phan mem giai phong mat bang

giai phong mat bang

giải phóng mặt bằng

Phần mềm giải phóng mặt bằng

Phần mềm quản lý

phần mềm giải phóng mặt bằng


Giải phóng mặt bằng là quá trình thực hiện các công việc liên quan đến việc di dời nhà cửa, cây cối, các công trình xây dựng và một bộ phận dân cư trên một phần đất nhất định được quy hoạch cho việc cải tạo, mở rộng hoặc xây dựng một công trình mới.
Quá trình giải phóng mặt bằng được tính từ khi bắt đầu hình thành hội đồng giải phóng mặt bằng đến khi giải phóng xong và giao cho chủ đầu tư mới. Đây là một quá trình đa dạng và phức tạp thể hiện sự khác nhau giữa các dự án và liên quan đến lợi ích trực tiếp của các bên tham gia và cả của xã hội.
Công tác giải phóng mặt bằng mang tính quyết định đến tiến độ của các dự án, là khâu đầu tiên thực hiện dự án. Trong đó đền bù thiệt hại là khâu quan trọng quyết định tiến độ giải phóng mặt bằng.
Từ những nhận thức trên VSD Việt Nam đã xây dựng phần mềm “Quản lý đền bù và hỗ trợ giải phóng mặt bằng (Căn cứ Nghị định 197/2004/NĐ-CP và Nghị định 84/2007/NĐ-CP) nhằm cung cấp cho quý khách hàng một sản phẩm mang tính khoa học, ổn định và hiệu quả với các chức năng chính sau:
  • Quản lý các dự án giải phóng mặt bằng.
  • Quản lý các đối tượng được đền bù, hỗ trợ.
  • Quản lý bảng tính giá cây danh mục đền bù, hỗ trợ (Đất đai, Nhà cửa, Công trình phụ, Vật kiến trúc, Cây cối hoa màu, Hỗ trợ - trợ cấp…..)
  • Hỗ trợ tính giá cho những đối tượng được đền bù và cho toàn bộ dự án.
  • In Biên bản kiểm kê hiện trạng, Biên bản xác định giá trị bồi thường cho những đối
  • Báo cáo tổng hợp, báo cáo theo loại danh mục đền bù, báo cáo theo từng dự án…..
  • Tra cứu, tìm kiếm và thống kê nhanh và chính xác theo tiêu chí lựa chọn hoặc theo từ
  • Phân quyền chặt chẽ đối với người sử dụng.
  • Hỗ trợ tối đa việc nhập dữ liệu cho dự án, nhập dữ 


Danh sách dự án

Thông tin chi tiết dự án

Danh sách đối tượng được đền bù, hỗ trợ

Chi tiết đền bù, hỗ trợ cho một đối tượng
Bảng tổng hợp diện tích đất
Bảng tổng hợp chi tiết đền bù, hỗ trợ

Báo cáo tổng hợp tùy chọn theo tiêu chí.

Địa chỉ xem Demo phần mềm: http://gpmb.vsd.com.vn
Tài khoản đăng nhập: cv1
Mật khẩu: 12345

Mọi chi tiết xin liên hệ:

Hỗ trợ kinh doanh:

  • Nguyễn Quang Tuấn - 04.62737300,  0912.068.823 (nqtuan@vsd.com.vn)

Hỗ trợ kỹ thuật:

  • Ngô Sinh Nguyên - 04.62737311 (nsnguyen@vsd.com.vn)
  • Phùng Quốc Hoàn - 04.62737311 (pqhoan@vsd.com.vn)

Wednesday, April 24, 2013

Hướng dẫn cài đặt và cấu hình Kerio Control version 8

(Setup and config Kerio Control)
(huong dan cai dat va cau hinh kerio control)

Các phiên bản của Kerio Control

  • Software Appliance: phiên bản phần mềm cài trên máy chủ (kiểu kiểu như ISA/TMG hoặc PFsense đó các bạn)
  • Virtual Appliance: cài đặt trên các hệ thống ảo
  • Kerio Control Box: phần mềm được tích hợp sẵn trong phần cứng (kiểu kiểu như CISCO ASA, PIX Firewall)

Yêu cầu hệ thống

Máy chủ

  • Pentium 1 GHz 
  • 1 GB RAM 
  • 100 MB HDD để cài đặt + không gian dành cho logging và bộ nhớ đệm 
  • 2 giao diện mạng (network interfaces) 
  • Các phiên bản Windows 2000/XP/2003/Vista/2008/7 (32 hoặc 64 bit) 

Kerio VPN Client 

  • 256 MB RAM 
  • 5 MB HDD 
  • Windows 2000/XP/2003/Vista/2008/7 (32 hoặc 64 bit) 
  • Debian 5.0/Ubuntu 7.04 (32 bit) 
  • Mac OS X 10.4 hoặc cao trên trên Mac Intel 

Kerio VPN không người dùng (Clientness VPN) 

  • Internet Explorer 7/8 
  • Firefox 3 
  • Safari 4 

Hướng dẫn cài đặt

1. Tải file ISO image từ website của hãng
2. Burn file iso ra đĩa CD/DVD hoặc hoặc boot từ thẻ nhớ USB
3. Boot từ ổ đĩa CD/DVD hoặc thẻ nhớ
4. Hệ thống boot từ đĩa CD/DVD

5. Cửa sổ Please select installation language hiện ra, bạn chọn ngôn ngữ, ấn phím Enter để tiếp tục quá trình cài đặt
6. Hệ thống đang cài đặt

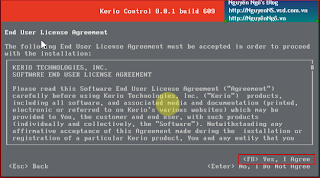
7. Cửa sổ End User License Agreement hiện ra, bạn ấn F8 để đồng ý với thỏa thuận bản quyền

8. Cửa sổ Ready to Install hiện ra, bạn gõ "135" vào ô Confirm, tiếp ấn phím Enter để tiếp tục

9. Hệ thống đang cài đặt

10. Cài đặt hoàn tất, bạn gõ Enter để khởi động lại máy chủ


11. Cửa sổ Local/Administative Network Configuration, bạn chọn Card mạng để đặt IP dùng cho việc quản trị Kerio (thường là card mạng nội bộ - LAN), tiếp ấn Enter


Thiết lập dải IP, đặt cấp phát DHCP tự động, sau đó ấn Enter để hoàn tất

12. Quá trình khởi tạo cấu hình hoàn tất, bạn nhấn Enter để khởi động Kerio Control

13. Địa chỉ để bạn truy cập vào cấu hình
Video hướng dẫn


Hướng dẫn cài đặt (từ hệ điều hành Windows)


Chạy File Setup của Kerio Control

Chọn Custom, Click Next.

Next

Đặt Username và Password quản lý, Next.

Nếu đang cài Kerio Control từ xa, click chọn “I am… remotely”, không thì bỏ qua, click Next.

Clich Install.

 Finish.

Hướng dẫn cấu hình

Từ một máy trạm trong mạng LAN, thiết lập IP về dải 10.10.10.x/24 (hoặc lấy IP tự động từ DHCP do Kerio cấp)
Gõ vào địa chỉ: https://10.10.10.1:4081/admin
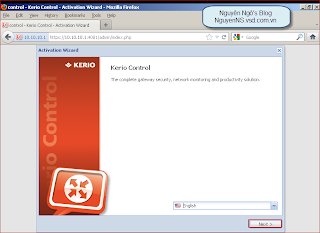
Cửa sổ Kerio Control hiện ra, nhấn Next

Thiết lập múi giờ, thời gian, nhấn Next

Tiếp theo, bạn kích hoạt sản phẩm nếu mua bản quyền, ở đây tôi kích hoạt trial version

Điền các thông tin cá nhân, nhấn Next

Tiếp nhấn Next

Thiếp lập mật khẩu tài khoản quản trị, nhấp Finish để hoàn tất

Nhấp chuột vào Close để hoàn tất
Đăng nhập hệ thống

Hệ thống tạo sẵn 4 Traffic Rule để các máy trạm có thể vào được mạng, các bạn tìm hiểu thêm nhé


Sunday, April 14, 2013

Configure Hotmail, Outlook.com, Gmail, Yahoo or AOL


Do you have a mail account at Live Hotmail, Outlook.com, Gmail, Yahoo! or AOL? This guide contains settings and instructions how to configure Outlook with those email providers.

Account setting dialogs

Most of the information can be set in the main “Add New E-mail Account” dialog but for either account you’ll also need to modify more advanced settings by pressing the “More Settings…” button. The settings below are sorted by the dialog that you need to access. If you are having problems finding out where to put in which information, look at the numbers in front of the settings and you can find them back in the screenshots section at the bottom of this document.

Live Hotmail / Outlook.com

Windows Live Hotmail and Outlook.com offer access via special Outlook Hotmail Connector software, which provides a two-way sync for mail, contacts and calendar, and access via POP3 for paid accounts and free accounts in most countries. In Outlook 2013, you can connect to your Hotmail/Outlook.com account via Exchange Active Sync (EAS).

Outlook Connector
Download and install the Outlook Connector from the location below;
Download: Outlook Hotmail Connector 32-bit
Download: Outlook Hotmail Connector 64-bit
Note: You will only need to install the 64-bit version when you are using the 64-bit version of Outlook 2010.
Start Outlook. If you don’t get prompted to add a new account already then choose;
  • Outlook 2003 and Outlook 2007
    Tools-> Account Settings…Outlook Connector-> Add a New Account…
  • Outlook 2010
    File-> Info-> Add Account-> Manually configure server settings or additional server types-> Other-> Microsoft Outlook Hotmail Connector
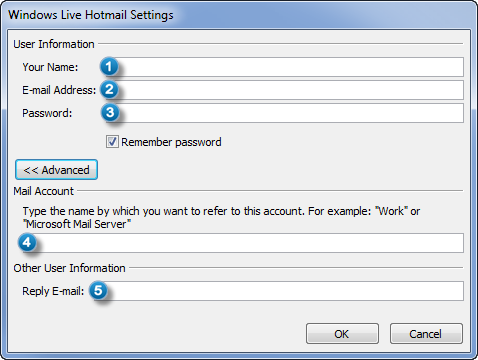
In the screen that pops-up you’ll have to provide your:
1Name:The display name you’d like others to see.
2E-mail address:Your main address of the Microsoft Account in full
(yourname@hotmail.com, yourname@live.com or yourname@outlook.com)
3Password:Your Microsoft Account password
Advanced (optional)
4Account nameThe display name for your account. This name is used in your folder list, in your account settings and when selecting your sending account when composing a message.
5Reply E-mailYou can specify an alternative address here to which replies will be sent when people reply to your messages.

POP3
Add New E-mail Account dialog
1Your Name:The display name you’d like others to see.
2E-mail Address:Your main address of the Microsoft Account in full
(yourname@hotmail.com, yourname@live.com or yourname@outlook.com)
3Account Type:POP3
4Incoming mail server:pop3.live.com
5Outgoing mail server:smtp.live.com
6User Name:Your main address of the Microsoft Account in full
(yourname@hotmail.com, yourname@live.com or yourname@outlook.com)
7Password:Your Microsoft Account password
8Remember passwordoptional
9Require logon using Secure
Password Authentication (SPA)
disabled
More Settings: Outgoing Server tab
10My outgoing server (SMTP) requires authentication:enabled
11Use same settings as my incoming mail server:enabled
More Settings: Advanced tab
12Incoming server (POP3):995
13This server requires an encrypted connection (SSL):enabled
14Outgoing server (SMTP):587 (for some it will be port 25 or 995)
15Use the following type of encrypted connection:SSL or TLS
16Leave a copy of messages on the serveroptional

Exchange ActiveSync (EAS)
Add New E-mail Account dialog
1Your Name:The display name you’d like others to see.
2E-mail Address:Your main address of the Microsoft Account in full
(yourname@hotmail.com, yourname@live.com or yourname@outlook.com)
3Mail server:m.hotmail.com
m.outlook.com
4User Name:Your main address of the Microsoft Account in full
(yourname@hotmail.com, yourname@live.com or yourname@outlook.com)
5Password:Your Microsoft Account password

Gmail

GMail offers access via IMAP and POP3 but you must first enable this. To do this, logon to your Gmail account and press Settings at the top of your screen. In the new page that load click “Forwarding and POP/IMAP”.

IMAP
Add New E-mail Account dialog
1Your Name:The display name you’d like others to see.
2E-mail Address:your Gmail address in full (yourname@gmail.com or yourname@yourdomain.com when using Gmail Apps)
3Account Type:IMAP
4Incoming mail server:imap.gmail.com
5Outgoing mail server:smtp.gmail.com
6User Name:your Gmail address in full (yourname@gmail.com or yourname@yourdomain.com when using Gmail Apps)
7Password:Your Gmail password
8Remember passwordoptional
9Require logon using Secure Password Authentication (SPA)disabled
More Settings: Outgoing Server tab
10My outgoing server (SMTP) requires authentication:enabled
11Use same settings as my incoming mail server:enabled
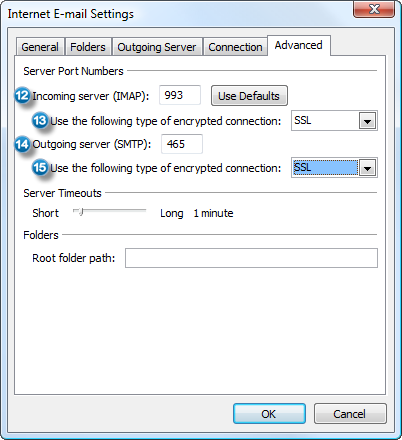
More Settings: Advanced tab
12Incoming server (IMAP):993
13Use the following type of encrypted connection:SSL
14Outgoing server (SMTP):465 (SSL) or 587 (TLS)
15Use the following type of encrypted connection:SSL or TLS
Don’t set Outlook to save the sent items in the Sent Items folder of the IMAP account or you’ll end up with duplicates. When you send via the SMTP server of Gmail, then your Sent Items are automatically placed there. If you are restricted to using another SMTP server (from your ISP for example), then you would still need to configure your account to save to the Sent Items folder.

POP3
Add New E-mail Account dialog
1Your Name:The display name you’d like others to see.
2E-mail Address:your Gmail address in full (yourname@gmail.com or yourname@yourdomain.com when using Google Apps)
3Account Type:POP3
4Incoming mail server:pop.gmail.com
5Outgoing mail server:smtp.gmail.com
6User Name:your Gmail address in full (yourname@gmail.com or yourname@yourdomain.com when using Google Apps)
7Password:Your Gmail password
8Remember passwordoptional
9Require logon using Secure Password Authentication (SPA)disabled
More Settings: Outgoing Server tab
10My outgoing server (SMTP) requires authentication:enabled
11Use same settings as my incoming mail server:enabled
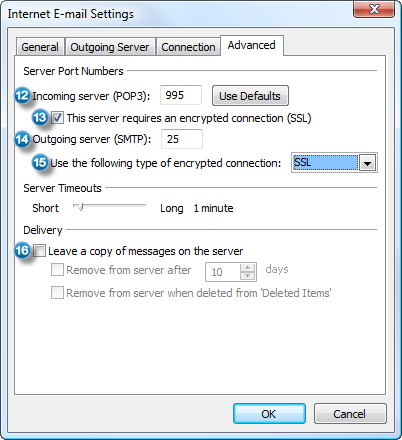
More Settings: Advanced tab
12Incoming server (POP3):995
13Use the following type of encrypted connection:SSL
14Outgoing server (SMTP):465 (SSL) or 587 (TLS)
15Use the following type of encrypted connection:SSL or TLS
16Leave a copy of messages on the serverdisabled (Gmail holds a copy already by default)

Yahoo!

Yahoo! offers POP3 access but only if you have a paid subscription to Yahoo! Mail Plus.

POP3
Add New E-mail Account dialog
1Your Name:The display name you’d like others to see.
2E-mail Address:your Yahoo! address in full (yourname@yahoo.com)
3Account Type:POP3
4Incoming mail server:plus.pop.mail.yahoo.com
5Outgoing mail server:plus.smtp.mail.yahoo.com
6User Name:your Yahoo! address in full (yourname@yahoo.com)
7Password:Your Yahoo! password
8Remember passwordoptional
9Require logon using Secure Password Authentication (SPA)disabled
More Settings: Outgoing Server tab
10My outgoing server (SMTP) requires authentication:enabled
11Use same settings as my incoming mail server:enabled
More Settings: Advanced tab
12Incoming server (POP3):995
13Use the following type of encrypted connection:SSL
14Outgoing server (SMTP):465 (SSL) or 25 (none) or 587 (none)
15Use the following type of encrypted connection:SSL or none
16Leave a copy of messages on the serveroptional

AOL

AOL offers both POP3 and IMAP access. It makes a difference whether you have an AOL address or an AIM address.

IMAP
Add New E-mail Account dialog
1Your Name:The display name you’d like others to see.
2E-mail Address:your AOL or AIM address in full
(yourname@aol.com or yourname@aim.com)
3Account Type:IMAP
4Incoming mail server:imap.aol.com or imap.aim.com
5Outgoing mail server:smtp.aol.com or smtp.aim.com
6User Name:your AOL or AIM screen name
(so without @aol.com or @aim.com behind it)
7Password:Your AOL or AIM password
8Remember passwordoptional
9Require logon using Secure Password Authentication (SPA)disabled
More Settings: Outgoing Server tab
10My outgoing server (SMTP) requires authentication:enabled
11Use same settings as my incoming mail server:enabled
More Settings: Advanced tab
12Incoming server (IMAP):143
13Use the following type of encrypted connection:none
14Outgoing server (SMTP):587
15Use the following type of encrypted connection:none

POP3
1Your Name:The display name you’d like others to see.
2E-mail Address:your AOL or AIM address in full
(yourname@aol.com or yourname@aim.com)
3Account Type:POP3
4Incoming mail server:pop.aol.com or pop.aim.com
5Outgoing mail server:smtp.aol.com or smtp.aim.com
6User Name:your AOL or AIM screen name
(so without @aol.com or @aim.com behind it)
7Password:Your AOL or AIM password
8Remember passwordoptional
9Require logon using Secure Password Authentication (SPA)disabled
More Settings: Outgoing Server tab
10My outgoing server (SMTP) requires authentication:enabled
11Use same settings as my incoming mail server:enabled
More Settings: Advanced tab
12Incoming server (POP3):110
13Use the following type of encrypted connection:none
14Outgoing server (SMTP):587
15Use the following type of encrypted connection:none
16Leave a copy of messages on the serveroptional

Screenshots

Below you’ll find screenshots of the account configuration screens. The numbers in the screenshots correspond with the numbers in the tables with the settings above.
Main settings screen
After setting the main account settings, press the More Settings… button
Configure Authentication
Advanced IMAP settings
Advanced POP3 settings
Settings Outlook Connector
Single screen configuration for the Outlook Connector
howto-outlook.com