
Do you have a mail account at Live Hotmail, Outlook.com, Gmail, Yahoo! or AOL? This guide contains settings and instructions how to configure Outlook with those email providers.
Account setting dialogs
Most of the information can be set in the main “Add New E-mail Account” dialog but for either account you’ll also need to modify more advanced settings by pressing the “More Settings…” button. The settings below are sorted by the dialog that you need to access. If you are having problems finding out where to put in which information, look at the numbers in front of the settings and you can find them back in the screenshots section at the bottom of this document.
Live Hotmail / Outlook.com
Windows Live Hotmail and Outlook.com offer access via special Outlook Hotmail Connector software, which provides a two-way sync for mail, contacts and calendar, and access via POP3 for paid accounts and free accounts in most countries. In Outlook 2013, you can connect to your Hotmail/Outlook.com account via Exchange Active Sync (EAS).
Outlook Connector
Download and install the Outlook Connector from the location below;
Download: Outlook Hotmail Connector 32-bit
Download: Outlook Hotmail Connector 64-bit
Note: You will only need to install the 64-bit version when you are using the 64-bit version of Outlook 2010.
Download and install the Outlook Connector from the location below;
Download: Outlook Hotmail Connector 32-bit
Download: Outlook Hotmail Connector 64-bit
Note: You will only need to install the 64-bit version when you are using the 64-bit version of Outlook 2010.
Start Outlook. If you don’t get prompted to add a new account already then choose;
- Outlook 2003 and Outlook 2007
Tools-> Account Settings…Outlook Connector-> Add a New Account… - Outlook 2010
File-> Info-> Add Account-> Manually configure server settings or additional server types-> Other-> Microsoft Outlook Hotmail Connector
In the screen that pops-up you’ll have to provide your:
| 1 | Name: | The display name you’d like others to see. |
| 2 | E-mail address: | Your main address of the Microsoft Account in full (yourname@hotmail.com, yourname@live.com or yourname@outlook.com) |
| 3 | Password: | Your Microsoft Account password |
Advanced (optional)
| 4 | Account name | The display name for your account. This name is used in your folder list, in your account settings and when selecting your sending account when composing a message. |
| 5 | Reply E-mail | You can specify an alternative address here to which replies will be sent when people reply to your messages. |
POP3
Add New E-mail Account dialog
| 1 | Your Name: | The display name you’d like others to see. |
| 2 | E-mail Address: | Your main address of the Microsoft Account in full (yourname@hotmail.com, yourname@live.com or yourname@outlook.com) |
| 3 | Account Type: | POP3 |
| 4 | Incoming mail server: | pop3.live.com |
| 5 | Outgoing mail server: | smtp.live.com |
| 6 | User Name: | Your main address of the Microsoft Account in full (yourname@hotmail.com, yourname@live.com or yourname@outlook.com) |
| 7 | Password: | Your Microsoft Account password |
| 8 | Remember password | optional |
| 9 | Require logon using Secure Password Authentication (SPA) | disabled |
More Settings: Outgoing Server tab
| 10 | My outgoing server (SMTP) requires authentication: | enabled |
| 11 | Use same settings as my incoming mail server: | enabled |
More Settings: Advanced tab
| 12 | Incoming server (POP3): | 995 |
| 13 | This server requires an encrypted connection (SSL): | enabled |
| 14 | Outgoing server (SMTP): | 587 (for some it will be port 25 or 995) |
| 15 | Use the following type of encrypted connection: | SSL or TLS |
| 16 | Leave a copy of messages on the server | optional |
Exchange ActiveSync (EAS)
Add New E-mail Account dialog
| 1 | Your Name: | The display name you’d like others to see. |
| 2 | E-mail Address: | Your main address of the Microsoft Account in full (yourname@hotmail.com, yourname@live.com or yourname@outlook.com) |
| 3 | Mail server: | m.hotmail.com m.outlook.com |
| 4 | User Name: | Your main address of the Microsoft Account in full (yourname@hotmail.com, yourname@live.com or yourname@outlook.com) |
| 5 | Password: | Your Microsoft Account password |
Gmail
GMail offers access via IMAP and POP3 but you must first enable this. To do this, logon to your Gmail account and press Settings at the top of your screen. In the new page that load click “Forwarding and POP/IMAP”.
IMAP
Add New E-mail Account dialog
| 1 | Your Name: | The display name you’d like others to see. |
| 2 | E-mail Address: | your Gmail address in full (yourname@gmail.com or yourname@yourdomain.com when using Gmail Apps) |
| 3 | Account Type: | IMAP |
| 4 | Incoming mail server: | imap.gmail.com |
| 5 | Outgoing mail server: | smtp.gmail.com |
| 6 | User Name: | your Gmail address in full (yourname@gmail.com or yourname@yourdomain.com when using Gmail Apps) |
| 7 | Password: | Your Gmail password |
| 8 | Remember password | optional |
| 9 | Require logon using Secure Password Authentication (SPA) | disabled |
More Settings: Outgoing Server tab
| 10 | My outgoing server (SMTP) requires authentication: | enabled |
| 11 | Use same settings as my incoming mail server: | enabled |
More Settings: Advanced tab
| 12 | Incoming server (IMAP): | 993 |
| 13 | Use the following type of encrypted connection: | SSL |
| 14 | Outgoing server (SMTP): | 465 (SSL) or 587 (TLS) |
| 15 | Use the following type of encrypted connection: | SSL or TLS |
Don’t set Outlook to save the sent items in the Sent Items folder of the IMAP account or you’ll end up with duplicates. When you send via the SMTP server of Gmail, then your Sent Items are automatically placed there. If you are restricted to using another SMTP server (from your ISP for example), then you would still need to configure your account to save to the Sent Items folder.
POP3
Add New E-mail Account dialog
| 1 | Your Name: | The display name you’d like others to see. |
| 2 | E-mail Address: | your Gmail address in full (yourname@gmail.com or yourname@yourdomain.com when using Google Apps) |
| 3 | Account Type: | POP3 |
| 4 | Incoming mail server: | pop.gmail.com |
| 5 | Outgoing mail server: | smtp.gmail.com |
| 6 | User Name: | your Gmail address in full (yourname@gmail.com or yourname@yourdomain.com when using Google Apps) |
| 7 | Password: | Your Gmail password |
| 8 | Remember password | optional |
| 9 | Require logon using Secure Password Authentication (SPA) | disabled |
More Settings: Outgoing Server tab
| 10 | My outgoing server (SMTP) requires authentication: | enabled |
| 11 | Use same settings as my incoming mail server: | enabled |
More Settings: Advanced tab
| 12 | Incoming server (POP3): | 995 |
| 13 | Use the following type of encrypted connection: | SSL |
| 14 | Outgoing server (SMTP): | 465 (SSL) or 587 (TLS) |
| 15 | Use the following type of encrypted connection: | SSL or TLS |
| 16 | Leave a copy of messages on the server | disabled (Gmail holds a copy already by default) |
Yahoo!
Yahoo! offers POP3 access but only if you have a paid subscription to Yahoo! Mail Plus.
POP3
Add New E-mail Account dialog
| 1 | Your Name: | The display name you’d like others to see. |
| 2 | E-mail Address: | your Yahoo! address in full (yourname@yahoo.com) |
| 3 | Account Type: | POP3 |
| 4 | Incoming mail server: | plus.pop.mail.yahoo.com |
| 5 | Outgoing mail server: | plus.smtp.mail.yahoo.com |
| 6 | User Name: | your Yahoo! address in full (yourname@yahoo.com) |
| 7 | Password: | Your Yahoo! password |
| 8 | Remember password | optional |
| 9 | Require logon using Secure Password Authentication (SPA) | disabled |
More Settings: Outgoing Server tab
| 10 | My outgoing server (SMTP) requires authentication: | enabled |
| 11 | Use same settings as my incoming mail server: | enabled |
More Settings: Advanced tab
| 12 | Incoming server (POP3): | 995 |
| 13 | Use the following type of encrypted connection: | SSL |
| 14 | Outgoing server (SMTP): | 465 (SSL) or 25 (none) or 587 (none) |
| 15 | Use the following type of encrypted connection: | SSL or none |
| 16 | Leave a copy of messages on the server | optional |
AOL
AOL offers both POP3 and IMAP access. It makes a difference whether you have an AOL address or an AIM address.
IMAP
Add New E-mail Account dialog
| 1 | Your Name: | The display name you’d like others to see. |
| 2 | E-mail Address: | your AOL or AIM address in full (yourname@aol.com or yourname@aim.com) |
| 3 | Account Type: | IMAP |
| 4 | Incoming mail server: | imap.aol.com or imap.aim.com |
| 5 | Outgoing mail server: | smtp.aol.com or smtp.aim.com |
| 6 | User Name: | your AOL or AIM screen name (so without @aol.com or @aim.com behind it) |
| 7 | Password: | Your AOL or AIM password |
| 8 | Remember password | optional |
| 9 | Require logon using Secure Password Authentication (SPA) | disabled |
More Settings: Outgoing Server tab
| 10 | My outgoing server (SMTP) requires authentication: | enabled |
| 11 | Use same settings as my incoming mail server: | enabled |
More Settings: Advanced tab
| 12 | Incoming server (IMAP): | 143 |
| 13 | Use the following type of encrypted connection: | none |
| 14 | Outgoing server (SMTP): | 587 |
| 15 | Use the following type of encrypted connection: | none |
POP3
| 1 | Your Name: | The display name you’d like others to see. |
| 2 | E-mail Address: | your AOL or AIM address in full (yourname@aol.com or yourname@aim.com) |
| 3 | Account Type: | POP3 |
| 4 | Incoming mail server: | pop.aol.com or pop.aim.com |
| 5 | Outgoing mail server: | smtp.aol.com or smtp.aim.com |
| 6 | User Name: | your AOL or AIM screen name (so without @aol.com or @aim.com behind it) |
| 7 | Password: | Your AOL or AIM password |
| 8 | Remember password | optional |
| 9 | Require logon using Secure Password Authentication (SPA) | disabled |
More Settings: Outgoing Server tab
| 10 | My outgoing server (SMTP) requires authentication: | enabled |
| 11 | Use same settings as my incoming mail server: | enabled |
More Settings: Advanced tab
| 12 | Incoming server (POP3): | 110 |
| 13 | Use the following type of encrypted connection: | none |
| 14 | Outgoing server (SMTP): | 587 |
| 15 | Use the following type of encrypted connection: | none |
| 16 | Leave a copy of messages on the server | optional |
Screenshots
Below you’ll find screenshots of the account configuration screens. The numbers in the screenshots correspond with the numbers in the tables with the settings above.

After setting the main account settings, press the More Settings… button

Configure Authentication
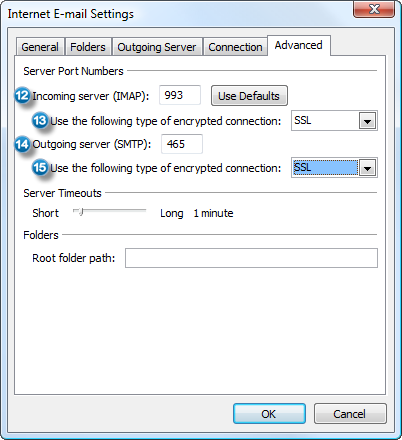
Advanced IMAP settings
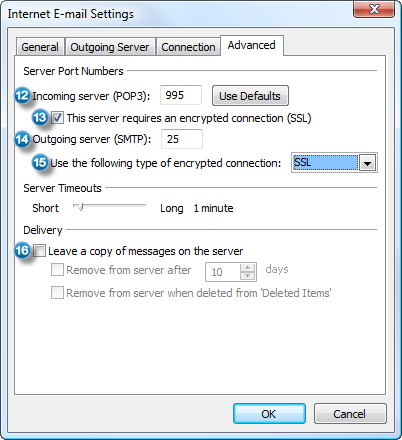
Advanced POP3 settings
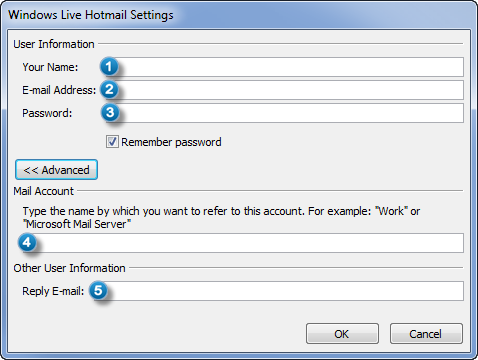
Single screen configuration for the Outlook Connector
howto-outlook.com


