Search This Blog

Tuesday, May 13, 2014

2 Free Microsoft Windows Server 2012 Antivirus Solutions.


2 Free Microsoft Windows Server 2012 Antivirus Solutions.

Hai phần mềm diệt virus miễn phí cho Windows Server 2012

By default, Windows Server 2012 comes without a security solution.
This is especially important if you use 2012 as a robust workstation OS for your studying needs.
So, to protect your time-consuming lab-rat experiments, you might feel left “high and dry“.
‘Though not everything is lost, since there are 2 hacks you might wish to implement to provide a minimum form of protection to your lab.

1. Microsoft Security Essentials for Windows 7 into Windows Server 2012.

The first hack allows you to install Microsoft Security Essentials (MSE).
Microsoft Security Essentials is designed for Windows 7 and is not compatible (nor supported) on Windows Server 2012.
But if you insist, you might as well end-up installing it on your Windows Server 2012.
  1. Download a copy of MSE from Microsoft: http://windows.microsoft.com/en-us/windows/security-essentials-all-versions
  2. Right Click on the “mseinstall.exe”.
  3. Click on Properties.
  4. Click on the “Compatibility”-tab.
  5. Locate the “Compatibility mode”-section.
  6. Check “Run this program in compatibility mode for:”.
  7. Select From the (now active) dropdown menu “Windows 7″.
  8. Open a Command Prompt as Administrator.
  9. cd to your Downloads folder (ie. cd C:\Users\%username%\Downloads).
  10. Run “mseinstall /disableoslimit” and follow the installer prompts to install MSE on your Windows Server 2012.

2. Microsoft Endpoint Protection 2012 (part of the System Center 2012 suite).

Microsoft Endpoint Protection 2012 is part of a freaking awesome Microsoft System Center suite.
For further info, please refer to http://en.wikipedia.org/wiki/System_Center#Microsoft_System_Center
They are all fully integrated & automated Client/Server solutions that satisfy specific system administration requirements (in addition to the already excellent features provided by Windows Server).
Among those, there’s Microsoft Endpoint Protection 2012, which is a Client/Server Security solution that fully integrates with your Active Directory Domain.
In layman’s words, Microsoft Endpoint Protection 2012 could be considered as the “full” version of Microsoft Security Essentials (aka Windows Defender on Windows 8/8.1).
The solution includes both a “Server” application (ie. to deploy on your application server) and a “Client” counterpart (ie. for your workstations).
  • The hack here is the possibility to run the Client as a “standalone” product (ie. without the Server application).
Not only, you can get the client “for free”, by simply downloading the Trial version of the entire Microsoft Endpoint Protection 2012 suite (trial refers to the Server Application).
To install System Center 2012 Endpoint Protection on Windows Server 2012 proceed as follows:
  • Download Microsoft System Center Configuration Manager and Enpoint Protection 2012 SP1 from the following address:
http://technet.microsoft.com/en-US/evalcenter/hh667640.aspx?wt.mc_id=TEC_105_1_33
Once you obtain the package (mine was named SC2012_SP1_RTM_SCCM_SCEP.exe and it was 613MB):
  1. Right Click on it and open the archive with 7zip.
  2. Extract the “CLIENT”-Folder from SC2012_SP1_RTM_SCCM_SCEP.exe into a temporary location.
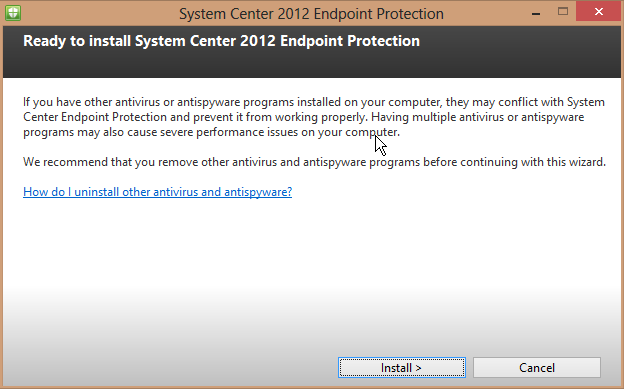
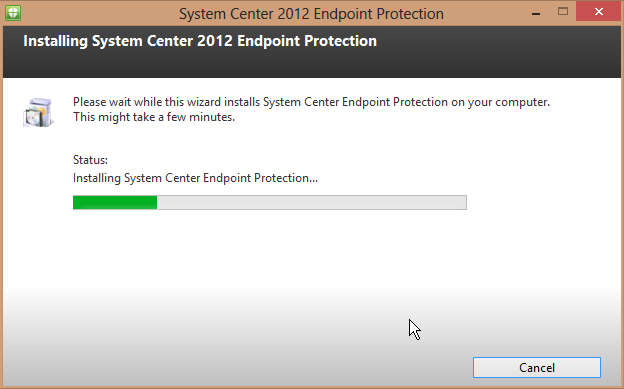
  3. Browse to the CLIENT folder with Windows Explorer and run “SCEPINSTALL.exe”.
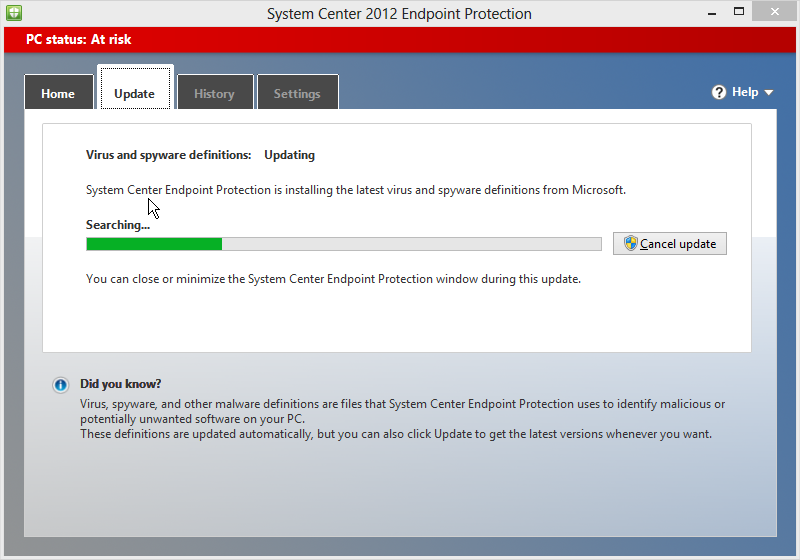
  4. Follow the installer Prompts and you’ll end up with a fully featured  Security Solution courtesy of Microsoft.
System Center 2012 Endpoint Protection System Center 2012 Endpoint Protection System Center 2012 Endpoint Protection System Center 2012 Endpoint Protection


Personal remarks.

Now, apart from what’s moral and what’s not, Microsoft highly likely wishes you to “give it a go” (at their own Security solutions).
Despite glorious bugs that made glowing news during the previous decade, Microsoft takes a serious stand when it comes to Security.
How?! For one, by constantly releasing Windows “Security Updates”.
Pair that with a basic form of malware protection and you might just end up covering 80% of your security needs.
Independent testing says:”meh..!“.
If you asked me what’s my favourite professional security suite, I’d say:”it depends“.
If you’re an SMB with limited resources (and perhaps close to none IT personnel), then I’d lean towards a fully managed OOB solution (like Bitdefender).
If you’re a Windows-only Enterprise or Government organization, then I’d lean towards a secured Active Directory domain environment (ie. w/Applocker & IPSec), with the integration & automation provided by Microsoft System Center-based solutions (such as Endpoint Protection 2012).
Thoughts welcome.

[UPDATE] 2014-02-12 -- Windows Server 2012 R2 compatibility:

Jens (a reader of this article), reports SCCM 2012 SP1 is not working on his Windows Server 2012 R2.
  • I tried to run MS SCCM 2012 R2 EP Client on Windows Server 2012 R2 Datacenter and it just worked!
So yes, the above procedure is confirmed to work on Windows Server 2012 R2 -- provided you use Microsoft System Center 2012 R2 Endpoint Protection Client.

Updated procedure for Windows Server 2012 R2.

  1. Obtain SCCM 2012 R2 TRIAL from http://technet.microsoft.com/en-us/evalcenter/dn205297.aspx
  2. Extract the SCCM 2012 R2 EP “Client”-Folder from SC2012_R2_SCCM_SCEP.exe.
  3. Run “SCEPINSTALL.exe” as Admin.

http://www.pwrusr.com

Tuesday, March 25, 2014

Tạo nhóm và người dùng Notes

(Notes user registration and groups)
Trong suốt quá trình setup server, tài khoản Administrator tự động được tạo. Trong bài này, tôi sẽ giới thiệu với các bạn, cách tạo (đăng ký) người dùng trong Notes (Notes user registration).
Để việc quản trị được dễ dàng hơn, bạn nên quản lý việc truy cập và server hoặc database bằng cách sử dụng nhóm.

Thế nào là đăng ký người dùng Notes?

Đăng ký người dùng Notes là một tiến trình mà bạn phải:

  • Tạo một tài liệu người dùng Person document trong Domino Directory
  • Tạo một file Notes User ID, và việc này phụ thuộc vào kiểu hệ thống mail mà người dùng sử dụng, lưu nó vào một hoặc nhiều nới trong những nơi sau:
  • Person document
  • Trên ổ đĩa của máy tính
  • Trong mail file của người dùng
  • Trong Address book của người dùng
  • Gửi tới Notes User ID Vault
  • Nếu người dùng sử dụng Notes Mail, tạo Mail database trên máy chủ
  • Bạn có thể gán người dùng vào một hoặc nhiều nhóm
  • Nếu bạn sử dụng Windows Server và đã cài đặt + cấu hình Domino Directory Sync Services, tạo người dùng trong Domino sẽ tạo luôn trên Windows Server, thêm người dùng vào Nhóm trong Domino sẽ thêm người dùng vào nhóm trong Windows
Người dùng được đăng ký sẽ không "active" cho đến khi bạn cài đặt Notes Client.

Tạo người dùng Notes

Bước 1: Trước khi bạn đăng ký người dùng, bạn phải truy cập vào file ID, mặc định Domino sẽ truy cập vào file Cert.ID, ở đây tôi chọn file OU.ID
Bước 2: Từ công cụ Domino Adminitrator chọn tab Configuration
Bước 3: Mở rộng công cụ Registration, chọn Person
Bước 4: Bước tiếp theo phụ thuộc vào bạn đã đăng ký người dùng lần nào chưa
Nếu Domino Administrator đã sử dụng ID để đăng ký người dùng lần trước, thì lần này bạn chỉ việc nhập mật khẩu của ID đã dùng.
Nếu đúng là cert mà bạn cần, điền vào mật khẩu của Certifier ID file và nhấn chuột vào OK
Nếu không phải cert ID bạn cần, nhấn chuột vào Cancel. Sau đó hệ thống sẽ hiện hộp thoại cho bạn chọn cert ID khác.
Bước 5: Nếu Domino Administrator chưa sử dụng để đăng ký người dùng lần nào, bạn sẽ phải chọn Registration Server và Certifier ID:
Nhấn chuột vào:
Server: để chọn Server mà bạn muốn sử dụng để đăng ký
Certifier ID: Để lựa chọn Certifier ID file
Nhấn chuột vào OK, sau đó nhập vào mật khẩu
Bước 6: Hộp thoại Person Registration hiện ra, hình dưới thể hiện một phần của hộp thoại

Bước 7: Nếu Registration Server hiện lên, không phải là server bạn muốn dùng để đăng ký, bạn nhấn chuột vào Registration Server để chọn server cần đăng ký.
Bước 8: Điền vào Fist và last name
Bước 9: Điền vào mật khẩu phù hợp với chính sách về độ phức tạp của mật khẩu
Chú ý 1: Để thiết lập độ phức tạp của mật khẩu, nhấn chuột vào Password Option. Nếu bạn lựa chọn Set internet password trong trường Internet password. Thì mật khẩu này sử dụng để xác thực qua trình duyệt web mà còn cho các giao thức khác (LDAP, POP3, HTTP, SMTP...). Nếu bạn không sử dụng trình duyệt web để xác thực vào hệ thống, thì bạn không cần thiết lập Internet Password.
Chú ý 2: Mỗi người dùng Domino có thể có 1 hoặc hai mật khẩu ( Mật khẩu của file Notes ID và mật khẩu để xác thực khi sử dụng trình duyệt web HTTP) cái này tùy thuộc vào thiết lập của người quản trị.
Bước 10: Nhấn chuột và Advanced để hiện thị thêm lựa chọn
Bước 11: Nhấn chuột vào Mail tab, đây là nơi bạn thiết lập các cấu hình hòm thư cho người dùng.
Bước 12: Nhấn chuột vào ID Infor tab để ý rằng cách hiển thị tên cert, nếu thấy chưa đúng hoặc chưa hợp lý bạn hãy chỉnh lại
Bước 13: nhấn chuột vào Group tab, đây là nơi bạn muốn đưa người dùng vào nhóm nào.
Nếu bạn không muốn đưa người dùng vào nhóm nào thì bỏ qua bước này.
Bước 14: Nhấn chuột vào nút tích để đăng ký một người
Bước 15: Nhấn chuột vào nút để hệ thống hoàn tất. Đăng ký xong, nhấn chuột vào nút Done để đóng hộp thoại đăng ký
Bước 16: Xem kết quả, nhấn chuột vào People, bạn sẽ nhìn thấy người dùng mình vừa đăng ký ở khung bên phải, nếu không thấy ấn phím F9 để refesh lại khung nhìn.

Tại sao phải sử dụng nhóm

Nếu bạn chỉ có một số lượng nhỏ người dùng trong Domino Domain, thì bạn không cần phải nghĩ tới việc sử dụng nhóm. Nhưng nhóm là một phần bảo mật của server và database, sẽ hiệu quả hơn khi bạn phân quyền bằng nhóm thay vì việc sử dụng tên từng user trong mục Server Access Lists và Database Access Control Lists (ACLs).
Để việc quản trị dễ dàng hơn, bạn có thể điều khiển truy cập tới server hoặc databse bạn có thể sử dụng kiểu server/user:
  • Những thành viên trong nhóm được lưu trong Group document
  • Tên tổ chức có thể được thay thế bằng ký tự đại diện: ví dụ */vsd hoặc */vsd/com/vn, sẽ nhanh hơn khi so với Group khi server truy vấn

Các nhóm chuẩn của Domino

  • LocalDomainServers: có quyền truy cập tới tất cả server, quản lý truy cập tới tất cả databases, có quyền tạo database, tạo đồng bộ hóa
  • Terminations: danh sách những người bạn muốn từ chối truy cập tới tất cả server
  • Developers: có quyền truy cập và tạo databases trên tất cả server
  • Department X, DepartmentY, Department Z: sử dụng để điều khiển truy cập và gửi mail cho những người thuộc nhóm
  • WholeCompany hoặc LocalDomainPeople: bao gồm các nhóm phòng ban có quyền truy cập tới tất cả server và mail server
  • OtherDomainServers: đại diện cho server thuộc công ty khác, hạn chế truy cập tới server và database
  • OtherDomainUsers: giống OtherDomainServers
  • WebUsers: điều khiển truy cập từ trình duyệt tới database

 Tạo nhóm

Bước 1: Đăng nhập vào Domino Administrator, chọn tab People & Groups
Bước 2: Mở rộng khung nhìn Domino Directory và chọn Groups
Bước 3: nhấn chuột vào Add Group
Bước 4: Hoàn thiện các trường trong phần tạo nhóm, nhấn chuột Save & Close để hoàn tất