Search This Blog

Friday, July 24, 2015

Getting Started with SQL Server 2014 In-Memory OLTP

SQL Server 2014 introduces memory-optimized database technology for optimizing the performance of OLTP workloads. In particular, it introduces memory-optimized tables for efficient, contention-free data access, and natively compiled stored procedures for efficient execution of business logic.    
With this post we are giving you a brief introduction to the new syntax for in-memory OLTP, and will show you how to get started with T-SQL and SQL Server Management Studio (SSMS).    
Before we start, let’s create a sample database. If you have an existing database you can skip this step.

-- optional: create database
CREATE DATABASE imoltp
GO

SSMS: To create a database,
1.    In Object Explorer, connect to an instance of the SQL Server Database Engine and then expand that instance.
2.    Right-click Databases, click New Database and then enter the value for the database name.


Step 1: enable your database for in-memory OLTP
We are going to add a filegroup for memory_optimized_data to our database, and add a container to this filegroup. This filegroup will be used to guarantee durability of memory-resident data in the event of a server crash or restart. During the crash recovery phase in server startup, the data is recovered from this filegroup and loaded back into memory.
When creating the container in the memory_optimized_data filegroup you must specify the storage location. In this example we picked the folder ‘c:\data’. Make sure the folder exists before running the script.
-- enable for in-memory OLTP - change file path as needed
ALTER DATABASE imoltp ADD FILEGROUP imoltp_mod CONTAINS MEMORY_OPTIMIZED_DATA
ALTER DATABASE imoltp ADD FILE (name='imoltp_mod1', filename='c:\data\imoltp_mod1') TO FILEGROUP imoltp_mod
GO

SSMS: To add a memory_optimized_data filegroup and its container,
1.    In Object Explorer, expand the Databases node, right-click your database and then click Properties.
2.    To add a new memory optimized data filegroup, click the Filegroups page. Under MEMORY OPTIMIZED DATA, click Add filegroup and then enter the values for the filegroup.
3.    To add a file to the filegroup, click the General page. Under Database files, click Add and then enter the values for the file. Use file type FILESTREAM Data.

Getting Started with SQL Server 2014 In-Memory OLTP
Getting Started with SQL Server 2014 In-Memory OLTP Part 2
 
Step 2: create your first memory-optimized table

We are now ready to create our first memory-optimized tables. We have here two tables, ‘ShoppingCart’, and ‘UserSession’. ‘ShoppingCart’ is a durable table (the default), which means that its contents are persisted on disk and will not be lost on a server crash. ‘UserSession’ is a non-durable table (DURABILITY=SCHEMA_ONLY), which means that the contents of the table exist only in memory, and are lost on server restart.
Note that in CTP1 memory-optimized tables support only ‘nonclustered hash’ indexes. The bucket_count of the index should be roughly 1 to 2 times the number of unique index keys you expect to find in the table.
-- create memory optimized tables
USE imoltp
GO

-- durable table – contents of this table will not be lost on a server crash
CREATE TABLE dbo.ShoppingCart (
   ShoppingCartId int not null primary key nonclustered hash with (bucket_count=2000000),
   UserId int not null index ix_UserId nonclustered hash with (bucket_count=1000000),
   CreatedDate datetime2 not null,
   TotalPrice money
)
WITH (MEMORY_OPTIMIZED=ON)
GO

-- non-durable table – contents of this table are lost on a server restart
CREATE TABLE dbo.UserSession (
   SessionId int not null primary key nonclustered hash with (bucket_count=400000),
   UserId int not null,
   CreatedDate datetime2 not null,
   ShoppingCartId int,
   index ix_UserId nonclustered hash (UserId) with (bucket_count=400000)
)
WITH (MEMORY_OPTIMIZED=ON, DURABILITY=SCHEMA_ONLY)
GO

SSMS: To create a memory-optimized table,
1.    In Object Explorer, right-click the Tables node of your database, click New, and then click Memory Optimized Table. A template for creating a memory-optimized table is displayed.
2.    To replace the template parameters, click Specify Values for Template Parameters on the Query menu. The shortcut key is Ctrl-Shift-M.

Step 3: load your data
You can load data into the tables in various ways, including INSERT .. SELECT from an existing disk-based table and BCP. In this example we are using simple INSERT statements for loading the data.
-- Basic DML
-- insert a few rows
INSERT dbo.UserSession VALUES (1,342,GETUTCDATE(),4)
INSERT dbo.UserSession VALUES (2,65,GETUTCDATE(),NULL)
INSERT dbo.UserSession VALUES (3,8798,GETUTCDATE(),1)
INSERT dbo.UserSession VALUES (4,80,GETUTCDATE(),NULL)
INSERT dbo.UserSession VALUES (5,4321,GETUTCDATE(),NULL)
INSERT dbo.UserSession VALUES (6,8578,GETUTCDATE(),NULL)
INSERT dbo.ShoppingCart VALUES (1,8798,GETUTCDATE(),NULL)
INSERT dbo.ShoppingCart VALUES (2,23,GETUTCDATE(),45.4)
INSERT dbo.ShoppingCart VALUES (3,80,GETUTCDATE(),NULL)
INSERT dbo.ShoppingCart VALUES (4,342,GETUTCDATE(),65.4)
GO

-- verify table contents
SELECT * FROM dbo.UserSession
SELECT * FROM dbo.ShoppingCart
GO

SSMS: To view the contents of a memory-optimized table,
⦁    In Object Explorer, right-click on your memory-optimized table, click on Script Table as, click on SELECT To, click on New Query Editor Window and then execute the query that is displayed.

Step 4: update statistics
Memory-optimized tables do not support auto_update_statistics, thus statistics will need to be updated manually. You can use UPDATE STATISTICS to update statistics for individual tables, or sp_updatestats for all tables in the database.
-- update statistics on memory optimized tables
UPDATE STATISTICS dbo.UserSession WITH FULLSCAN, NORECOMPUTE
UPDATE STATISTICS dbo.ShoppingCart WITH FULLSCAN, NORECOMPUTE
GO

Step 5: run queries
You are now ready to run your queries. Because they access memory-optimized tables, these queries will benefit from the latch-free data structures and more efficient data access. Here are a few examples.
-- in an explicit transaction, assign a cart to a session and update the total price.
-- note that the isolation level hint is required for memory-optimized tables with
-- SELECT/UPDATE/DELETE statements in explicit transactions
BEGIN TRAN
  UPDATE dbo.UserSession WITH (SNAPSHOT) SET ShoppingCartId=3 WHERE SessionId=4
  UPDATE dbo.ShoppingCart WITH (SNAPSHOT) SET TotalPrice=65.84 WHERE ShoppingCartId=3
COMMIT
GO
-- verify table contents
SELECT *
FROM dbo.UserSession u JOIN dbo.ShoppingCart s on u.ShoppingCartId=s.ShoppingCartId
WHERE u.SessionId=4
GO

Step 6: create natively compiled stored procedures
To further optimize the access to memory-optimized tables, and to optimize execution of your business logic, you can create natively compiled stored procedures. While these procedures are written using Transact-SQL, they do not support the full Transact-SQL surface area. For details, see Books Online.
Here is an example of a natively compiled stored procedure that accesses the tables we created previously.
-- natively compiled stored procedure for assigning a shopping cart to a session
CREATE PROCEDURE dbo.usp_AssignCart @SessionId int
WITH NATIVE_COMPILATION, SCHEMABINDING, EXECUTE AS OWNER
AS
BEGIN ATOMIC
WITH (TRANSACTION ISOLATION LEVEL = SNAPSHOT, LANGUAGE = N'us_english')

  DECLARE @UserId int,
    @ShoppingCartId int

  SELECT @UserId=UserId, @ShoppingCartId=ShoppingCartId
  FROM dbo.UserSession WHERE SessionId=@SessionId

  IF @UserId IS NULL
    THROW 51000, 'The session or shopping cart does not exist.', 1

  UPDATE dbo.UserSession SET ShoppingCartId=@ShoppingCartId WHERE SessionId=@SessionId
END
GO

EXEC usp_AssignCart 1
GO

The following stored procedure showcases the performance of natively compiled stored procedures by inserting a large number of rows into a memory-optimized table. This scripts inserts 1,000,000 rows.
Note that if log IO becomes a bottleneck in the application, SQL Server allows you to use a non-durable table (DURABILITY=SCHEMA_ONLY), which removes the log IO completely.
-- natively compiled stored procedure for inserting a large number of rows
--   this demonstrates the performance of native procs
CREATE PROCEDURE dbo.usp_InsertSampleCarts @StartId int, @InsertCount int
WITH NATIVE_COMPILATION, SCHEMABINDING, EXECUTE AS OWNER
AS
BEGIN ATOMIC
WITH (TRANSACTION ISOLATION LEVEL = SNAPSHOT, LANGUAGE = N'us_english')

  DECLARE @ShoppingCartId int = @StartId
  WHILE @ShoppingCartId < @StartId + @InsertCount
  BEGIN
    INSERT INTO dbo.ShoppingCart VALUES
         (@ShoppingCartId, 1, '2013-01-01T00:00:00', NULL)
    SET @ShoppingCartId += 1
  END

END
GO

-- insert 1,000,000 rows
DECLARE @StartId int = (SELECT MAX(ShoppingCartId)+1 FROM dbo.ShoppingCart)
EXEC usp_InsertSampleCarts @StartId, 1000000
GO

-- verify the rows have been inserted
SELECT COUNT(*) FROM dbo.ShoppingCart
GO

SSMS: To create a natively compiled stored procedure,
1.    In Object Explorer, right-click the Stored Procedures node of your database, click New, and then click Natively Compiled Stored Procedure. A template for creating natively compiled stored procedures is displayed.
2.    To replace the template parameters, click Specify Values for Template Parameters on the Query menu. The shortcut key is Ctrl-Shift-M.

For more details about the concepts for in-memory OLTP, as well as a reference of the syntax, see Books Online or get started and download SQL Server 2014 CTP1 here.
That’s all for today, but stay tuned for further posts on this blog!   
http://blogs.technet.com

Saturday, April 25, 2015

Cho thuê hệ thống một cửa điện tử

Cho thuê hệ thống một cửa điện tử
Thuê phần mềm một cửa điện tử
Thuê dịch vụ công nghệ thông tin

Tuesday, February 3, 2015

Hệ thống Quản lý tài liệu lưu trữ

I. Giới thiệu chung:
  • Hệ thống Quản lý Tài liệu lưu trữ là hệ thống được sử dụng để quản lý, lưu trữ, bảo toàn và phân phối các tài liệu của tổ chức.
  • Hệ thống Quản lý Tài liệu lưu trữ nhắm đến mục tiêu làm việc quản lý thông tin trong doanh nghiệp trở nên dễ dàng hơn thông qua việc đơn giản hóa lưu trữ, bảo mật và sử dụng. Nhờ đó, một tổ chức sẽ được nhiều lợi ích như: hiệu suất gia tăng, khả năng kiểm soát tốt hơn và giảm thiểu chi phí.
  • Hệ thống Quản lý Tài liệu lưu trữ nhằm tin học hóa và thống nhất các hình thức lưu trữ, trao đổi, tìm kiếm, chia sẻ thông tin hồ sơ trong tổ chức.
  • Xây dựng hệ thống các kho Hồ sơ điện tử, khắc phục một cách cơ bản tình trạng mất mát, thất lạc hồ sơ.
  • Quản lý toàn bộ hồ sơ của phòng ban, của tổ chức

II. Chức năng dùng chung:
1. Tra cứu hồ sơ:
Người sử dụng có thể tra cứu hồ sơ theo những danh sách lựa chọn:


2. Tìm kiếm nâng cao:
Tại giao diện trang chủ cũng như tại những danh sách tra cứu hồ sơ đều cho phép chọn chức năng tìm kiếm hồ sơ nâng cao.

3. Tìm kiếm toàn văn hồ sơ:
Hệ thống hỗ trợ người sử dụng tìm kiếm toàn văn thông tin của hồ sơ, tìm kiếm theo nội dung file gắn kèm là file có đuôi dạng  txt, doc, docx, chuẩn pdf, xls, xlsx…. Tại trang chủ hoặc các trang danh sách đều có ô tìm kiếm toàn văn hồ sơ.

III. Quản lý hồ sơ:
1. Tạo mới hồ sơ (tạo, sửa, xóa):


Đính kèm các văn bản liên quan (nếu có)


Thêm những người có quyền xem hồ sơ.

2. Xem lịch sử thay đổi của hồ sơ:
Khi người sử dụng thêm file đính kèm, xóa file hoặc chia sẻ hồ sơ cho người khác xem, hệ thống sẽ lưu lại lịch sử thay đổi của hồ sơ.


IV. Thùng rác
Những hồ sơ đã xóa sẽ không xóa hoàn toàn khỏi hệ thống mà sẽ được đưa vào thùng rác, chỉ người có quyền quản trị hệ thống mới thấy được chức năng thùng rác. Tại chức năng thùng rác người quản trị hệ thống có thể khôi phục lại hồ sơ đã xóa hoặc xóa hoàn toàn hồ sơ khỏi hệ thống.


Mọi chi tiết xin liên hệ

Hỗ trợ kinh doanh:
  • Nguyễn Quang Tuấn - 04.62737300,  0912.068.823 (nqtuan@vsd.com.vn)
Hỗ trợ kỹ thuật:
  • Phùng Quốc Hoàn - 04.62737311 (pqhoan@vsd.com.vn)

Thursday, December 4, 2014

How to enable detailed errors for remote client - IIS7

By default IIS 7.0 (Internet Information Service), shows the detailed error when you're browsing locally, but if you are remoting as a normal web client to the webserver, you won't be able to see the error, except the default '500 - Internal server error'.
Here is the guide to enable the detailed error, within IIS 7.0
First of all, you need access to IIS controlpanel, and the Webconfig from the specific website, you want's to see the detailed error from. In the Webconfig, it's very important that you have specified the CustomError mode to Off, otherwise your local configs would overwrite the server default settings. Please check you got the same setup as the example below.
<system.web>
<customErrors mode="Off" />
</system.web>

If you still receive the default error, you have to change the server custom error module settings. You can do this from the IIS7 Admin tool by running the server manager, or writing inetmgr.exe from the Run command.
  1. Select your website, at the left menu
  2. Click on the "Error Pages" button
  3. Click on the action "Edit Feature Settings" at the right menu
  4. Pick the "Detailed errors" option
  5. Confirm the change by clicking "OK"

You should now be able to see the detailed error from the IIS7 webserver, from your remote location. Check the picture below, to verify you got the same settings.
http://dnohr.dk

Wednesday, July 23, 2014

Windows - Certificate Auto Enrollment Fails

KB ID 0000921 Dtd 01/02/14

Problem

I was trying to get Windows 7 to auto enroll with a CA on Windows 2008 R2, after a couple of reboots the certificates were simply not appearing on the test client I was working on.

Solution

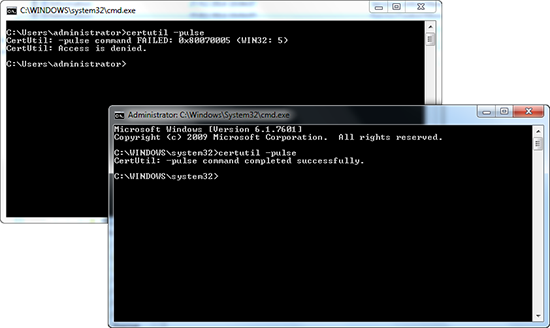
1. Test to make sure the client can see the CA, and is able to communicate with it, issue the following command;
certutil -pulse
CertUtil -pulse failed
As you can see above, the first time I ran the command I got the following error;
CertUtil: -pulse command FAILED: 0x80070005 (WIN32: 5)
CertUtil: Access is denied.

I then ran the command window 'as administrator' and it completed, this was the first inkling I had, that permissions were probably not right.
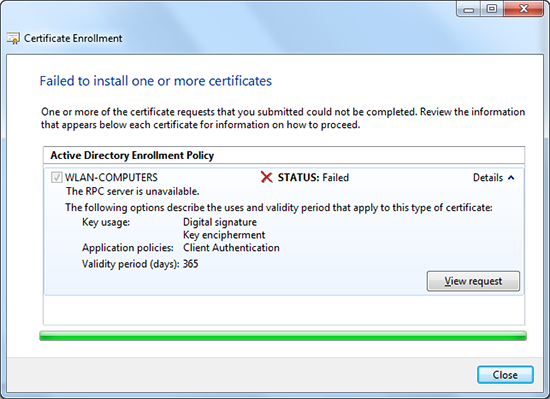
2. Run mmc on an affected machine, and add in the certificates (local computer*) snap-in. right click the 'personal container' > attempt to get the certificate you have published manually.
*Or local user if you are auto enrolling user certificates.
Certifcate RPC server is unavailble
At that point I got this error;
Active Directory Enrollment Policy
STATUS: Failed
The RPC server is unavailable.

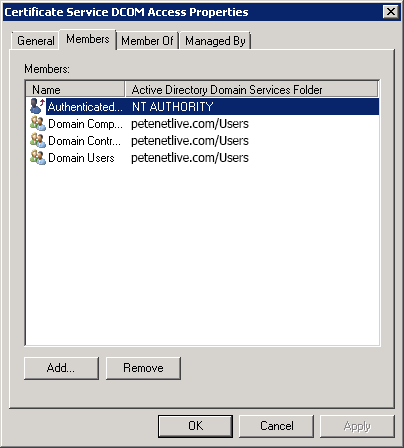
3. The most common cause for that error, is the membership of the 'Certificate Service DCOM Access' group is incorrect, check yours and make sure it matches the one below.
Certificate Servi DCOM Access Group Membership
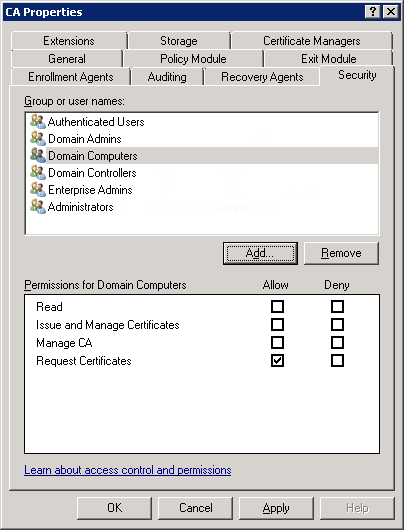
4. On the CA Server launch the Certification Authority management tool and look at the properties of the CA Server itself, on the security tab make sure yours looks like this, (Domain computer and domain controllers should have the 'request certificates' rights).
CA Server Security Settings
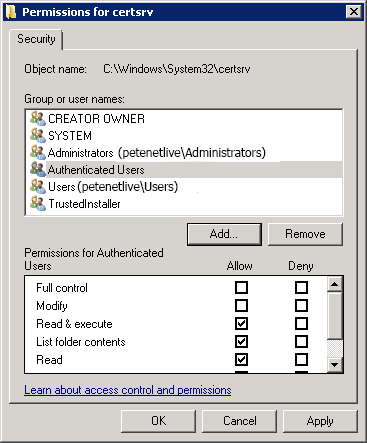
5. Still on the CA Server, check the permissions on the C:\Windows\System 32\certsrv directory, authenticated users should have Read & Execute rights.
certsrv folder pemissions
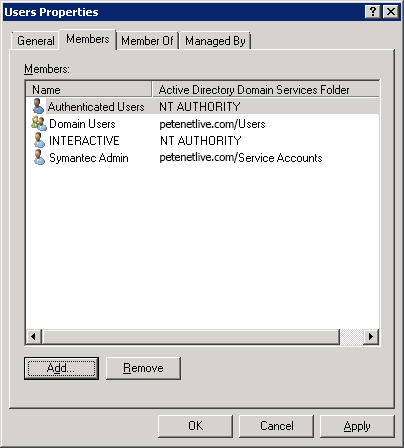
6. This is the change that finally fixed mine: In active directory users and computers, locate the Builtin container, within it there is a group called 'Users'. Make sure it contains Authenticated Users and INTERACTIVE.
Builtin users group membership
7. Run a 'gpupdate /force' on your test client, and/or reboot it.
www.petenetlive.com

Thursday, July 10, 2014

Sao lưu và phục hồi trong Windows

Đối với người quản trị hệ thống thì việc sao lưu và phục hồi dữ liệu là một công việc quyết định sự tồn tại của họ nói riêng và của cả công ty họ nói chung. Dữ liệu là tài sản vô cùng quí giá đối với bất kì tổ chức nào. 
A.     Back up có các dạng sau: Normal, Differential, Incremental, Copy và Daily.
1.      Normal:
ü      Back up toàn bộ dữ liệu mà ta cấu hình “job” cho dữ liệu đó.
ü      Xóa marker, nghĩa là sau khi backup xong windows sẽ ghi nhận là dữ liệu đã được back up.
2.      Differential:
ü      Chỉ back up những phần dữ liệu có sự thay đổi mà ta cấu hình “job” cho dữ liệu đó.
ü      Không xóa marker, nghĩa là sau khi backup xong windows sẽ ghi nhận là dữ liệu chưa được back up.
3.      Incremental:
ü      Chỉ back up những phần dữ liệu có sự thay đổi mà ta cấu hình “job” cho dữ liệu đó.
ü      Xóa marker, nghĩa là sau khi backup xong windows sẽ ghi nhận là dữ liệu đã được back up.
4.      Copy:
ü      Back up toàn bộ dữ liệu mà ta cấu hình “job” cho dữ liệu đó.
ü      Xóa marker, nghĩa là sau khi backup xong windows sẽ ghi nhận là dữ liệu chưa được back up.
5.      Daily:
ü      Chỉ back up những dữ liệu bị thay đổi trong ngày hiện tại mà ta cấu hình “job” cho dữ liệu đó.
ü      Không xóa marker, nghĩa là sau khi backup xong windows sẽ ghi nhận là dữ liệu chưa được back up.
B.     Sự kết hợp của các kiểu back up
Chúng ta có các kiểu kết hợp thông dụng sau:
ü      Normal + Incremetal.
ü      Normal + Differential.
ü      Normal + Differential + Copy.
Ví dụ: ta có dữ liêu sau cần back up.
retore

Khi đó, mỗi sự kết hợp khác nhau sẽ có cách hoạt động khác nhau, sau đây chúng ta sẽ tìm hiểu từng kiểu back up đã nêu trên.
1.      Normal + Incremetal:
Ta cấu hình chúng thực hiện back up theo bảng sau:
Thứ
Hai
Ba
Năm
Sáu
Bảy
Kiểu Back up
Normal
Incremetal
Incremetal
Incremetal
Incremetal
Incremetal
File lưu trữ
N2.bkf
I3.bkf
I4.bkf
I5.bkf
I6.bkf
I7.bkf

Diển giải:
File N2.bkf sẽ chứa tất cả các dữ liệu mà ta cấu hình “job” thực hiện back up cho dữ liệu đó.
Các file: I3.bkf, I4.bkf, I5.bkf, I6.bkf và I7.bkf chỉ chứa những dữ liệu mà có thay đổi trong các ngày tương ứng lần lược từ thứ Ba, Tư, Năm, Sáu và Bảy. 
Nếu chúng ta cần phục hồi dữ liệu của ngày thứ năm thì ta se restore lần lược các file sau đây:
N2.bkf -> I3.bkf -> I4.bkf -> I5.bkf. (Restore 4 file) 
Tóm lại, ưu khuyết điểm của kiểu này như sau:
Ưu: back up nhanh.
Khuyết: resotre chậm.

2.      Normal + Differential:
Ta cấu hình chúng thực hiện back up theo bảng sau:

Thứ
Hai
Ba
Năm
Sáu
Bảy
Kiểu Back up
Normal
Differential
Differential
Differential
Differential
Differential
File lưu trữ
N2.bkf
D3.bkf
D4.bkf
ID5.bkf
D6.bkf
D7.bkf

Diển giải:
File N2.bkf sẽ chứa tất cả các dữ liệu mà ta cấu hình “job” thực hiện back up cho dữ liệu đó.
File D3.bkf chỉ chứa những thay đổi của ngày thứ Ba.
File D4.bkf chứa những thay đổi của ngày thứ Ba và Tư.
File D5.bkf chứa những thay đổi của ngày thứ Ba, Tư và Năm.
File D6.bkf chứa những thay đổi của ngày thứ Ba, Tư, Năm và Sáu.
File D7.bkf chứa những thay đổi của ngày thứ Ba, Tư, Năm, Sáu và Bảy.
Nếu chúng ta cần phục hồi dữ liệu của ngày thứ năm thì ta se restore lần lược các file sau đây:
N2.bkf -> D5.bkf. (Restore 2 file)
Tóm lại, ưu khuyết điểm của kiểu này như sau:
Ưu: back up chậm.
Khuyết: resotre nhanh.

3.      Normal + Differential + Copy:
Ta cấu hình chúng thực hiện back up theo bảng sau:

Thứ
Hai
Ba
Năm
Sáu
Bảy
Kiểu Back up
Normal
Differential
Differential
Differential
Copy
Differential
Differential
File lưu trữ
N2.bkf
D3.bkf
D4.bkf
D5.bkf
C5.bkf
D6.bkf
D7.bkf

Diển giải:
Kiểu kết hợp này tương tự như kiểu 2, nhưng vấn đề đặt ra là, khi chúng ta đã cấu hình sẵn sàng cho hệ thống thực hiện back up tự động các ngày trong tuần bất thình lình ngày thứ năm chúng ta được yêu cầu back up lại toàn bộ dữ liệu
Như vậy chúng ta sẽ thêm 1 “job” vào ngày thứ Năm và job này chỉ có thể là Copy vì nấu chúng ta chọn Normal thì sau khi back up xong windows sẽ xóa marker đi dẫn đến tiến trình back up “Normal + Differentil” đã cấu hình sẵn sẽ chạy sai với mong muốn ban đầu.

Dương Việt Trí

Monday, July 7, 2014

Application Pool Identities

Introduction

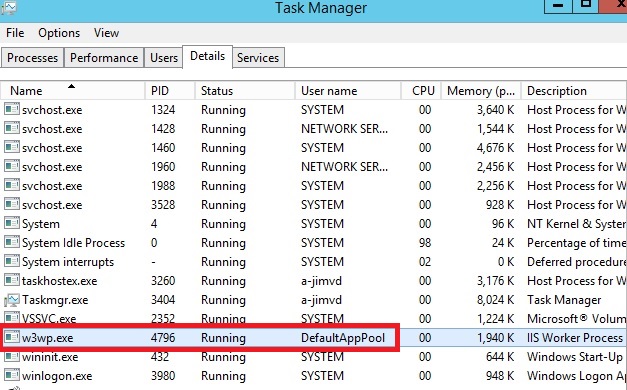
Whether you are running your site on your own server or in the cloud, security must be at the top of your priority list. If so, you will be happy to hear that IIS has a security feature called the application pool identity. This feature was introduced in Service Pack 2 (SP2) of Windows Server 2008 and Windows Vista. An application pool identity allows you to run an application pool under a unique account without having to create and manage domain or local accounts. The name of the application pool account corresponds to the name of the application pool. The image below shows an IIS worker process (W3wp.exe) running as the DefaultAppPool identity.

Application Pool Identity Accounts

Worker processes in IIS 6.0 and in IIS 7 run as Network Service by default. Network Service is a built-in Windows identity. It doesn't require a password and has only user privileges; that is, it is relatively low-privileged. Running as a low-privileged account is a good security practice because then a software bug can't be used by a malicious user to take over the whole system.
However, a problem arose over time as more and more Windows system services started to run as Network Service. This is because services running as Network Service can tamper with other services that run under the same identity. Because IIS worker processes run third-party code by default (Classic ASP, ASP.NET, PHP code), it was time to isolate IIS worker processes from other Windows system services and run IIS worker processes under unique identities. The Windows operating system provides a feature called "virtual accounts" that allows IIS to create a unique identity for each of its application pools. Click here for more information about Virtual Accounts.

Configuring IIS Application Pool Identities

If you are running IIS 7.5 on Windows Server 2008 R2, or a later version of IIS, you don't have to do anything to use the new identity. For every application pool you create, the Identity property of the new application pool is set to ApplicationPoolIdentity by default. The IIS Admin Process (WAS) will create a virtual account with the name of the new application pool and run the application pool's worker processes under this account by default.
To use this virtual account when running IIS 7.0 on Windows Server 2008, you have to change the Identity property of an application pool that you create to ApplicationPoolIdentity. Here is how:
  1. Open the IIS Management Console (INETMGR.MSC).
  2. Open the Application Pools node underneath the machine node. Select the application pool you want to change to run under an automatically generated application pool identity.
  3. Right click the application pool and select Advanced Settings...
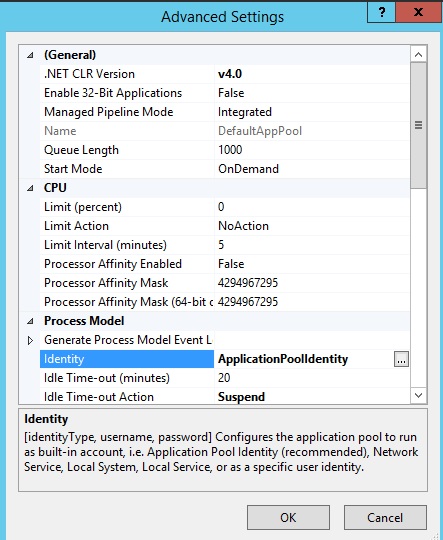
  4. Select the Identity list item and click the ellipsis (the button with the three dots).
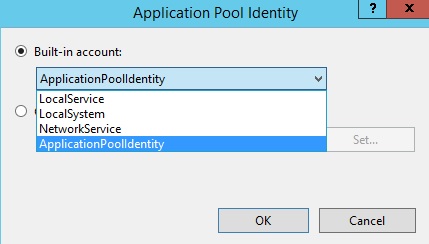
  5. The following dialog appears:
  6. Select the Built-in account button, and then select the identity type ApplicationPoolIdentity from the combo box.
To do the same step by using the command-line, you can call the appcmd command-line tool the following way:
%windir%\system32\inetsrv\appcmd.exe set AppPool <your AppPool> -processModel.identityType:ApplicationPoolIdentity

Securing Resources

Whenever a new application pool is created, the IIS management process creates a security identifier (SID) that represents the name of the application pool itself. For example, if you create an application pool with the name "MyNewAppPool," a security identifier with the name "MyNewAppPool" is created in the Windows Security system. From this point on, resources can be secured by using this identity. However, the identity is not a real user account; it will not show up as a user in the Windows User Management Console.
You can try this by selecting a file in Windows Explorer and adding the "DefaultAppPool" identity to the file's Access Control List (ACL).
  1. Open Windows Explorer
  2. Select a file or directory.
  3. Right click the file and select Properties
  4. Select the Security tab
  5. Click the Edit button and then Add button
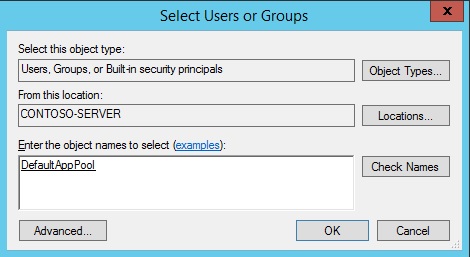
  6. Click the Locations button and make sure that you select your computer.
  7. Enter IIS AppPool\DefaultAppPool in the Enter the object names to select: text box.
  8. Click the Check Names button and click OK.
By doing this, the file or directory you selected will now also allow the DefaultAppPool identity access.
You can do this via the command-line by using the ICACLS tool. The following example gives full access to the DefaultAppPool identity.
ICACLS test.txt /grant "IIS AppPool\DefaultAppPool":F For more information, see ICACLS.
On Windows 7 and Windows Server 2008 R2, and later versions of Windows, the default is to run application pools as the application pool identity. To make this happen, a new identity type with the name "AppPoolIdentity" was introduced. If the "AppPoolIdentity" identity type is selected (the default on Windows 7 and Windows Server 2008 R2, and later), IIS will run worker processes as the application pool identity. With every other identity type, the security identifier will only be injected into the access token of the process. If the identifier is injected, content can still be ACLed for the ApplicationPoolIdentity, but the owner of the token is probably not unique. Here is an article that explains this concept.

Accessing the Network

Using the Network Service account in a domain environment has a great benefit. Worker process running as Network Service access the network as the machine account. Machine accounts are generated when a machine is joined to a domain. They look like this:
<domainname>\<machinename>$,
For example:
mydomain\machine1$
The nice thing about this is that network resources like file shares or SQL Server databases can be ACLed to allow this machine account access.

What about Application Pool Identities?

The good news is that application pool identities also use the machine account to access network resources. No changes are required.

Compatibility Issues with Application Pool Identities

Guidance Documentation

The biggest compatibilty issue with application pool identities is probably earlier guidance documents which explicitly recommend that you ACL resources for Network Service, that is, the default identity of the DefaultAppPool in IIS 6.0 and IIS 7.0. Customers will have to change their scripts to ACL for "IIS AppPool\DefaultAppPool" (or another application pool name) when running on IIS 7.5 or later (see the example above for how to do this).

User Profile

IIS doesn't load the Windows user profile, but certain applications might take advantage of it anyway to store temporary data. SQL Express is an example of an application that does this. However, a user profile has to be created to store temporary data in either the profile directory or in the registry hive. The user profile for the Network Service account was created by the system and was always available. However, with the switch to unique Application Pool identities, no user profile is created by the system. Only the standard application pools (DefaultAppPool and Classic .NET AppPool) have user profiles on disk. No user profile is created if the Administrator creates a new application pool.
However, if you want, you can configure IIS application pools to load the user profile by setting the LoadUserProfile attribute to "true".

Summary

Application pool identities are a powerful new isolation feature introduced for Windows Server 2008, Windows Vista, and later versions of Windows. It will make running IIS applications even more secure and reliable.
http://www.iis.net