Search This Blog

Monday, November 7, 2011

Securely connect Lotus Domino servers on different domains

Jim MC
One of the many challenges Lotus Notes Domino administrators face is the increased workload that results from having a distributed setup of their IT organization. This is especially true if they are working on multiple domains. When exchanging information across more than one domain, security is a particular concern. This reader-submitted tip explains how to safely and securely connect Lotus Domino servers that are located on different domains through a process called cross-certification.

In the case of Domino servers being located in different domains, administrators can cross-certify the servers to communicate, connect, and exchange information with each other. Cross-certifying allows Lotus Notes users in one domain access to data in another domain -- while simultaneously maintaining security at its highest levels.
Here are the steps you should follow to carry out the cross-certification process:
  1. Create a "safe copy" of an existing user ID file and open your Lotus Notes client.
    Related resources from SearchDomino.com:
    Expert Advice: Cannot connect to new domainProtect
  1. Lotus Notes from malicious code with the Domino ECL
    Lotus Notes Domino Access, Permissions and Authentication Reference Center
  2. From the File menu, locate the User Security option. The location of this menu option will vary, depending on your installed version of Lotus Notes.
  3. Select the Your Certificates tab and also the Export Notes ID (Safe Copy) tab from the Other Actions dropdown list. When prompted, click Save to create the SAFE.ID file. This will create a safe copy of the ID file for a Lotus Notes user in the first domain.
  4. Transfer the created file to the destination Lotus Domino server (i.e. the Domino server located in second domain).
  5. Copy the file to diskette, shared directory folder, CD-ROM, or otherwise, transfer the file to the Lotus Domino server.
  6. Launch the Domino Administrator client.
  7. Select the File -> Open Server menu options to connect to the Domino server.
  8. From the main navigation window, select the Configuration tab.
  9. Now click Certification and Cross-Certify from the right-most side. If the options are not displayed, click on the Tools button to expand the list configuration options.
  10. From the Choose a Certifier dialog window, choose the Certifier ID button and select the CERT.ID file associated with the Lotus Domino server. This is a special ID file that was automatically created when the Domino server was installed. A copy of the file will probably be stored on the Domino server. Select the file and click OK to continue.
  11. When prompted, specify the password associated with the server CERT.ID file and click OK again. You must know this password to continue with the process.
  12. You will now be prompted to select the safe copy of the ID file. This will enable all Lotus Notes users in the first domain to access the Lotus Domino server in the second domain. Click OK after the SAFE.ID file has been selected.
  13. Click the Cross Certify button to generate the cross-certificate for the destination Domino Server Directory. Note that the first time you connect to the destination Domino server you will be prompted to create a digital certification for the destination server. This is a one-time event so just click on the "Yes" button when that message is displayed.

Blank Screen LED Error Codes (HP CQ)

Support details

This document pertains to HP Notebook PCs with the HP Unified Extensible Firmware Interface (UEFI) beginning in late-2008.
On startup, you may see a blank screen. If the diagnostic utilities detect a specific problem with hardware components, the fan turns on, but the screen remains blank. To help identify the cause of the problem, various LED lights on the keyboard blink a series of codes.
The diagnostic utilities use the LEDs near the Num Lock or Caps Lock keys to blink a series of error codes. At the end of the series the blinking stops. The pattern of blinks will occur any time you attempt to start the computer until the error is resolved.
Battery power LED blinks
The Battery power LED indicates the condition of the power supply. When starting the computer, or when the computer is in operation, use the chart to identify the power condition.
Battery Power LEDComponent TestedError Condition
Battery power LED off, and Caps Lock/Num Lock offBattery or AC AdapterAC adapter not connected or failure

Battery low charge or failure
Battery power LED blinkingBatteryInsufficient charge on the battery
When new computer is used for first time, the white LED light for the AC power connector blinks.Battery is still in "Shipping Mode", the light continues to blink even when AC power is connected. 

To resolve, turn off notebook, connect AC power and allow battery to charge for at least 30 minutes, then start computer.
LEDs near Caps Lock and Number Lock keys blink when starting notebook
The LED lights near the Caps Lock and Num Lock keys will blink if an error is detected during the start up process. The LEDs will blink a number of times in a sequence and then stop. The number of blinks in the sequence indicates what component caused an error when it was being tested during start up.
If the LEDs stop blinking and the computer does not start, you can press the power button again to repeat the tests. Count the number of blinks, and use the chart to identify the error condition.
Knowing the number of blinks is helpful when you contact an HP support agent for technical help.
Caps Lock/Num Lock LEDComponent TestedError Condition
LEDs blink 1 timeCPUCPU not functional
LEDs blink 2 timesBIOSBIOS corruption failure
LEDs blink 3 timesMemoryModule error not functional
LEDs blink 4 timesGraphicsGraphics controller not functional
LEDs blink 5 timesSystem boardGeneral system board failure
LEDs blink 6 timesBIOSBIOS authentication failure
Error code explanations
The sections below provide some common explanations for each error code listed in the table above.
When the computer is on battery power only and the AC adapter is disconnected, if the Battery Power and Caps Lock / Number Lock LEDs do not glow, there is either a very low change or no charge in the battery. Connect the AC power adapter, verify that the battery power LED glows, allow the battery to charge for 15 - 30 minutes and then attempt to start the computer. If it starts, run the battery test and calibrate the battery. If it does not start, if possible, connect a replacement battery to verify that the battery is the problem.
If the computer does not start after charging the battery, remove the battery and connect the AC power supply. Verify that the battery power LED glows, and then attempt to start the computer. If the LED still does not glow, either the AC adapter has failed, or there is a bad connection between the adapter and the system board. If possible, connect a different AC power adapter to verify that the adapter is the problem, or contact HP for support which may require a service event.
If the battery light LED (which looks like a lightning bolt  ) flashes, the battery has insufficient charge to start the computer. To resolve this error, try the following solutions.
  • Connect the notebook PC to AC power and attempt to start the computer again.
    • Check the AC adapter to confirm that all of the plugs are securely seated.
    • Determine if the power LED on the AC adapter is lit (if available) to verify that the computer is receiving AC power from the wall outlet.
  • If the computer operates on AC power correctly, charge the battery for thirty minutes to one hour and then restart the computer.
    NOTE:Charging the battery for this length of time is called "trickle charging". Trickle charging is a continuous constant-current charge at a low rate, which recharges the battery slowly when it is in a deep discharge state. Deep discharge occurs when a battery is left unused for extended periods of time.
The computer processor (Blink code 1) has stopped functioning properly. Contact HP for assistance.
If a BIOS corruption error occurs (Blink code 2), you may not even notice the blink codes, because as soon as the computer recognizes the error, it restarts, attempts to recover the BIOS, and then restarts again. You may notice an extra-long startup process as a result, and a message indicating that the BIOS has been recovered may display on startup. If this occurs, update the BIOS on the computer. For more information, refer to the HP Notebook PCs - Locate and Install Updated BIOS, Drivers, and Software .
support document.
If you experience a memory failure (Blink code 3), follow the guide in the table below.
If Using Original MemoryIf New Memory Is Added
Reseat the memory. 

If reseating the memory does not resolve the problem, try replacing the memory with new memory.
Reseat the memory. 

If you continue to experience this error code after reseating the memory, the problem may be with the memory itself. Take the new memory out of the computer, put the original memory back into the computer, and then retest it.
If you do not feel comfortable reseating the memory yourself, take the computer to a computer retailer and ask them to reseat it for you.
NOTE:Some memory module errors may allow the computer to start but will then cause the computer to restart and display a blinking error code.
If you experience a graphics controller failure (Blink code 4), contact HP for assistance.
A general system board failure (Blink code 5) is the failure of a component not covered by the other LED error codes. Contact HP for assistance.
The BIOS authentication error (Blink code 6) is extremely rare. It is the result of a discrepancy between the BIOS and the hardware that is installed on the computer. This error occurs when the BIOS cannot authenticate signatures from the hardware on the system. The purpose of the BIOS authentication is to be sure that no one has tampered with the BIOS on the computer.
If a BIOS authentication failure occurs, the computer automatically performs a BIOS recovery. If the computer does not automatically recover the BIOS, manually perform a BIOS recovery. To manually perform a BIOS recovery, press all four arrow keys at the same time to cause the BIOS to go to the EFI partition to find and recover the current BIOS.

Sunday, November 6, 2011

Five Domino domain default server settings you should change and why

Just because you don't immediately notice a default setting on your Domino server, doesn't mean there isn't one. I once asked a Lotus Domino system administrator what the default setting was for disconnecting an idle user from a Domino server. He replied, "There is no default setting." This is incorrect; there are defaults for all settings, regardless of whether they're apparent or hidden.
Some default settings, however, can be completely incorrect for your Domino domain. Here are five of my least-favorite default settings and why changing them can improve Domino server performance, tighten security and help you monitor your Domino domain.
  1. Default idle user disconnect time is four hours  
By default, an idle Lotus Notes user will remain connected to your Domino server for four hours. Keep in mind that idle users are taking up valuable resources, without doing anything. I have been using a 30-minute idle time disconnect for many years without any problems. IBM's article, How the notes.ini file parameter affects server performance, explains why it's good practice to use this parameter.
You'll want to set Notes.ini parameter on your servers so that it looks like this:
Server_session_timeout = 30
Tip: It's best to use server configuration documents to control these settings.
If you stick with your default setting of four hours, it makes it really hard to get a reading on the number of concurrent users.

  2. Message Recall defaults to on  
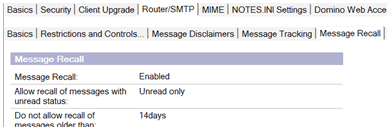
If you've upgraded to Lotus Notes R8 and haven't explicitly turned off Message Recall, it's on by default.
By default, Lotus Notes 8 users can recall mail that they've sent up to 14 days ago, as long as it hasn't been read yet. Recalling a message that has been in someone's mail file for 14 days could create some issues.
If you want to turn off Message Recall or change the number of days that a sent message can be recalled, there are a few options. You can create a server configuration document, edit the default one, or edit each server configuration document. Whichever option you decide to use, go to the Message Recall tab on the Router/SMTP tab to take control.
Mail Recall
If you have no server configuration documents, then Message Recall is automatically on and set for 14 days.


  3. Insecure storage of Internet passwords is on  
Check your Domino domain's directory profile by going to Actions -> Edit Directory Profile.
Directory Profile
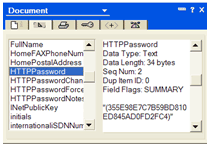
If "Use more secure Internet Passwords" is set to "No," then a clever hacker could run a dictionary attack against your address book to obtain address book content.
Domino Directory Configuration Profile
If your HTTP password looks like the one below -- with all capital letters and numbers -- then you've got a problem.
HTTP Password
Use the menu options Actions -> Upgrade to More Secure Internet Password to fix existing person docs.
Upgrade to More Secure Internet Password
  4. The default number of cluster replicators is set to '1'  

Related resources from SearchDomino.com:
Log off idle Lotus Notes users for better Domino Server performanceCopy Lotus Notes databases from the Domino Server console command line
Notes.ini and mail.boxes transaction logging -- a cautionary tale
Clustered servers only use a single cluster replicator by default. Cluster replication is an event-driven process. When changes occur on one Domino server in a cluster, the changes are pushed to the other servers as well. If many changes occur, cluster replication can fall behind. If there is a failover while the databases are out of sync, users will call help desk to ask, "Where are all the meetings I arranged this morning?" or "The mail I sent this morning isn't in my Sent folder." Adding another cluster replicator using the above parameter will help avoid this. Your clustered servers will run with two cluster replicators if you add this parameter to the Notes.ini file of the clustered servers:
Cluster_Replicators = 2
You can tell if you still need more by looking at the statistic Replica.Cluster.SecondsOnQueue, which should generally show a time under 15 seconds when the server has a light load. It should be under 30 seconds when the server is operating with a heavy load. Be sure to look at the Replica.Cluster.SecondsOnQueue.Avg and Replica.Cluster.SecondsOnQueue.Max statistics to get a better feel for whether or not everything is in sync.

  5. Change Domino server console colors  
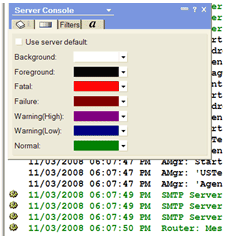
This last one is one of those personal things that I've picked up in the last decade of working with the Domino server. To make things easier, change the default colors of your console so that you can see what's going on in one quick glance. Here's what I use on every Domino server I monitor:
Change Domino server console colors
Green is good; red is bad. The white-on-black color theme seems old fashioned. Ditch it for a color scheme that's simple to read and will easily tell you what's happening with your Domino servers.
Andy Pedisich

Setting up ID Vault operations in Notes/Domino 8.5

ID Vault in Lotus Notes/Domino 8.5 solves many problems found in the previous password recovery feature. Given the interest in the ID Vault, this tip details how to set up the ID Vault from scratch and documents all the steps. You'll find detailed instructions for several ID Vault operations -- including how to store new and existing users in the vault and how to reset a password -- as well as the solutions to gotchas I encountered along the way.
I set up the ID Vault on a Linux/Domino 8.5 server, using Domino Administrator 8.5.1 on Windows. After creating the vault, I stored some ID files in the vault, then used the vault to recover an ID file and reset a password.

  To create the ID Vault  

  1. From Domino Administrator, File -> Open Server to select the target server.

  2. Go to the Configuration tab and choose ID Vaults -> Create, on the far right side, which starts a very helpful wizard to guide you through the whole process.

  3. Set the Notes ID Vault Name to something short and simple. This will be the name of a new organization certifier, which will manage the vault. Something like AcmeVault works well enough.

  4. Set the description of the ID Vault. This will become the database title of the vault .nsf file. You can use something like Acme Corp ID Vault.

  5. Set a strong and secure vault password. Next, Make sure the vault server is correct.

  6. Your name will automatically be listed as one of the vault administrators. Normally, you'd want to add some other administrators, unless you work for a very small organization. These administrators will be able to control the vault itself, specifically adding and removing other administrators. This is not the list of people who can reset a password; that will come later in the tip.

  7. Select the organizations that will trust this vault by choosing their certifier ID files. Usually, this is your top-level organization, such as /Acme. But it may also be one or more of your organization units, such as /Accounting/Acme or /IT/Acme.
  8. Be sure to just choose certain organizations units if you're setting up other ID vaults for other organization units. Note that you must have the certifier ID for the organization(s) and know their passwords.

  9. Individual users are assigned to an ID Vault by the Security Settings document within the relevant policy. The next step allows you to perform this setup with several options, depending on whether you already have an organization policy, want to start a new policy or would like to set up the policy later. I chose to create a new policy for my entire organization.

  10. The last screen of the wizard displays all the choices you've made, so you can double-check them before any real action is taken. Some of the choices cannot be undone later, so be sure to read the screen carefully.

  11. After verifying your choices, press the button to create the ID Vault. During this process, you'll be asked to find the certifier IDs and to enter their passwords.

  12. The wizard creates an on-screen log file of its work, with the option to copy the entire text to the clipboard when it's done. I suggest copying it, then saving the log somewhere for later reference.

  To store a new user ID in the vault  

  1. Make sure that the relevant policy -- in my case, a single organization-wide policy -- contains setting documents for both registration and security. Also make sure that the security setting specifies the ID Vault. By default, the built-in ID Vault wizard creates a policy without registration settings. Note: This caused a new user registration to fail during my test. The fix was simple. I added a standard registration settings document to the organization policy containing two entries: a setting name and the server name.

  2. New users will now automatically have their ID files uploaded to the ID Vault during the user registration process.

  To store an existing user ID in the vault  

  1. Make sure that existing users are covered by a policy -- in my case a single organization-wide policy -- and that this policy contains a security setting which specifies the ID Vault.

  2. When the above condition is met, existing user ID files will be uploaded to the ID Vault automatically.

  3. Be aware that Notes/Domino does not immediately upload existing ID files to the vault. The client and server work together to perform the upload on a reasonable schedule, so that the server doesn't get swamped when a new vault is created.

  4. You can force an ID file to be uploaded immediately by switching IDs on a workstation, then switching back to the original ID.

  To recover a lost ID file  

  1. To recover a lost ID file completely -- not just reset its password -- the administrator doing the recovery must have the [Auditor] role in the access control list (ACL) of the ID Vault database.

  2. Using the Domino Administrator client, select the name of the person with the missing ID file in the People view.

  3. On the right-hand side of the screen, under Tools -> ID Vaults, select Extract ID From Vault and follow the prompts. You should be able to override the default filename of the ID file, so that it's something like jsmith.id instead of user.id.

  To reset a Lotus Notes user's password  

  1. To reset the password of a Notes ID file, the person doing the reset must have password reset authority for that group of users. This is controlled by the ID Vault administrator and is set with Tools -> ID Vaults -> Password Reset Authority.

  2. Using the Domino Administrator client, select the name of the person who needs a password reset in the People view.

  3. On the right-hand side of the screen, under Tools -> ID Vaults, select Reset Password and follow the prompts
Chuck Connell

Saturday, November 5, 2011

How to Remove Your IP from Gmail’s Blacklist

If you cannot send emails to Gmail, your server may have been blacklisted. Here are some tips to get removed from the Gmail blacklist. This is another installment of our Spam Blacklist Removal Series, so be sure to check out the series for other ISPs.
Before jumping through the blacklist removal hoops, you may want to double check that your emails are not simply going into the spam folder. This process will not help you with emails being dropped into the spam folder. This is for getting off of Gmail’s blacklist. I am going to outline 3 steps.
  1. Verify you are on the Gmail blacklist.
  2. Perform preliminary blacklist removal checks.
  3. Submit Gmail blacklist delisting request.

Gmail Blacklist Verification

If you are blacklisted, then you should be getting a delivery rejection notice from Google. If you check your server’s logs or your email bounce you may see something like this:
Remote_host_said:_550-5.7.1 Our_system_has_detected_an_unusual_rate_of unsolicited_mail_originating_from_your_IP_address._To_protect_our users_from_spam,_mail_sent_from_your_IP_address_has_been_blocked. Please_visit_http://www.google.com/mail/help/bulk_mail.html_to_review_our_Bulk_Email_Senders_Guidelines
If you are seeing this email error, then your server’s IP has likely been blocked by Google. There could be other response codes, but typically all Gmail blacklist notifications will include a 550 error plus a link to the Gmail policies pages.
If you are not seeing 550 errors, then you may not have an email blacklist problem but some other email delivery issue.

Preliminary Blacklist Removal Tasks

Before requesting removal from Gmail’s blacklist, you will want to take some steps to stop whatever caused the listing. See some of my other blacklist removal posts for more details but in a nutshell you should:
Make sure there is no unauthorized email going from your server.
  • Check the daily volume of email going to Gmail
  • Look for compromised user accounts.
  • Look for people forwarding email to Gmail.
Once you have reviewed these items, you should be able to determine the cause of the listing. For example, if someone is forwarding email to Gmail and then marketing it as spam, your server’s sender reputation is lowered and you can be blacklisted. Sudden spikes in email volume can also trigger the filters. The important thing is look for changes in your server’s behavior as it is likely the cause of the listing.

Gmail Blacklist Removal Process

The forms to initiate an inquiry at Gmail are buried in Google’s email help section. If you are running your own server, you will want to start with their “My domain can’t send to Gmail” form. If you answer the questions correctly, you will win a prize:
Report a delivery problem between your domain and Gmail.
Provide only what they ask, and do not complain. Just provide the requested details and drop a note of thanks into the additional information field. I suspect they receive 100’s of these a day, so be nice and wait.
Unlike some ISP’s, I rarely get a reply from Gmail. The issue simply resolves or not. I find them one of the more difficult email providers to deal with regarding email blacklisting practices.

Your Gmail Experiences?

If you have Gmail delivery tips or blacklist removal tips, please let me know. I deal with email blacklisting every week and am trying to document the processes at major email providers.
rackaid.com

Friday, October 21, 2011

To to - nhỏ nhỏ

Trên thành phố to to
Có con đường nho nhỏ
Trên con đường nho nhỏ
Có ngôi nhà to to
Trong ngôi nhà to to
Có căn phòng nho nhỏ
Trong căn phòng nho nhỏ
Có cái giường to to
Trên cái giường to to
Có bà vợ nho nhỏ
Bên bà vợ nho nhỏ
Có ông chồng to to
Ông chồng tuy to to
Nhưng cặp chân nho nhỏ
Trên cặp chân nho nhỏ
Có cái quần to to
Trong cái quần to to
Có cái quần nho nhỏ
Trong cái quần nho nhỏ
Cái cái gì lúc nhỏ … lúc to

Wednesday, October 19, 2011

Bài thơ vô đề

Trên trời có đám mây xanh
Có con chó chạy loanh quanh mấy vòng
Hỏi cô môi thắm má hồng
Rằng nay cô đã có chồng hay chưa?
Bỗng nhiên có một cơn mưa
Từ đâu rớt xuống giữa trưa nắng hè
Để cho mấy chú cá mè
Rủ nhau kết lại thành bè trôi sông
Thế rồi xa lắm mùa đông
Thẫn thờ em bé ngóng trông mẹ về
Trên núi có một đàn dê
Tìm nước suối uống đi về phương nam
Ông mặt trời màu da cam
Ngập tràn ánh nắng ngôi làng xa xăm
Trong vườn chuối đã ra hoa
Chuồn chuồn ớt đỏ bay ra bay vào
Ông nội ngồi hút thuốc nào
Tiếng kêu sòng sọc đi vào giấc mơ
Chiều thu lớp học i tờ
Thầy cô ngồi nhớ những giờ mạng đêm
Thế là đã nở hoa xoan
Khắp sân khắp ngõ chỉ toàn trắng tinh
Giữa đường có bục bùng binh
Chú công an đứng rình người đi đêm
Ba lô nặng trũi trên vai
Bộ đội luyện tập một, hai bước đều
Hoàng hôn đỏ ối mỗi chiều
Bầu trời mơ ước, cánh diều tuổi thơ
Ao hồ mặt nước xanh lơ
Lục bình tim tím thẫn thờ buồn trôi
Đâu ngờ cô bé bán xôi
Đôi mắt đen lánh, đôi môi ửng hồng
Mây mưa tạo những cầu vồng
Để cho ai đó chưa chồng vẩn vơ
Định làm thơ đến giao thừa
Nhưng mà mệt quá xin chừa tại đây
Nếu mà các bác thấy hay
Thì em xin nguyện ăn chay một tuần