Search This Blog

Saturday, March 3, 2012

Configure the Team Foundation Build Service of TFS 2010

Configure the Team Foundation Build Service of TFS 2010
1. Open the Team Foundation Server Administration Console from Start Menu –> Microsoft Team Foundation Server 2010 Beta 2.
2. In the Team Foundation Server Administration Console select Team Foundation Build Configuration from the left panel and then click Configure Installed Features on the right.
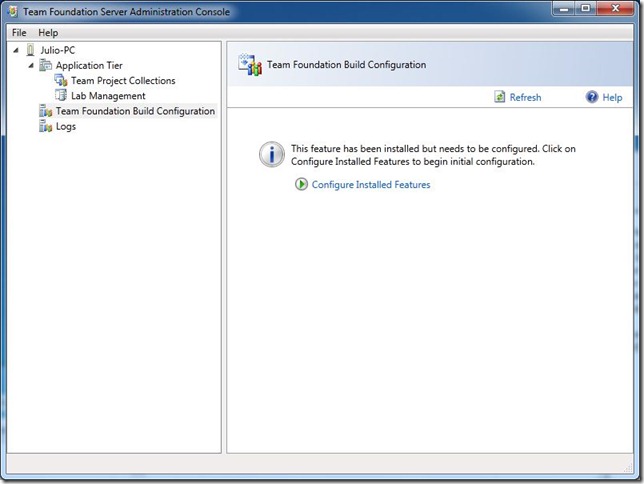
TFBConfig01
3. On the Team Foundation Server Configuration screen click Start Wizard.
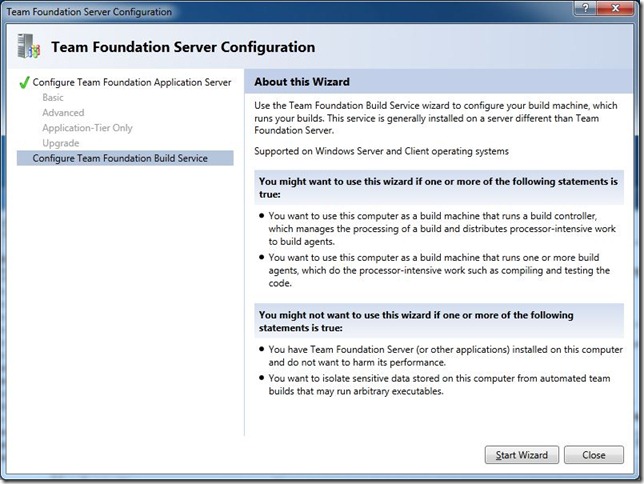
TFBConfig02
4. On the Team Foundation Build Service Configuration Wizard start screen click Next.
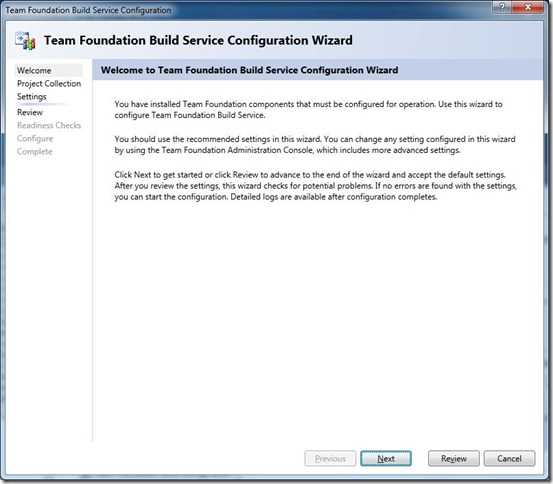
TFSConfig03
5. On the Team Project Collection screen click Browse… to select the team project collection that this build machine will serve.
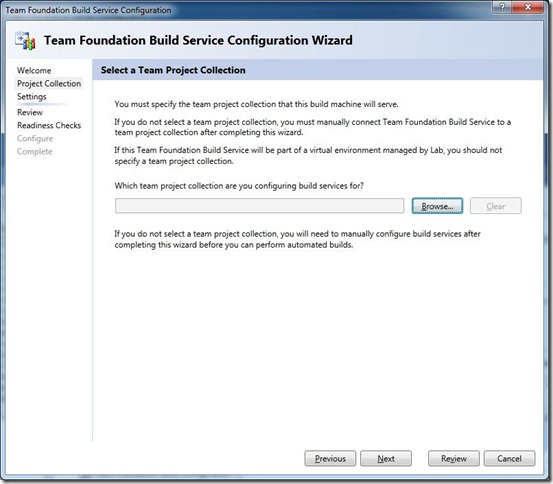
TFSConfig04
6. On the Connect to Team Project Collection dialog click Servers… to select the Team Foundation Server where the team project collection is located.
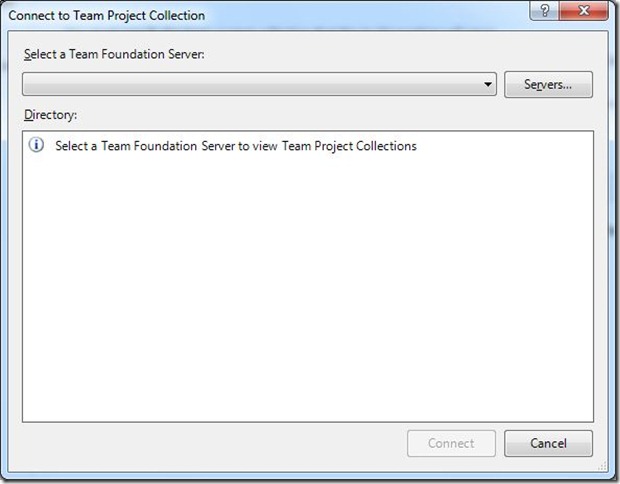
TFSConfig05
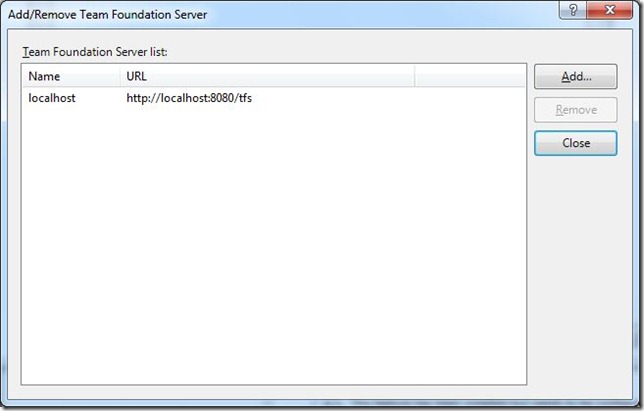
7. On the Add/Remove Team Foundation Server dialog click Add… to add your Team Foundation Server to your server list.
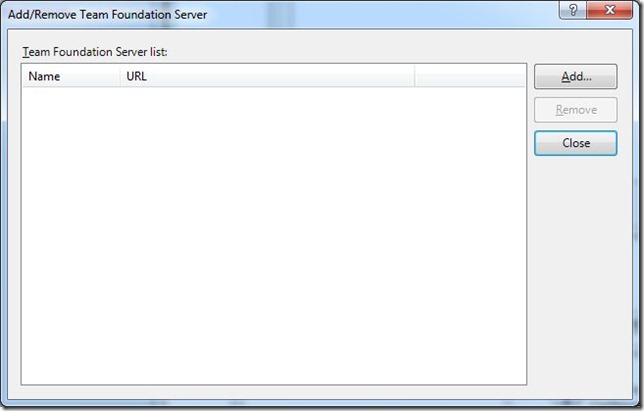
TFSConfig06
8. On the Add Team Foundation Server dialog enter localhost for the server name (we installed TFS on the same Windows 7 machine where we are configuring the Team Build Service) and leave the other fields with the default values. Then click OK and then Close in the previous dialog.
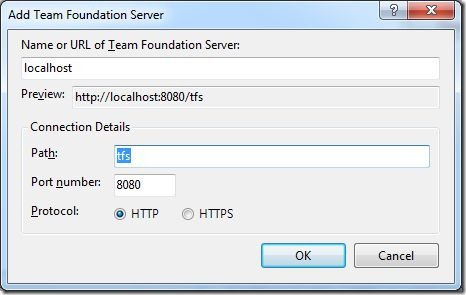
TFSConfig07
TFSConfig08
9. Back in the Connect to Team Project Collection dialog, select localhost in the server drop down list and DefaultCollection on the directory list. Then click Connect.
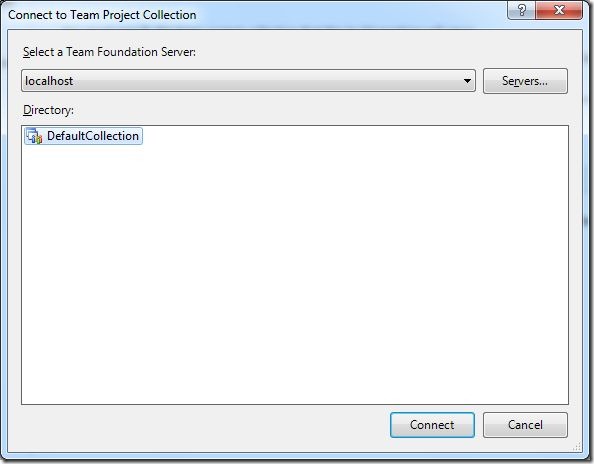
TFSConfig09
10. Back in the Team Project Collection screen of the wizard you can see you have now selected DefaultCollection for your team project collection. Click Next.
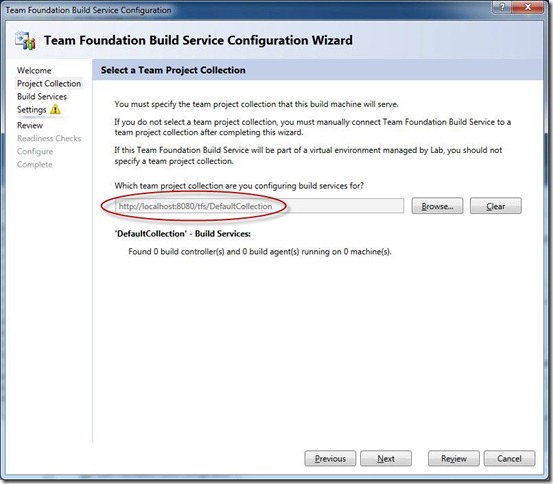
TFSConfig10
11. On the Configure Team Foundation Service screen, select Use the default setting and select 1 (recommended) from the drop down list. This is appropriate as we are configuring a build service for a Windows 7 laptop, so we don’t want to affect the performance of the machine with more than one build agent. Click Next.
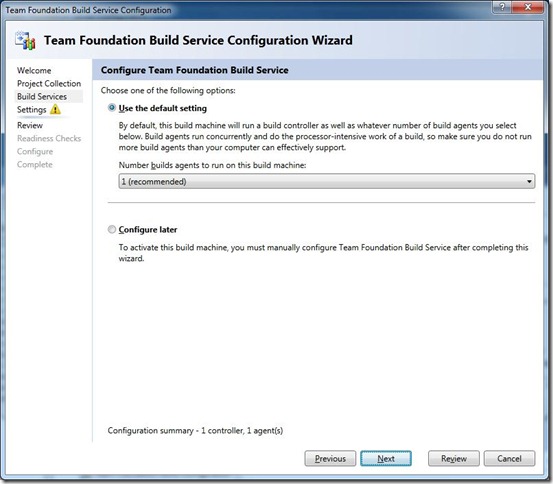
TFSConfig11
12. On the Configure Build Machine screen select Use a user account and then enter your user credentials. I didn’t select Network Service because in the verification step (a couple of steps after this) I got a warning stating that Network Service was not part of the project collection. So for now just enter the same administrator account that you used to install TFS 2010. Make sure you specify your account as <machinename>\<username> because if you don’t specify the machine name and click Test it will pass the validation here but will
fail in the middle of the configuration process later (I suppose this is a bug, hopefully fixed for RTM). Leave the default port selected (9191) and then click Next.
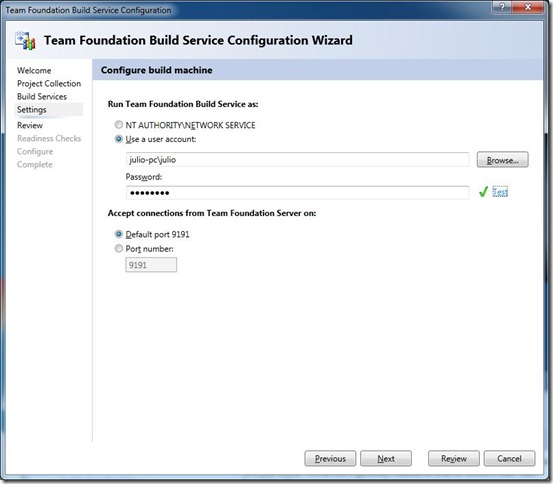
TFSConfig12
13. On the Configuration Summary screen click Next.
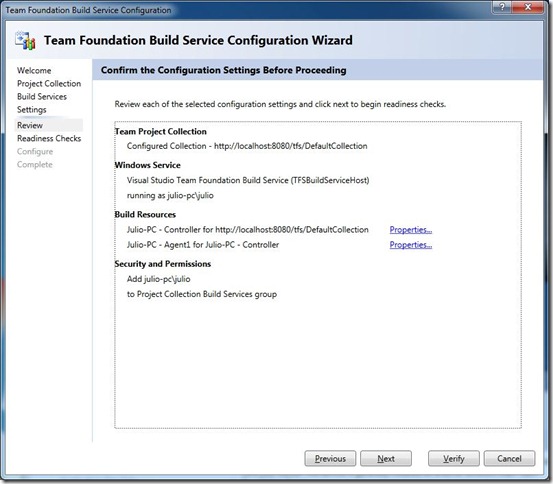
TFSConfig13
14. On the Readiness Checks screen wait for all validations to pass and then click Configure.
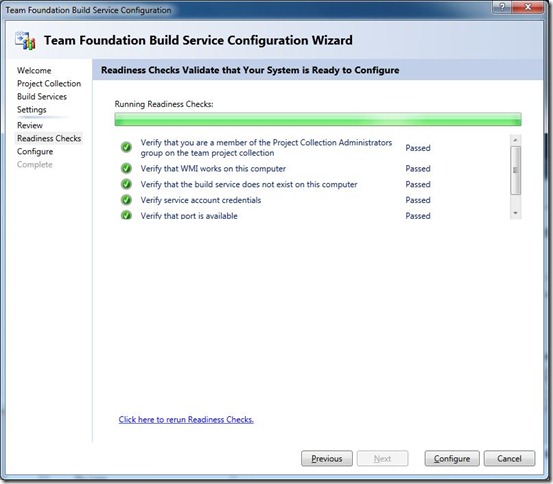
TFSConfig14
15. On the Configuration Process screen wait until the all the configuration is done and then click Next.
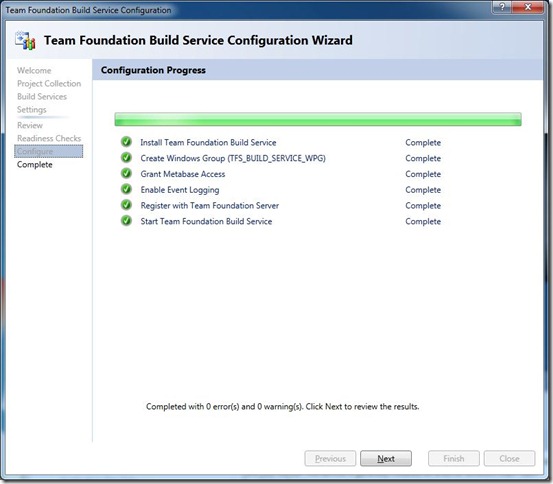
TFSConfig15
16. Your Team Foundation Build Service is now ready to use. Click Close to end the wizard.
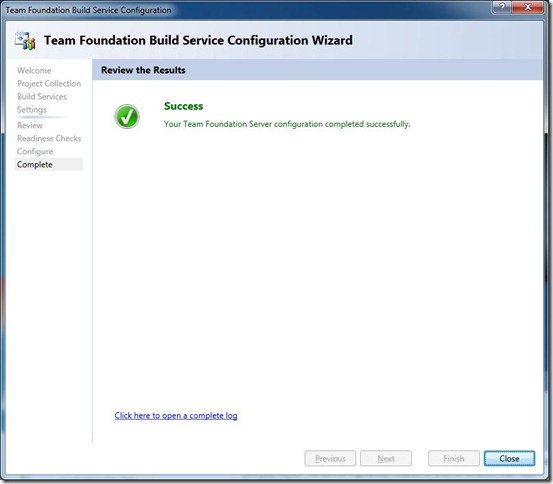
TFSConfig16
17. From now on you can check and/or change your Team Foundation Build configuration from the Team Foundation Server Administrator Console.
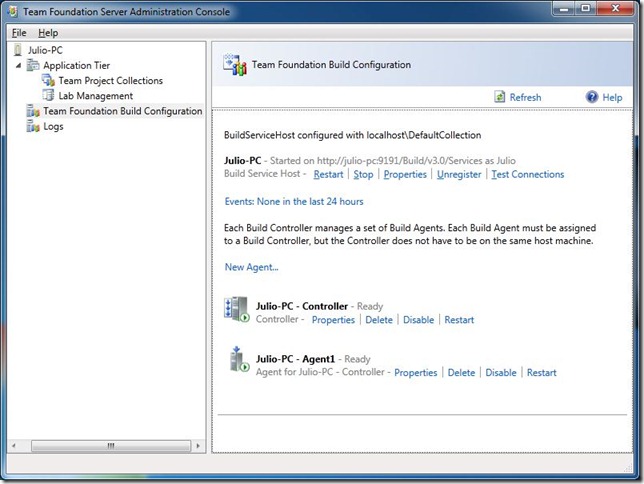
TFSConfig17
I must say that, besides user account problem I related in step 12, it was a pretty easy configuration and I am now curious about this new Build Controller + Build Agent environment that you have in 2010. I think it will make much more sense in a more complex environment.
I’d like to cover the actual creation of a new Team Project in the next post. I’m pretty excited to see the innovations in the process templates, specially for MSF 5.0, so keep checking the blog for some updates soon.
Julio

Install Team Foundation Server 2010

The installation of Microsoft's latest beta release of Team Foundation Server 2010 has apparently been quite a hot topic in IT lately. My Twitter page isn't that popular and when I first started tweeting my progress, shortly after I was receiving messages regarding my documentation and progress. Here is the shortly awaited documentation on what I've done to install TFS.

Here's what my environment looks/will look like:
- Windows Server 2008 Enterprise (with hyper-v but that's irrelevant)
- SQL Server 2008 Standard
- WSS 3.0
- Sharepoint 2007 Enterprise
- Team Foundation Server 2010 Beta 1 (of course)

There are a few ways this environment can be changed around (which versions such as Enterprise or Standard can be used). Check out Microsoft's TFS installation documentation for this information (a convenient .chm file...check my blog post on this if you have issues opening this file).

Additionally, this post documents a single-server installation on a 64-bit machine.

Here's a summary of the order of software installation that will be taking place.
1.) Windows Server 2008 (we have to have an operating system)
2.) IIS 7
3.) SQL Server 2008
4.) Team Foundation Server 2010 Beta 1 (with WSS 3.0)

If it isn't obvious yet, this is going to be a long post. I've taken screenshots of many of the steps which won't help the length. Is everyone buckled in? Good. Let's get started.


Installing Windows Server 2008

The install of Windows Server really isn't that complicated. There are not special requirements for this. However, post-install, my server was added to a domain so I could use domain service accounts. It isn't necessary to have the server added to a domain though.


Installing IIS 7.0

This part really isn't too bad (thankfully). In the server management, on the left click Roles. On the right, click Add Role Services.


On the window that comes up, at the bottom check Web Server (IIS) and click Next.


Here some default values are selected. You need to add HTTP Redirection, ASP.Net, Windows Authentication, and IIS 6 Management Compatibility and all subordinate check boxes. Click Next.


Here your selections are reviewed. If everything is correct, click Install. Once the install has completed, you'll see another review window. If everything was successful, click Close.


Installing SQL Server 2008

Here's where the real fun begins. This install isn't too bad. The real ticket is to know if you have any service accounts you want to use for the SQL services. Since I did a single-server install on a server dedicated to my team, I used NT Authority/Network Service for mostly everything, but I'll get to that a little later.

First off, insert the SQL installation media (I used an ISO file mounted through Hyper-V for mine).
From here, run the setup executable on the disk. Mine did an autorun. From that window, I selected installation on the left navigation pane. On the screen that loads on the right, select New SQL Server stand-alone installation or add features to an existing installation.
The screen that comes up will run five tests. If your installation is clean than most likely all five will pass with a green check mark. Mine threw a warning to me on Windows Firewall because mine was turned on with default settings. Since the server is behind two firewalls, I elected to disable the Windows firewall completely. Re-running the test after that resolved the warning. Click Okay.

Here we are at the obligatory Product Key screen. Enter your product key and hit Next.
If you accept the license terms (License Terms page), check the box and click Next.

The next screen wants to install setup support files. Go ahead and click Install to continue. The following screen will yet again, run some more tests (eleven to be precise). Again, if this is a clean install, every test should pass.

Here's one of the crucial screens: Feature Selection. On this screen, you should select to install Database Engine Services (for TFS), Full Text search (for reporting), Reporting Services (for reporting), Analysis Services, Client Tools Connectivity, and Management Tools Basic. Once those are checked, click Next.


Hit Next to continue to the Instance Configuration screen. If you want to, you can rename this SQL instance to whatever you want it to be. I chose the default MSSQLSERVER since it will be used for TFS only and nothing else will be connecting to it. Click Next.


Click Next on the Disk Space Requirements screen.

Here we are at the Server Configuration section. Unless you have any specific domain accounts set up for running SQL, NT AUTHORITY\Network Service will suffice for all of the accounts listed. No password is required to use this username. Also be sure to change SQL Server Agent to start up automatically (by default it is manual). Click Next.

The Microsoft documentation suggests on the Database Engine Configuration page that Windows authentication mode be checked. I have had some pretty nasty experiences with this in the past and selected Mixed mode authentication. Following this, you need to type in a password for the SQLSA user. Also, don't forget to add all of the users you want to have access to the DB engine. Once you're done with that, click next.
The next page is the Analysis Services Configuration page. Add any users you want to have access to the analysis services that your SQL instance will supply. Click Next.
On the Reporting Services Configuration page, select Install the native mode default configuration. Click Next.
Here's the obligatory Error and Usage Reporting screen. Check whether or not you want Microsoft to receive anonymous usage statistics regarding your SQL instance and click Next.
Nearing the end, click Next on the Installation Rules screen.
Finally, we're at the Ready to Install screen. Review the features to be installed and click Install.
Once the installation is complete, click Next and Close.


Installing Team Foundation Server 2010 Beta 1

Here we are at the final software install. This part really isn't too bad (surprisingly enough).
To begin, insert the installation media (once again, I mounted an ISO through Hyper-V). If autorun is enabled, a standard window should come up giving you the option to explore the newly inserted media. If this does not happen, just open up Computer and navigate to the disk.
Inside the disk there are three folders. Depending on your processor architecture, choose either the TFS-x64 or TFS-x86 folders. From within that folder, run the Setup.exe file.
Here we're at the first screen. Click Next to proceed.
Once again, the ever-present Licensing Terms page. If you accept, check the box and hit Next.


The Microsoft documentation suggests that only Team Foundation Server be checked. I actually need the build server to be on the Team Foundation Server as well so I checked all three. Either will work though. Click Install.


During your installation, the server will need to be restarted. Click restart now. Upon restart, the configuration option will become available to you.


Pat yourself on the back. You just installed TFS. This is a long enough blog post for now. I'll post here very shortly the configuration steps I took for TFS (still haven't taken all of the screenshots I need for it).
Aaron - aaronwball.blogspot.com

Tuesday, February 7, 2012

Công ty cổ phần công nghệ VSD


Công ty cổ phần công nghệ VSD ( http://vsd.com.vn) thành lập năm 2012. VSD được thành lập với mục tiêu cung cấp cho khách hàng những sản phẩm, giải pháp CNTT đáng tin cậy và hiệu quả cao.

 VSD luôn có những ý tưởng và tầm nhìn bắt kịp với sự phát triển về công nghệ thông tin, có những giải pháp để đáp ứng với nhu cầu thực tế. Với lực lượng cán bộ chuyên nghiệp, được đào tạo bài bản và có nhiều kinh nghiệm hoạt động trong lĩnh vực CNTT, chúng tôi luôn tự tin có thể mang đến cho các bạn sự hài lòng nhất thông qua các giải pháp, sản phẩm và dịch vụ của chúng tôi.
       Bằng sự nỗ lực của lãnh đạo và tập thể cán bộ VSD, chúng tôi sẽ phấn đấu hết mình vì sự phát triển CNTT của nước nhà, vì sự hài lòng của quý khách hàng. VSD cam kết sẽ luôn đem lại các sản phẩm, dịch vụ hiệu quả nhất, hỗ trợ vận hành, nhiệt tình giải đáp các thắc mắc của khách hàng 24/7.

Sản phẩm và dịch vụ của công ty VSD
Sản phẩm
Dịch vụ

Tuesday, January 31, 2012

ISA 2006 Authentication over HTTP


I implemented different ISA 2006 Reverse Proxy servers in conjunction with Microsoft Exchange 2003 or Windows Exchange 2007.
Today I configured ISA 2006 with Exchange 2007. I configured the Reverse Proxy server as I did always. And the connection from outside the network works perfectly. On the internal Exchange server I configured Basic and Integrated Authentication on the OWA virtual directory. The problem is that internal users now automatically log in to their webmail box when entering the URL from the Exchange server.
This is not the desired configuration, because internal users should be able to open other people’s mailboxes by logging in as that user. The customer also has an ISA 2006 on the internal network for forwarding proxy purposes.
I decided to publish Exchange 2007 on the internal ISA 2006 server as well. The configuration should use Form Based Authentication (FBA) over HTTP. After configuring and trying the connection, the user can’t access the ISA logon page. In the logging you find that Authentication over HTTP isn’t allowed.
Error Code: 403 Forbidden. ISA Server is configured to block HTTP requests that require authentication. (12250)
This is a default setting in ISA 2006 which can be disable. To allow Authentication over HTTP go to the Listener configuration. Go to the Authentication tab and Select Advanced. In the next tab enable the option Allow client authentication over HTTP. This option enables the using FBA over HTTP.
 booches.nl

Active Directory restores: How to restore deleted objects

Windows Server 2008 and Windows Server 2008 R2 allow you to restore deleted objects back to the Active Directory. In this article, I will demonstrate an Active Directory restore with a combination of authoritative and non-authoritative techniques.
A non-authoritative restoration is a process in which the domain controller is restored, and then the Active Directory objects are brought up to date by replicating the latest version of those objects from other domain controllers in the domain.
An authoritative restore is an operation in which the data that has been restored takes precedence over the data that exists on other domain controllers in the domain. When you perform an authoritative restore, the current versions of objects in the Active Directory are overwritten by the versions of the objects which were restored.
This process works the same way regardless of how you made the backup or where the data is being restored from. The Active Directory objects that have been restored are assigned a new version number, which ensures that the Active Directory replication process will overwrite the existing Active Directory objects with the objects that have been restored. This process is completely automated and it affects all of the domain controllers in the domain.
Performing the restoration
The restoration process is performed from the command line. To begin, you’ll need to know the name of the object that you plan to restore, as well as that object’s location within the Active Directory.
Because we are restoring an object that has been previously overwritten or deleted, we will have to perform an authoritative restore. That way the item that you have restored will not be overwritten by a newer copy during the Active Directory replication process.
However, we can’t just jump right in to an authoritative restoration, because the entire Active Directory would be rolled back to a previous state and defeat the purpose of performing a granular restoration.
To keep that from happening, we’ll perform a non-authoritative restore of the entire Active Directory. After doing so, we can make the restoration authoritative for the specific object that needs to be restored.
Performing a non-authoritative restoration
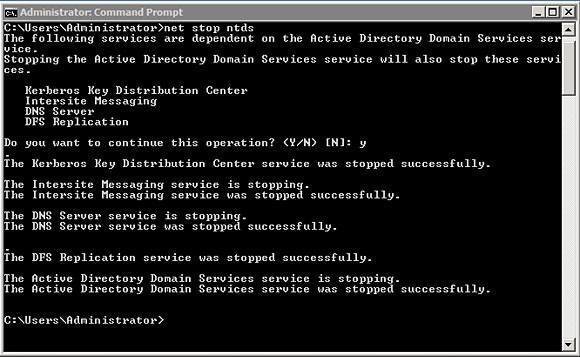
There are a variety of methods for performing the initial non-authoritative restore. The easiest way to complete this process is to stop the Active Directory Domain Services and then restore a valid system state. To stop the Active Directory Domain Services you will need to open an elevated command prompt and then enter the following command:
Net Stop NTDS
As you can see in Figure A, shutting down the Active Directory Domain Services causes several other dependency services to stop as well. The dependency services that are affected by this operation include:
Kerberos Key Distribution Center
Intersite Messaging
DNS Server
DFS Replication
Once the Active Directory Domain Services have been stopped, you can restore a System State backup. When the restoration process completes, you will likely be prompted to reboot your server. You should avoid rebooting because doing so will cause the Active Directory Domain Services to be restarted, which will cause your restoration to be overwritten.
Performing an authoritative restore
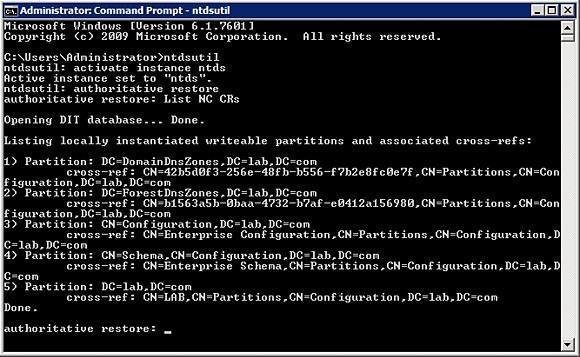
Before the server is rebooted, we need to tell Windows which Active Directory object needs to be restored authoritatively. This can be accomplished by using the NTDSUTIL utility. You can begin the process by entering the following commands:
Ntdsutil
Activate Instance NTDS
Authoritative Restore
Although not technically required, I recommend entering the LIST NC CRs command at this point. This command will list the various Active Directory partitions and their cross references. It allows you to validate that you are about to perform an authoritative restore within the correct Active Directory partition, as shown in Figure B.

Now it’s time to specify the object that needs to be restored. You can do so by using the Restore Object command. For example, suppose that you wanted to restore a user account named User1 that existed in the Users container in a domain named Contoso.com. To perform such a restoration, you would use the following command:
Restore Object “CN=User1,CN=Users,DC=Contoso,DC=com”
Wrapping it up
Now that you have marked the object that needs to be restored, the only thing that is left do is to restart the Active Directory Domain Services. This can be accomplished by entering the following command:
Net Start NTDS
When the Active Directory Domain Services start, the object that you restore will be replicated to the other domain controllers in the domain.
About the author: Brien M. Posey, MCSE, has previously received Microsoft's MVP award for Exchange Server, Windows Server and Internet Information Server (IIS). Brien has served as CIO for a nationwide chain of hospitals and has been responsible for the Department of Information Management at Fort Knox. You can visit Brien's personal website at www.brienposey.com.

Wednesday, January 11, 2012

How to Backup and Restore Active Directory on Server 2008

Have you ever accidentally deleted a user account or an OU in Active Directory and wished you could restore it?
I recently had a client call me after they installed updates and rebooted their server. They noticed after the reboot that there was a message that said “Active Directory is rebuilding indices. Please wait”.
Their Active Directory database had become corrupted from the updates. So what do you do? How can you restore AD?
Let’s talk about how to backup AD in Windows Server 2008 and how to restore it. Today I’ll show you:
  • what you need to do to get your Server 2008 ready for backup
  • how to backup Active Directory on Server 2008
  • how to perform an Authoritative Restore of Active Directory
  • how to perform Active Directory Snapshots

Prerequisites: Getting Server 2008 Ready for Backup

Before you can backup Server 2008 you need to install the backup features from the Server Manager.
1. To install the backup features click StartServer Manager.

How to Backup and Restore Active Directory on Server 2008 - 1
2. Next click FeaturesAdd Features


How to Backup and Restore Active Directory on Server 2008 - 2
3. Scroll to the bottom and select both the Windows Server Backup and the Command Line Tools


How to Backup and Restore Active Directory on Server 2008 - 3
4. Click Next, then click Install

Backing up Server 2008 Active Directory

Now that we have the backup features installed we need to backup Active Directory. You could do a complete server backup, but what if you need to do an authoritative restore of Active Directory?
As you’ll notice in Server 2008, there isn’t an option to backup the System State data through the normal backup utility.


How to Backup and Restore Active Directory on Server 2008 - 4
So what do we do? We need to go “command line” to backup Active Directory.
1. Open up your command prompt by clicking Start and type “cmd” and hit enter.
2. In your command prompt type “wbadmin start systemstatebackup -backuptarget:e:” and press enter.
Note: You can use a different backup target of your choosing
3. Type “y” and press enter to start the backup process.


How to Backup and Restore Active Directory on Server 2008 - 5
When the backup is finished running you should get a message that the backup completed successfully. If it did not complete properly you will need to troubleshoot.


How to Backup and Restore Active Directory on Server 2008 - 6
Now you have a system state backup of your 2008 Server!

Authoritative Restore of Active Directory

So now what if you accidentally delete an OU, group, or a user account and it’s already replicated to your other servers? We will need to perform an authoritative restore of the Active Directory object you accidentally deleted.
1. To do this you will need to boot into DSRM (Directory Services Restore Mode) by restarting your server and pressing F8 during the restart.
2.Choose Directory Services Restore Mode from the Advanced Boot menu.


How to Backup and Restore Active Directory on Server 2008 - 7
3. Login to your server with your DSRM password you created during Active Directory installation.
4. Once you’re logged into your server and in DSRM safe mode, open a command prompt by clicking Start, type “cmd“, and press enter.
5. To make sure you restore the correct backup it’s a good idea to use the “wbadmin get versions” command and write down the version you need to use.


How to Backup and Restore Active Directory on Server 2008 - 8
6. Now we need to perform a non-authoritative restore of Active Directory by typing “wbadmin start systemstaterecovery -version:04/14/2009-02:39“.
Note: The version of backup will vary depending on your situation. Type “y” and press enter to start the non authoritative restore.
7. Go grab some coffee and take a break while the restore completes.


How to Backup and Restore Active Directory on Server 2008 - 9
8. You can mark the sysvol as authoritative by adding the –authsysvol switch to the end of the wbadmin command.


How to Backup and Restore Active Directory on Server 2008 - 10
9. But if you want to restore a specific Active Directory object then you can use the ever familiar ntdsutil.
For this example we are going to restore a user account with a distinguished name of CN=Test User,CN=Users,DC=home,DC=local. So the commands would be:
ntdsutil
activate instance ntds
authoritative restore
restore object “cn=Test User,cn=Users,dc=home,dc=local”
Note: The quotes are required


How to Backup and Restore Active Directory on Server 2008 - 11
10. Reboot your server into normal mode and you’re finished. The object will be marked as authoritative and replicate to the rest of your domain.

Using Active Directory Snapshots

There is a really cool new feature in Windows Server 2008 called Active Directory Snapshots. Volume Shadow Copy Service now allows us to take a snapshot of Active Directory as a type of backup. They are very quick to create and serve as another line of defense for your backup strategy.
With your server booted into normal mode open a command prompt by clicking Start, type “cmd“, and press enter.
We are going to use the ntdsutil again for creating the Active Directory snapshots. The commands are:
ntdsutil
snapshot
activate instance ntds
create
quit
quit

How to Backup and Restore Active Directory on Server 2008 - 12
So now that you have a snapshot of AD, how do you access the data? First we need to mount the snapshot using ntdsutil. The commands are:
ntdsutl
snapshot
list all
mount 1
— (Note: You should mount the correct snapshot you need; for this example there is only 1.)
quit
quit

How to Backup and Restore Active Directory on Server 2008 - 13
Your snapshot is mounted, but how do you access the data? We need to use the dsamain command to accomplish this. Then we need to select an LDAP port to use. The command is as follows:

dsamain –dbpath c:\$SNAP_200905141444_VOLUMEC$\WINDOWS\NTDS\ntds.dit –ldapport 10001
The result should look like this:


How to Backup and Restore Active Directory on Server 2008 - 14
Now we need to go to Start, Administrative Tools, then Active Directory Users and Computers.
Right click Active Directory Users and Computers and select Change Domain Controller.


How to Backup and Restore Active Directory on Server 2008 - 15
In the area that says < Type a Directory Server name [:port] here > enter the name of your server and the LDAP port you used when running the dsamain command.
For my example it would be: WIN-V22UWGW0LU8.HOME.LOCAL:10001


How to Backup and Restore Active Directory on Server 2008 - 16
Now you can browse the snapshot of Active Directory without affecting anything else negatively.

Your AD Backup Strategy

It’s always good to have a solid backup plan for your Active Directory. You can use a combination of backup strategies or just one of these methods for backing up your Active Directory.
Make sure you tailor your Active Directory backup strategy to meet your company’s needs and make it easy to recover if disaster does strike.

Trainsignal.com

Saturday, December 24, 2011

New email


Từ ngày 1/1/2012 do không tiếp tục làm việc tại Công ty CP tin học Tân Dân nên email NSNguyen@tandan.com.vn sẽ không còn tồn tại nữa. Mọi người có thể liên hệ theo địa chỉ NSNguyen@vsd.com.vn hoặc NguyenSTV@gmail.com